1. Foreman Remote Execution 0.3 Manual
This plugin enables Foreman to run arbitrary commands on hosts using different providers. Initially only an SSH provider is supported but we plan to add more. Communication goes through the smart proxy so Foreman does not have to have direct access to the target host and can scale to control many hosts. A command can be customized similarly to provisioning templates or partition tables. A number of templates are included for running basic commands, installing packages, etc. For more details see the Job Templates section.
Below is a short demo of running a single command on a particular host, with the ability to view the output live:
The command can be executed on multiple servers at once while specific parts of it can vary per host - in other words you can use variables in your commands. Variable values can be filled by given host fact, smart class parameter, smart variable or even host parameter. Last but not least, like the “command” example above, the value can be specified by user when they trigger the execution.
A few examples of tasks that this plugin helps you achieve:
- Install/update/remove a package
- Bootstrap a configuration management agent
- Trigger a Puppet/Salt/Chef run
1.1 Components
The whole remote execution system is pluggable, making it easy to add more providers of communication later. Therefore it’s split into several components that must be installed on Foreman and the Smart Proxy.
| Plugin | Description |
|---|---|
| foreman_remote_execution | Required, contains the UI part and currently also SSH provider, depends on foreman-tasks |
| foreman_tasks | Required, keep status of all executed commands, allows debugging if something goes wrong |
| smart_proxy_remote_execution_ssh | Smart Proxy plugin, required for using SSH provider, proxies the communication between Foreman and hosts, requires smart_proxy_dynflow |
| smart_proxy_dynflow | Smart Proxy plugin, runs the jobs asynchronously and keeps status of commands executed via this proxy. This plugins uses relational SQL DB (sqlite). |
1.2 Compatibility
Each component is packaged for platforms that Foreman is officially packaged for. Since both Foreman and Smart Proxy plugins requires Dynflow, Ruby 1.9+ is required.
1.2.1 foreman_remote_execution
| Foreman | foreman_remote_execution |
|---|---|
| 1.9.x | 0.0.x |
| 1.10.x | 0.1.x - 0.2.x |
1.2.2 smart_proxy_remote_execution_ssh
| Smart Proxy | smart_proxy_remote_execution_ssh | Notes |
|---|---|---|
| 1.9.x | 0.0.x | No compatibility with EL6 or Ubuntu 12.04 |
| 1.10.x | 0.0.x | No compatibility with EL6 or Ubuntu 12.04 |
2. Installation
2.1 Plugin Installation
This chapter covers a clean Foreman and plugin installation. We assume the smart proxy will be installed on the same host, however it’s not a requirement. Please adapt according to your needs.
Start by installing the latest Foreman or nightly, see Quickstart instructions and Foreman manual for more information.
With Foreman Installer
You can install both the Foreman and Smart Proxy plugin with the installer:
foreman-installer --enable-foreman-plugin-remote-execution\
                  --enable-foreman-proxy-plugin-remote-execution-ssh
The installer will automatically configure an SSH key for you, or you may use an existing see. See the foreman-installer –help for more information.
Manual Installation
In the case you want to install the package manually on an existing Foreman or a Katello, use the following steps.
Install the packages appropriate for your operating system:
RPM:
yum install tfm-rubygem-foreman_remote_execution\
            rubygem-smart_proxy_remote_execution_ssh
DEB:
apt-get install ruby-foreman-remote-execution\
                ruby-smart-proxy-remote-execution-ssh
Next you have to setup ssh keys. By default smart proxy loads the key
from /usr/share/foreman-proxy/.ssh/id_rsa_foreman_proxy. To customize it you
can edit the configuration in
/etc/foreman-proxy/config/settings.d/remote_execution_ssh.yml. Without
customization you need to create new ssh key and distribute it to
target hosts. The key must not use passphrase.
To generate a key, run following command on the host where Smart Proxy runs
mkdir ~foreman-proxy/.ssh
chown foreman-proxy ~foreman-proxy/.ssh
sudo -u foreman-proxy ssh-keygen -f ~foreman-proxy/.ssh/id_rsa_foreman_proxy -N ''
When using SELinux make sure the directory and the files have correct labels of ssh_home_t. If not, restore the context:
restorecon -RvF ~foreman-proxy/.ssh
Don’t forget to restart Foreman, Smart Proxy and Foreman tasks so plugins are loaded
service httpd restart
service foreman-tasks restart
service foreman-proxy restart
Finally, you have to refresh the Smart Proxy features in the Foreman: Dynflow and Ssh should appear there as new features of the Smart Proxy.
2.2 Remote Hosts Configuration
The remote hosts need to be configured to accept the private key that the smart
proxy is using. root is used as the default user for accessing remote hosts
via SSH. You may set the remote_execution_ssh_user global setting to change
the default. If you would like to override at the host group, host, or
other level, you may use parameters to do so. Set a parameter called
remote_execution_ssh_user.
The ssh keys for the smart proxies are available as a host parameter -
remote_execution_ssh_keys. This allows you to manage the authorized keys
with your configuration management platform of choice, or through a
provisioning template.
If you prefer to use a provisioning template, an example snippet is included. In the kickstart %post or finish template, simply include:
<%= snippet 'remote_execution_ssh_keys' %>
If you prefer to distribute the keys manually, you may do this:
ssh-copy-id -i ~foreman-proxy/.ssh/id_rsa_foreman_proxy.pub root@target.example.com
Alternatively, the Smart Proxy publishes the public key over the API, so that one can just download it into authorized keys:
curl https://myproxy.example.com:8443/ssh/pubkey >> ~/.ssh/authorized_keys
Note: For Katello installations, the default Smart Proxy port will be 9090 rather than 8443 in the above curl example.
For the execution to work, the client needs to have openssh-server installed and configured. Also, openssh-clients need to be present, in order to scp to work (which we use for getting the scripts to the remote host)
3. Usage
After installation you can start preparing your commands and run them on your hosts. Every command must be defined as a Job Template. Once defined it can be executed multiple times. Let’s start with the definition first.
3.1 Job Templates
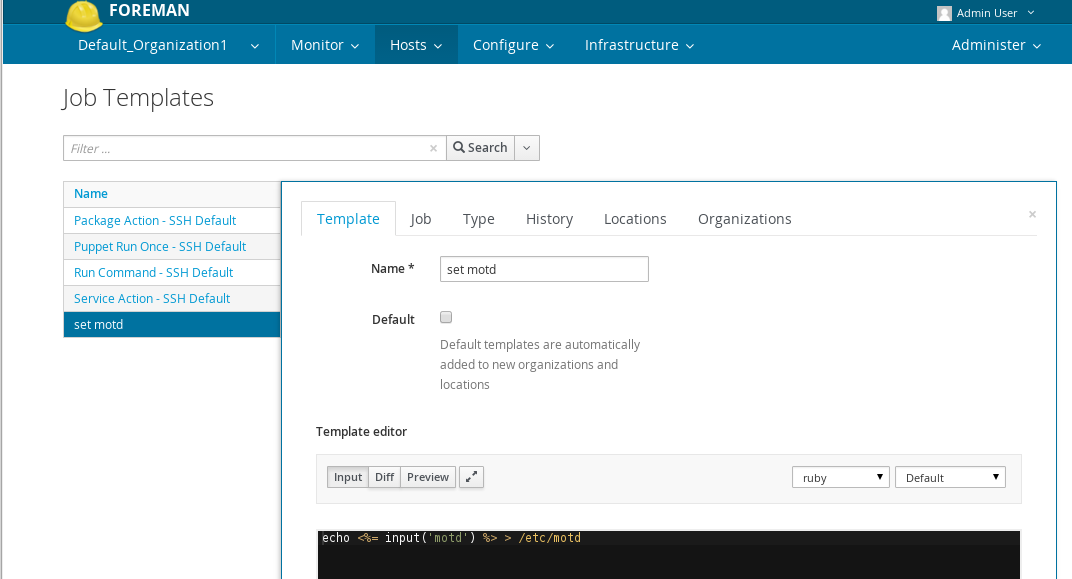
If you’re familiar with Foreman provisioning templates, you should find writing job templates familiar. First navigate to the Host > Job Templates menu. Then hit the green button with label “New Job Template”.
Note: If you don’t see a menu entry, the Foreman plugin is not installed correctly.
Now you should see a form similar to the Provisioning template one. In first tab you have to fill in Name. You can use input macros in ERB tags which stands for variables which you define in second tab called Job.
Before we get to inputs, lets look at other fields in Job tab. First one is an autocomplete field called Job category. This groups job template together and makes managing a huge number of templates easier.
A description format field is a template for job description. Imagine you run a template named “Install package” 10 times, each time with different package name specified by user input (more about this below). On job overview page you’d see the same “Install package” job and you’d have to inspect provided inputs to find the one that installed let’s say httpd package. Using description format you set your own rules for creating the description. Input values can be used as part of it. A good description format for our install package example would be the following:
Install package %{package_name}
Note that the name wrapped in %{…} is the name of input which value will replace this placeholder so you would see “Install package httpd” if httpd was used for this input. Note that the description format can be modified per job invocation as well so this is just a default value for particular job template. Two extra placeholders %{template_name} and %{job_category} can be used.
On the very same tab you can configure inputs. These template inputs defines values that can be accessed in the template itself. To add new input, click the green button “+ Add Input” which adds more fields to the form. To remove the input, hit the cross in top right corner of the input form.
We support four types of inputs. Each must have it’s name which is used in macro. If my input has the name “motd”, I can then use following ERB tag in my template code:
echo "<%= input('motd') -%>" > /etc/motd
The way we determine the input value differs based on Input type. Let’s start with User input. This input always needs the value to be specified by user. It means when user runs the job, we display the field that they must fill in, or provide options to select from. The provided value will be used as a result for the corresponding input macro. Whatever you put in Description field will be displayed to the user so he knows what’s the purpose of this input.
The rest of the types load values from the host and do not require any user interaction. Since the template is always rendered for a specific host on which the job is executed we load the value this host data. These data can be either Fact (coming from Puppet/Salt/Chef), smart class parameter (when you use Foreman as Puppet ENC), smart variable or a parameter.
If you want to load value from host facts, use Fact value input type. You’ll have to specify the Fact name so Foreman can match the right fact. If you make a mistake or the fact is not present for a given host, the rendering of template will fail and hence the execution on this host will fail.
If you want to use a value from smart class parameter, use Puppet parameter
input type. you’ll have to specify puppet class name and the name of its
parameter. It’s the value that you can see in ENC YAML under classes key.
If you want to use either smart variable or parameter, use Variable input type.
Both of these values are part of ENC YAML under parameters key overiding each
other if they have same name. You have to specify the name of either parameter
or smart variable.
If you’re confused about the difference between smart class parameter, smart variable and parameter, checkout Foreman manual parameters section.
It is also possible to render one job template from another:
<%= render_template("Run Command - SSH Default", :command => "echo hello world > /etc/motd") %>
The inputs for the rendered template can be specified explicitly in the render_template
call, or they can be imported into the template by using a foreign input set concept.
It’s similar to the inputs (editable in Job tab of edit template form).
One can provide:
- target template - inputs of what template should be imported
- include all - this imports all the inputs of target template
- include - if include all is disabled, this provides a list of comma separated names of inputs to include
- exclude - a list of comma separated names of inputs to exclude from the import - useful when overriding some inputs in the template
By default, render_template looks at the foreign input sets at the template
to fill in the values for a particular template. One can disable this behavior
like this:
<%= render_template("Run Command - SSH Default", { :command => "echo hello world > /etc/motd" }, { :with_foreign_input_set => false } ) %>
You can also use input macro to pass the value from current template
input. Let’s assume we have a template that sets hostname according to
fqdn puppet fact. It has an input of Fact value type with name fqdn.
Now we want to use it in our generic template to set any hostname that
the user specifies. We can create a foreign input set that includes
all and exclude the fqdn input, define our own input of type User
input with the same name and call the original template like this:
<%= render_template("Set hostname", { :fqdn => input('fqdn') }) %>
Since we created a foreign input set that includes all except fqdn, if “Set hostname” template has other inputs they would be used when rendering the template. If there were some inputs that have to be filled by user, they would be displayed in job invocation form of our newly created template.
It’s not allowed to import several inputs with the same name from different templates due to conflicts it would cause and it’s the template author’s responsibility to make sure the foreign inputs are unique across the whole template.
Note that until inputs and foreign input sets are saved the preview of template won’t work. To review the template first save it and then get back to the form and hit Preview button.
You can also specify default effective user for job template. By default a login that’s used to run the script on target host is specified by global setting named remote_execution_effective_user but if you specify another login, sudo would try to change effective user to this value. You can also enforce using current user login which can be handy if your users have same login as their posix accounts on target hosts. Last field is overridable which determines whether job template settings can be overridden during job invocation. See settings chapter for more details about customization.
3.2 Executing a Job
To execute on one host, go to the host detail page and click green “Run Job” button. For multiple hosts, use the bulk action tool on the “All hosts” page to select “Run Job”.
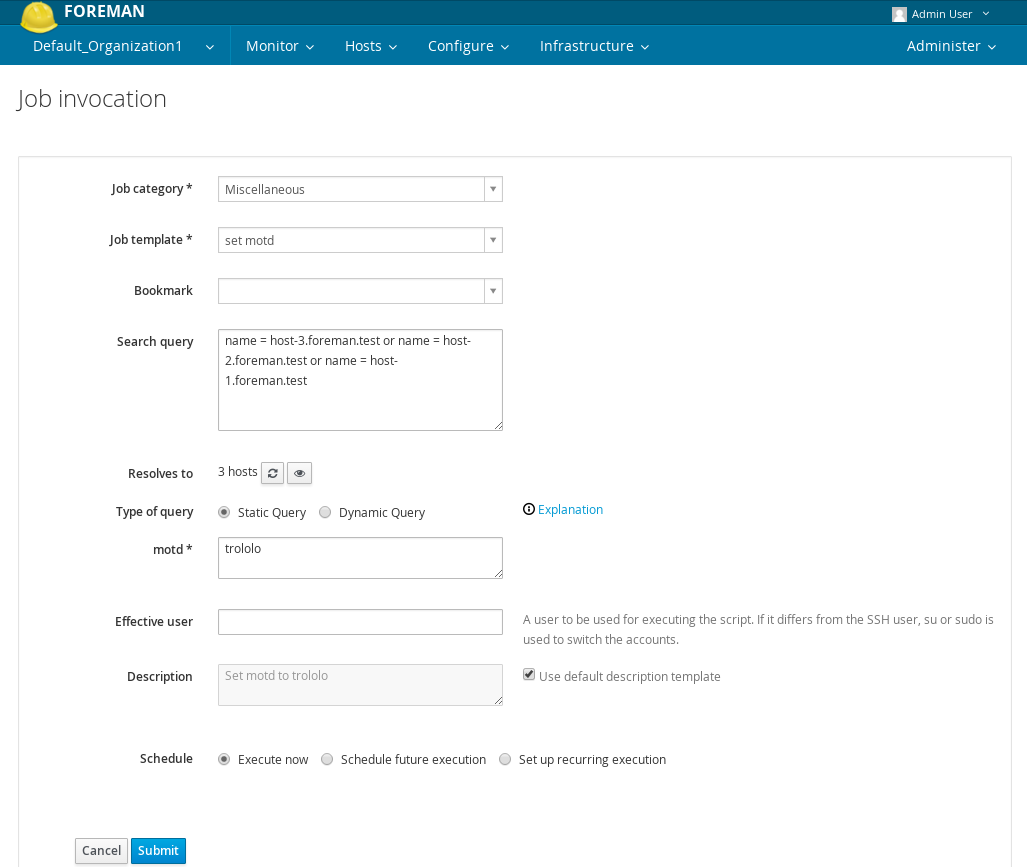
In this form you select which Job template you want to run on selected host(s). Then you can see prefilled Search query that uses the Foreman searching syntax. You can customize the query to search any set of hosts, e.g. all hosts running CentOS 7.1 or hosts with 1 GB memory. You can check how many hosts such search query covers by clicking refresh button below.
You can also specify Type of query. Currently we support two options
- Static query - evaluates the search query immediately when you hit the Submit button and saves the resulting set as the target of this execution
- Dynamic query - stores the search query and does the evaluation just before the command is executed, which means if there are new hosts added meanwhile, the job will be executed on them as well
Dynamic query is a powerful tool when used with scheduled or recurring executions in combinations with Bookmarks being used for specifying the targets. You don’t have to change scheduled job invocation if you just change the query of used bookmark.
To review the list of target hosts you can use the button with eye icon. It will display the list of hosts matching the search query.
You can override effective user for this invocation unless it was forbidden for selected job template. In non-editable description field you can see the name of job that will be used after you save it. You can also override description format by unchecking Use default description template checkbox and providing your own template in Description template. You can use placeholders that will be replaced by values of inputs with corresponding name for example if there’s input with name service_name you can specify the template like this
Restart service %{service_name}
If you set the input value to “httpd” the resulting description would become “Restart service httpd”.
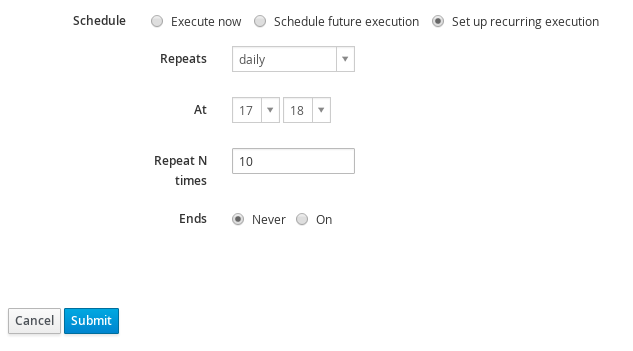
You can also plan the execution in future or configure multiple rerunning. There’s a second tab called Scheduling where you can choose from
- Execute now - immediate single execution,
- Schedule future execution - delayed single execution
- Set up recurring execution - multiple executions on regular basis
While execute now is obvious, future time scheduling offers you to customize two things. First is when the job should start, the second one called Start before determines the deadline after which the execution shouldn’t start. This can be useful when you have some maintenance window and if the execution gets delayed it wouldn’t be safe to run when the window was closed.
When setting up recurring execution there are many ways how you can specify the interval. You can choose from hourly, daily, weekly, monthly interval basis and for advanced users there’s option to specify custom cron configuration. This way you can setup various intervals, for example
# Run on every second Sunday of every month
0 4 8-14 * *

# Run every 5 minutes during 6 AM and 6 PM
*/5 6,18 * * *
You can specify the number of runs as Repeat N times attribute or limit it by Ends at date. What happens sooner takes precedence. You can keep the invocation configured without any fixed ending condition. If you want to stop such job later, you either cancel the job and cancel the recurring logic.
Another feature to allow more precise control over the execution is limitting by concurrency level and distributing the tasks over time. The Concurrency level allows to set a quota on how many parallel tasks can be run, which can effectively prevent depleting all of the system’s resources in case of executing a job on a large number of hosts. The Time span can be used to define a maintenance window, across which the tasks should be distributed. Important thing to note is the tasks which could not be started within that window (for example tasks before them took too long to finish) are cancelled. This allows to tailor the execution to fit your hardware and needs.
After submitting the form, you’re redirected to the Job detail which informs you about the progress.
3.3 Job detail
On the Job detail page you can see overall progress and result of the job execution.
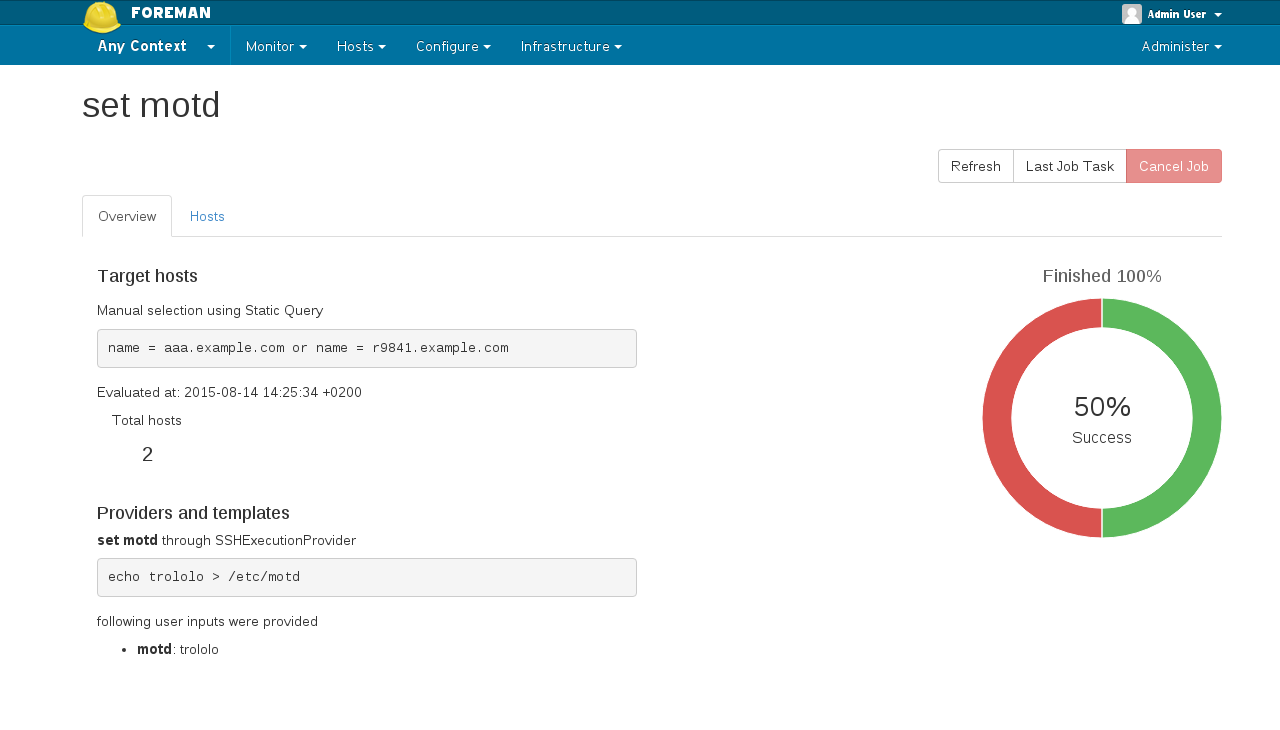
In the overview tab you can see what query was used to find the hosts and how many hosts were found using it. Below is the evaluated template in generic form. If there were some fact or parameter inputs used, you will see only placeholders for them since they are specific to each host. User inputs are evaluated since they are same for all hosts. A chart is showing the status of the job on all targets.
From this screen you can even cancel the job if it’s not finished yet. First cancel attempt will try to cancel the run on the Smart Proxy. If proxy does not respond, you can hit the cancel button a second time which forces the Job to be cancelled on Foreman (while it still might be running on Smart Proxy). Last Job Task takes you to Foreman Tasks that represents this Job.
In Hosts tab you can see all hosts targeted by this execution, status of the job on them and link to Foreman Task that represent the execution for a particular host. Note that this task is a subtask of a whole Job task.
If you scheduled a recurring you’ll also see Recurring logic tab. This gives you some basic information, e.g. when next run is supposed to happen. After you cancel the job, it cancels all future executions as well.
3.4 Jobs list
You can find all Jobs when you navigate to Monitor > Jobs. A table lists all jobs from history to future. You can search jobs by description with a query like
description ~ set*
This example would find all executions that run job which description starts with
“set”. Similarly you can search based on job category using keyword job_category.
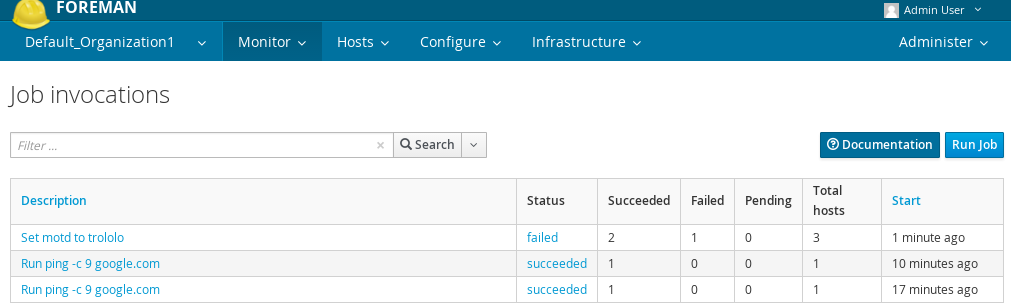
Each Job has a status which tracks the progress of the execution. A status value can be one of
- queued - job invocation was saved and has not start yet, either background processor hasn’t picked it yet or it was scheduled in future,
- running - background processor picked the job, we might have patial update but it is not finished yet,
- succeeded - job has finished sucessfully,
- failed - job has finished with some issue,
The same status is recorded for host as execution status after each job execution that targeted it. You can search for hosts using following search syntax
execution_status = ok
execution_status = error
The first example would find all hosts last job execution in state succeeded and hosts that have no job. The second returns hosts with failed last job.
If the job has more than one target hosts, the overall status is composed from statuses of all targets run. If execution failed on any of target the overall result of job would be failed. Similarly it succeeds only if all targets suceeds. Note that the status can be running if 99% targets already finished the job since the overall job is still waiting for the rest.
A start column tells us when the task started or is planned to start if it was scheduled to future. You can use it in search syntax as start_at. There’s also other similar attribute called started_at which holds information about when the task was picked by background processor and started in fact.
3.5 CLI
A hammer
plugin for Remote Execution is available, follow the instructions for
installing a plugin to install
hammer_cli_foreman_remote_execution, and then see hammer --help for more
information.
Examples:
- Create a job template:
hammer job-template create --file /tmp/template.txt --name "Ping a Host"\
  --provider-type SSH --job-category "Commands"
- Run a job:
hammer job-invocation create --job-template "Run Command - SSH Default" \
  --inputs command="ping -c 50 www.google.com" --search-query "name ~ rex01"
- Show output from a job:
hammer job-invocation output --id 155 --host rex01.example.com
3.6 Cockpit integration
To automatically sign to managed host’s Cockpit web interface, click on “Web
Console” button on the host detail page. The button only appears when plugin
was installed with --enable-foreman-proxy-plugin-remote-execution-cockpit
option. The managed host must also have the cockpit-system package installed.
Foreman and Cockpit exchange token via SSH, there is no need to enable Cockpit web service or create firewall rule to connect to port 9090. All communication is tunelled via SSH.
4. Advanced topics
In this section we try to explain how things work behind the scenes.
4.1 Determining the smart proxy for host
In order to perform the job on a host, there needs to be a Smart Proxy available to do the job. In the default install, it would use all Smart proxies with a remote execution provider. This can be turned off by changing the global setting remote_execution_global_proxy to false.
In more complex environments, not all proxies can be used, due to possible network isolation. In this case, you may assign a pool of proxies to each subnet, and jobs will be load balanced across them.
Alternatively, you may enable a fallback mode by setting remote_execution_fallback_proxy to true. In this case, the plugin will consider any proxy associated with the host, such as its Puppetmaster, as long as the proxy also has a remote execution feature.
4.2 Global settings
Under Administer -> Settings you can find RemoteExecution tab which allows you to customize plugin behavior. Here is the list of settings and their meaning.
| Parameter name | Description |
|---|---|
| remote_execution_effective_user | This is a login of default effective user for any job. When job is executed the effective user of the process is changed accordingly (e.g. by sudo). This option can be overridden per job template and job invocation. |
| remote_execution_effective_user_method | What method should be used to set the effective user on target, currently only su and sudo are supported. |
| remote_execution_fallback_proxy | Search the host for any proxy with Remote Execution, useful when the host has no subnet or the subnet does not have an execution proxy. |
| remote_execution_global_proxy | Search for remote execution proxy outside of the proxies assigned to the host. If locations or organizations are enabled, the search will be limited to the host's organization or location. | </td>
| remote_execution_ssh_user | Default user to use while the smart-proxy connects to the target using SSH. You may override per host by setting a parameter called remote_execution_ssh_user. Note that it can be set per Host, Host group, Operating system, Domain, Location and Organization. Also note that this can differ from effective user. |
4.3 Permission delegation
If you want to lock down ability of your users to run arbitrary scripts within your infrastructure, you can selectively configure what they can run and on which targets.
We provide 2 built-in roles that you can use, one is for the whole remote execution features called Remote Execution Manager and the second with the name Remote Execution User that allows only running jobs without permissions to modify job templates. You can clone the role and customize its filter for even higher granularity. If you adjust the filter with view_job_templates permission, user will be able to see and trigger only jobs based on matching job templates. The same applies on view_hosts and view_smart_proxies if you need to limit which hosts or smart proxies users can use.
There’s extra permission called execute_template_invocation which is checked just before the invocation starts allowing you to set even more granular permissions. The filter for this permission can define which job template can be run on particular host, let’s look at some examples of such filters:
name = Reboot and host.name = staging.example.com
name = Reboot and host.name ~ *.staging.example.com
name = "Restart service" and host_group.name = webservers
Note that permissions assigned to users can change in time, especially after users already scheduled some runs in future, therefore this permissions is enforced just before the run resulting in execution failure.
4.4 Writing custom templates
During writing your own job templates you might find some of following macros useful.
4.4.1 render_template
You can render a template from another template and feed it with inputs. A short example follows
<%= render_template 'Package Action', :action => 'install', :package => 'httpd' %>
chkconfig httpd on
<%= render_template 'Service Action', :action => 'start', :service_name => 'httpd' %>
For more information, see Job Templates
4.4.2 preview?
When you need to render a different output for preview of the template, you can
user preview? macro. This is useful if you need to hide some sensitive or
spamming part - e.g. private or public key content.
<% if preview? %>
  PUBLIC_KEY_STRIPPED_OUT
<% else %>
  <%= input('public_key') %>
<% end %>
Also when you disable safe mode, you might touch internal Foreman objects. Imagine you have a template for deleting puppet certificate that first deletes the certificate on puppet CA through Foreman objects and then removes it on target host.
<% if preview? -%>
#   this would delete a certificate on puppet ca, but running in preview mode
<% else -%>
  <%= @host.puppet_ca_proxy.statuses[:puppetca].destroy(@host.name) %>
<% end -%>
rm -rf /var/lib/puppet/ssl/*
In this case, previewing of the template would immediately trigger destroy method and therefore it’s wrapped in preview condition.
4.5 Plugin developer API
Plugins can leverage Remote Execution to perform a particular job on a host by
defining a Remote Execution Feature and the provided inputs. The
provided_inputs is a list of inputs that the feature provides to the
template.
The feature can be registered in the plugin initializer:
RemoteExecutionFeature.register(:reprovision, N_("Reprovision"),
                                :description => "Reprovision the host via script",
                                :provided_inputs => ["script"])
The mapping between the feature and which templates to use can be made in the
UI via ‘Administer -> Remote Execution Features’. Or, when seeding a template,
there is a new metadata item feature, which allows to assign some template as
default to the feature.
When the plugin wants to execute the paritcular feature they can use:
JobInvocationComposer.for_feature(:reprovision, host, :script => "grubby...").trigger!
5. Help
Please follow our standard procedures and contacts.
6. Getting involved
6.1 Troubleshooting
If you find a bug, please file it in Redmine.
See the troubleshooting section in the Foreman manual for more info.
6.2 Contributing
Follow the same process as Foreman for contributing.
7. Links
- foreman_remote_execution plugin https://github.com/theforeman/foreman_remote_execution
- foreman-tasks plugin https://github.com/theforeman/foreman-tasks
- smart_proxy_remote_execution_ssh https://github.com/theforeman/smart_proxy_remote_execution_ssh
- smart_proxy_dynflow https://github.com/theforeman/smart_proxy_dynflow
- issue tracker http://projects.theforeman.org/projects/foreman_remote_execution