In production Foreman and Katello setups you might like to load balance the work of Smart Proxies across a cluster. This post describes how to do this, utilizing Foreman 1.17, Katello 3.6 and HAProxy.
The approach described here is not as evolved as @sean797’s proposal for HA Smart Proxies, but it is possible to implement this approach with today’s codebase.
The idea is that you can just take a load-balancer like HAProxy and configure it in front of a number of Smart Proxies without much changes to the clients.
 |
|---|
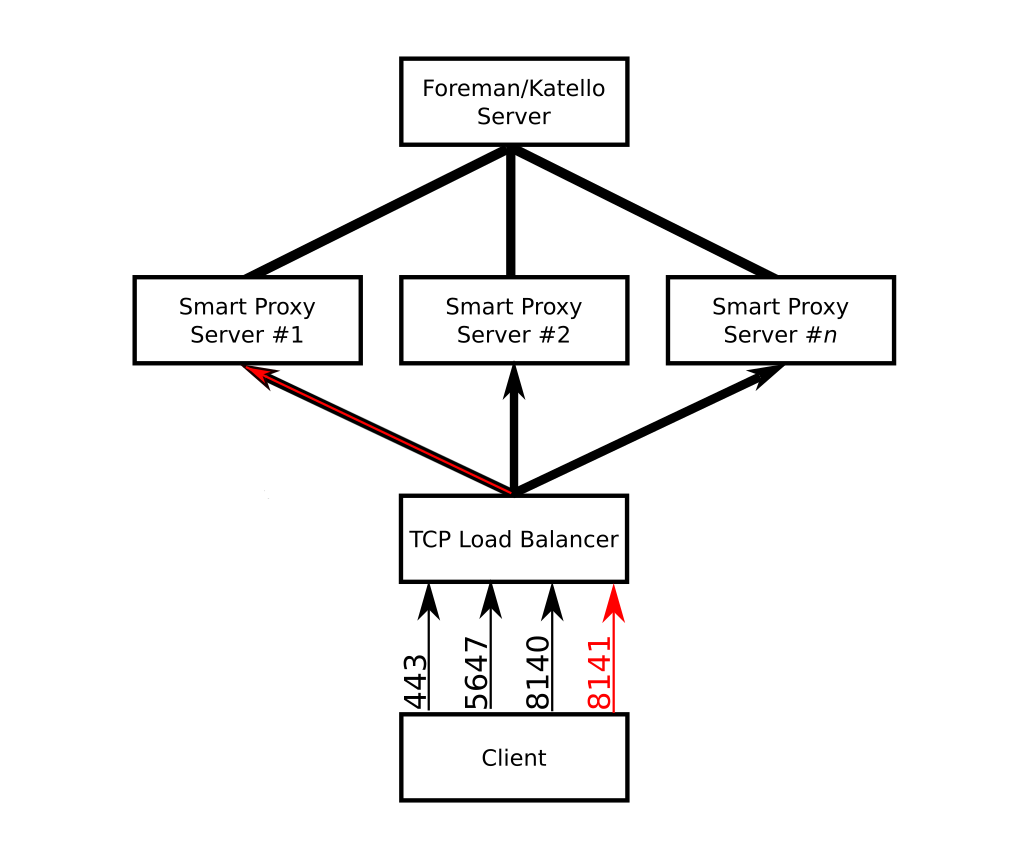
| Load-balanced smart proxies. Not all ports are shown in diagram. |
Caveats
PuppetCA
Puppetserver does not allow certificate signing to be load-balanced. The puppetserver keeps certificate information like the serial number counter and CRL on the filesystem, and if multiple writers use the same data it can result in corruption. To work around this, we pick one smart proxy (typically the first one) to be the signing server. We then tell clients to send CA requests to port 8141 on the load balancer, which gets redirected to 8140 on the smart proxy with signing capabilities.
Yum metadata
Each smart proxy generates its own yum metadata for RPM repositories. This means that if a request to https://smartproxy.example.net/repo/repodata/repomd.xml goes to the first smart proxy, and the next request to fetch repodata/<CHECKSUM>-primary.xml.gz goes to the second smart proxy, the second request will 404. To work around this, we advise that port 443 should be sticky-sessioned.
Requirements
- an existing working Foreman/Katello installation (we don’t need to do any changes here, setup is the normal installation)
- two or more machines for the Smart Proxy cluster
- a load balancer - you can use a machine with HAProxy if you don’t already have a load balancer
- a common name in the DNS that points to the load balancer (we’ll be using
smartproxy.example.net)
Installing the first Smart Proxy
Generating Katello certificates
When calling foreman-proxy-certs-generate, we have to pass --foreman-proxy-cname smartproxy.example.net to add the load-balanced name as an accepted subjectAltName to the list of names in the generated certificates. This allows clients to connect to each member of the smartproxy cluster as smartproxy.example.net
Preparing custom-hiera.yaml
Pulp uses the hostname of the smart proxy to generate redirects when serving lazy (on demand) synced content. These redirects need to happen to the name of the load-balancer, but this option is not exposed in the installer. Thus edit /etc/foreman-installer/custom-hiera.yaml and add the following line at the end:
pulp::lazy_redirect_host: smartproxy.example.net
Running the installer
As only the first Smart Proxy will host a PuppetCA, we configure that explicitly during the installation and also configure the Puppet certificate to include the smartproxy.example.net name:
[root@smartproxy01] # foreman-installer \
…
--puppet-dns-alt-names smartproxy.example.net \
--puppet-ca-server proxy01.example.net \
--foreman-proxy-puppetca true \
--puppet-server-ca true
Installing the other Smart Proxies
The installation of all other Smart Proxies is almost identical to the first one. We just have to prepare the Puppet certs on the first one (as it’s the only one having a PuppetCA) and disable the PuppetCA in the installer.
Generating Katello certificates
This step is identical to the steps used to generate the certificates for the first smart proxy. Simply use foreman-proxy-certs-generate as described above.
Generating Puppet certificates
On the first smart proxy, generate the Puppet certificates by running
puppet cert generate proxy02.example.net --dns_alt_names=smartproxy.example.net
Install the puppetserver package on the second smart proxy, to create the puppet user and the directory structure in /etc/puppetlabs.
Now copy /etc/puppetlabs/puppet/ssl/*/proxy02.example.net.pem and /etc/puppetlabs/puppet/ssl/certs/ca.pem to the second smart proxy and ensure ownership and permissions are identical to those the first host. Also don’t forget to check the SELinux contexts of the files you copied over (hint: ls -lZ) :)
Repeat this step for all smart proxies that are going to sit behind the same load balancer.
Preparing custom-hiera.yaml
These steps are identical to the steps used on the first Smart Proxy.
Running the installer
As only the first Smart Proxy will host a PuppetCA, we point the Puppet agent to it explicitly during the installation and also configure the Puppet certificate to include the smartproxy.example.net name:
[root@smartproxy02] # foreman-installer \
…
--puppet-dns-alt-names smartproxy.example.net \
--puppet-ca-server proxy01.example.net \
--foreman-proxy-puppetca false \
--puppet-server-ca false
Installing HAProxy
Please note that if you are using a different load balancer technology, you can use this configuration as reference.
Configure SELinux to allow HAProxy to bind any port: semanage boolean --modify --on haproxy_connect_any
The HAProxy setup itself is straightforward, just load-balance a bunch of ports in TCP mode round-robin across all the Smart Proxies. TCP mode is required because the load balancer will not be doing TLS termination. There are just two exceptions to that: port 443 should use source not roundrobin to not confuse Yum, and the additional port for the PuppetCA (8141) is forwarded only to the first smart proxy.
| Service | Port | Mode | Balance mode | Destination |
|---|---|---|---|---|
| HTTP | 80 | TCP | roundrobin |
port 80 on all proxies |
| Anaconda | 8000 | TCP | roundrobin |
port 8000 on all proxies |
| HTTPS | 443 | TCP | source |
port 443 on all proxies |
| RHSM | 8443 | TCP | roundrobin |
port 8443 on all proxies |
| AMQP | 5647 | TCP | roundrobin |
port 5647 on all proxies |
| Puppet | 8140 | TCP | roundrobin |
port 8140 on all proxies |
| PuppetCA | 8141 | TCP | roundrobin |
port 8140 on the first proxy |
| SmartProxy | 9090 | TCP | roundrobin |
port 9090 on all proxies |
| Docker | 5000 | TCP | roundrobin |
port 5000 on all proxies |
You can find an example haproxy.cfg in the forklift repository.
Configuring Clients
As far as clients are concerned, they should only know about smartproxy.example.net, and should never need to connect directly to a smartproxy. That has to be configured for Puppet, goferd, and for RHSM/Yum.
Using katello-client-bootstrap
katello-client-bootstrap is designed to configure a machine to be used with an exiting Katello environment. It can also configure Puppet properly for us and supports setting a separate Puppet CA and Puppet CA port in current Git.
To attach clients to the load-balanced proxy, we just have to pass --server smartproxy.example.net and --puppet-ca-port 8141, bootstrap.py will take care of the rest.
Manual registration
Instead of using bootstrap.py, the client can also be registered manually. However, we recommend using bootstrap.py since it handles these extra manual steps for you.
After installing katello-ca-consumer RPM from http://smartproxy.example.net/pub/katello-ca-consumer-latest.noarch.rpm /etc/rhsm/rhsm.conf and /etc/yum.repos.d/redhat.repo will contain the hostname of whichever proxy served the initial request and not smartproxy.example.net as we’d like it. Thus, when registering the system with subscription-manager, we have to pass --serverurl=https://smartproxy.example.net:8443/rhsm --baseurl=https://smartproxy.example.net/pulp/repos to update those two config files.
Since PuppetCA is reachable on a dedicated port, all Puppet agents need to be configured to talk to smartproxy.example.net on port 8140 for Puppet requests and port 8141 for PuppetCA requests.
This can be achieved by modifying puppet.conf to include the following lines:
server = smartproxy.example.net
ca_server = smartproxy.example.net
ca_port = 8141
Forklift
As usual, there is support for the loadbalanced scenario in forklift.
Help! Something doesn’t work!
The load balancer adds additional complexity to a Foreman/Katello installation. If a client is having trouble using one of the services provided by the smart proxies, a typical first debugging step is to point the client directly to one of the smart proxies via a /etc/hosts entry, which bypasses the load balancer. If the issue persists, then you know that the issue is with that smart proxy. Each smart proxy can be checked individually for functionality with this method. Don’t forget that if you are debugging Puppet certificate signing issues related to the Puppet CA feature, you will need to use port 8140 on the first capsule.
It is also helpful to use the load balanced scenario in forklift, so you have a working setup to use as reference.
Make sure that each smart proxy is configured the same way from Foreman/Katello’s perspective. Foreman/Katello’s current codebase is not aware of groups of smart proxies, so you will be responsible for making sure all of the smart proxies have the same features, content and configuration.