Foreman not only can ensure that our systems have a consistent view of our desired content, but also can provision those systems identically across many physical, virtual and public cloud environments. Whether we are using network or image based provisioning, there may be a limit to the configuration and integrations that we can apply to a system with kickstart or cloud-init during the build. Using Ansible in addition to kickstart opens up additional possibilities. In this post, we will look at how we integrate Foreman Provisioning with AWX to help us deliver consistent complete solutions repeatedly in any environment and across them!

Before we begin - some assumptions
This article assumes that you have a functional Foreman instance configured for provisioning and an Ansible AWX Control Node instance configured to run Ansible automation plays and to get a dynamic inventory from the Foreman instance. Optionally, you can also integrate a FreeIPA instance if you have one installed in your environment. Installing and configuring FreeIPA or AWX is outside the scope of this document. For more information, see Integrating Foreman with AWX.
If you want to follow along with this post, you can find the demo templates used on my github repo.
Here is a quick overview of the steps that occur during provisioning with Ansible Callbacks. It involves the proper configuration of the AWX and Foreman Servers and coordinated communication between AWX, Foreman and the provisioned client. The communications take place over configured HTTPS ports and SSH ports.
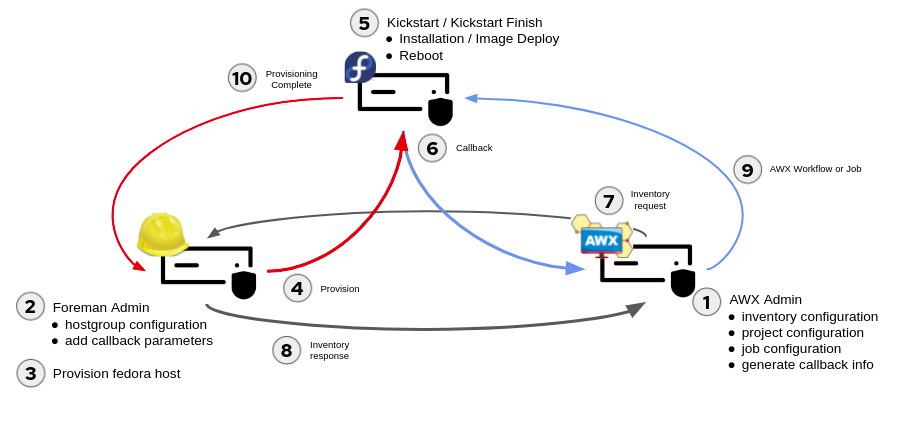
Lets start with the configuration of the AWX Server
Ansible Callback & Parameters
In Foreman network provisioning, we use kickstart to build a machine from the ground up. Many use this as a method for creating the images that they will use later for provisioning on a hypervisor or cloud platform. The default kickstart file under Hosts » Provisioning Templates called Kickstart Default contains the following line near the end of the file:
<%= snippet('ansible_provisioning_callback') %>
This pulls in our kickstart snippet that will configure the system to automatically callback to AWX after the new host is successfully built and rebooted. The snippet contains the following code:
<% if host_param_true?('ansible_tower_provisioning') -%>
...
<%= save_to_file('/etc/systemd/system/ansible-callback.service',
                 snippet('ansible_tower_callback_service')) %>
# Runs during first boot, removes itself
systemctl enable ansible-callback
Note: The kickstart default finish template provides the same code for image based deployments.
This checks to see if you have turned on ansible provisioning integration for this deployment and if you have installed and enabled the ansible-callback service. This is a tiny service that requests to run a play from a specified ansible control node using the originating system as the inventory host. Once it runs, it disables itself. The service snippet creates a curl command that sends a configuration key to securely send a request to a web API specifying the job ID that we want to run on the host.
This request requires three more parameters. With the variable used to control our use of ansible we have these four variables in total:
ansible_tower_provisioning- boolean - whether or not to use ansible callbacksansible_host_config_key- string - the unique id created by ansible to use to identify a valid callback request for the jobansible_tower_fqdn- string - the fqdn of our ansible control nodeansible_job_template_id- integer - the id of the job that we want to run on the host when it boots for the first time
We get these values from AWX. Let’s take a look at an example job that we want to run to see where these come from. In our example, we are going to use a simple play that runs a couple of roles against the newly built system. Our job template that we created in AWX is called ForemanCallbackDemo. It uses a demo project and calls a playbook called callback/main.yml. The main.yml file from the project looks like this:
# This play uses the motd role to update the motd page
# for the target systems
#
- name: Apply provisioning sample roles
  hosts: all
  vars:
    message: "Today's message: Buy your Foreman admin a coffee!"
  roles:
    - motd
    - cockpitcert
You can find these in my github repo for ansible samples. You will need to create the project and job template in AWX to make this work. When this is called, the first role adds a motd banner and the second role adds a FreeIPA generated certificate to the cockpit instance of the specified host. If you don’t have a FreeIPA server in your environment like I have, comment out the second role after you clone the repo. Adding a FreeIPA server to your environment is a whole other series of blogs! Until then, you can learn more about how to do that here.
Creating an AWX Project
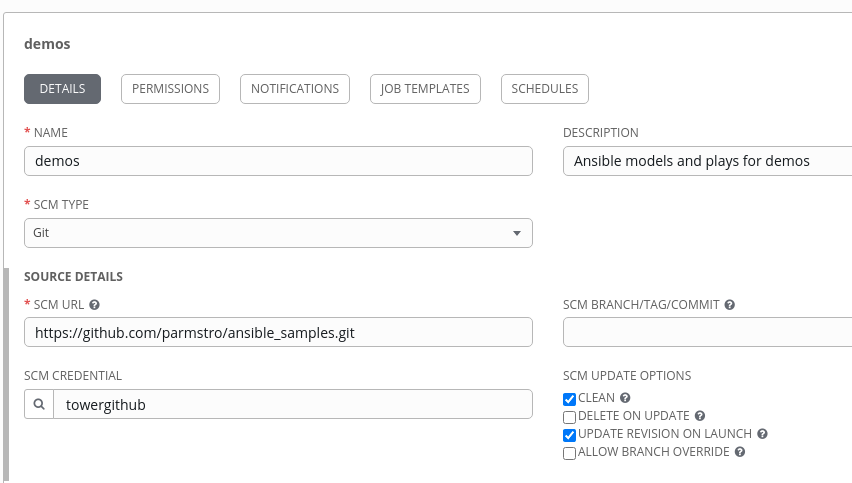
Clone the repo listed above to your own git repository, local or on your favourite git instance. Create a new project in AWX, give it a name - ‘demo’ in our case - and set the SCM type to git. Enter the URL of your cloned copy of the repo and set the credentials. I like to start with a clean copy and update on launch whenever I am developing or using demo code. Select your source code controls appropriately for your environment. It is assumed that you have done this before in AWX and already have configured credentials to login to your repos. To understand more, see the Projects and Credentials documentation.
Creating an AWX Job Template
Use the first image for a general overview of how to configure AWX to interact with Foreman.
- In your AWX instance, navigate to the templates page and create a new job template. Here, we will add the information for our play and generate the key to use with the callback.
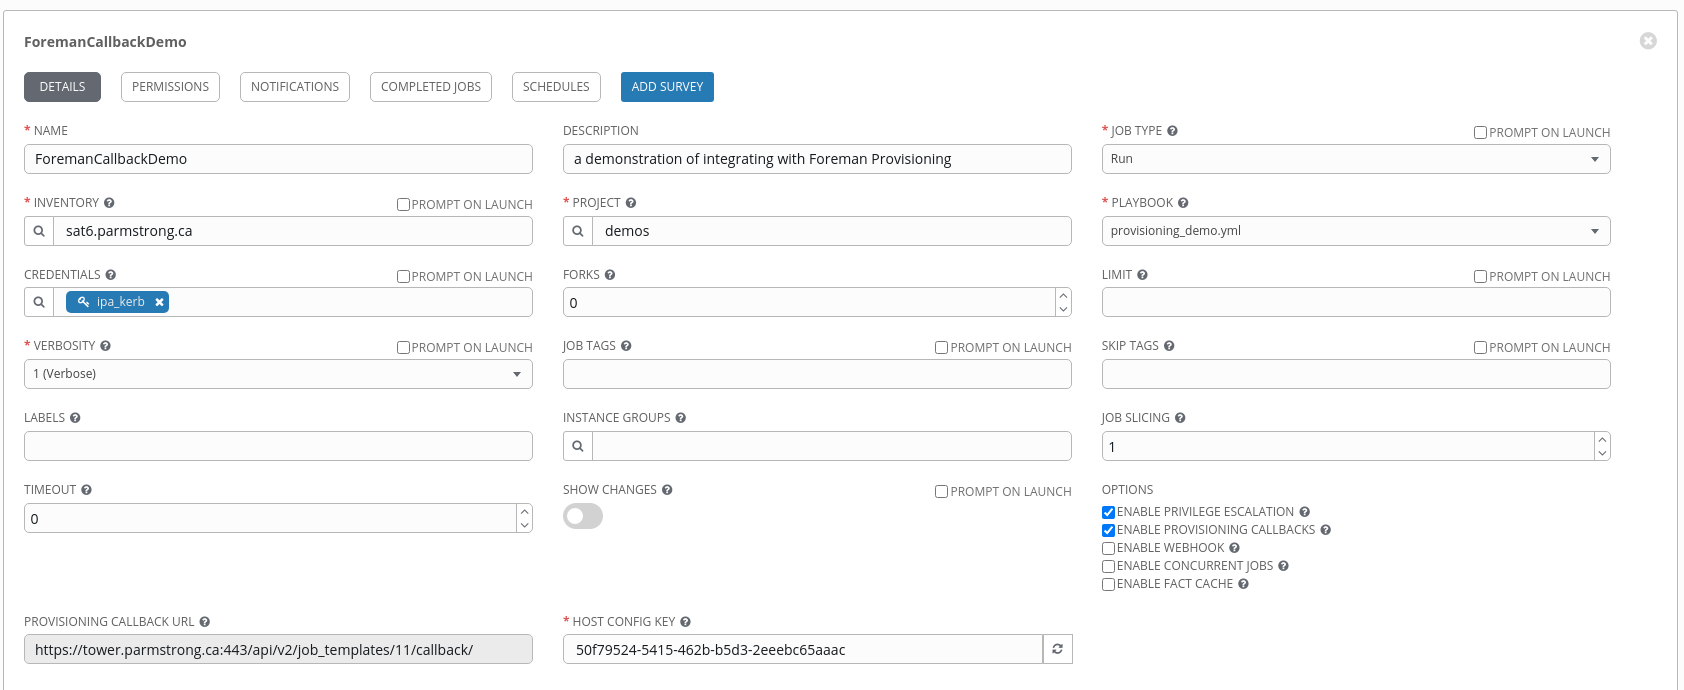
- Provide a name and optional description.
- Select job type of Run.

- Select an inventory - for Foreman integration we use an inventory with a Source type of Red Hat Satellite 6 pointing to our Foreman server.
- Select the project you created in the previous section. I have created a project that I pull down from github called demos, you can use a local project or any other project that your AWX system has access to.
- Select your playbook from the available plays in your project.
-
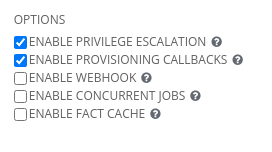
Select your credentials that Ansible will use to connect to the newly provisioned machine. In this instance, I have used a set of default credentials that match the initial root password configured for the hostgroup in Foreman. Ensure that you select the appropriate options for the job as highlighted in the screenshot.
- The ENABLE PROVISIONING CALLBACKS option, when selected, will display the HOST CONFIG KEY field and you can generate a new key by clicking on the regeneration button to the right of the field. You can add or override variables in the EXTRA VARIABLES field. Try adding an override of the message value for the banner here.
The variable name is simply “message”.
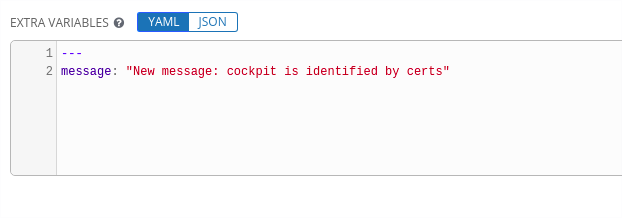
- Save the Job Template.
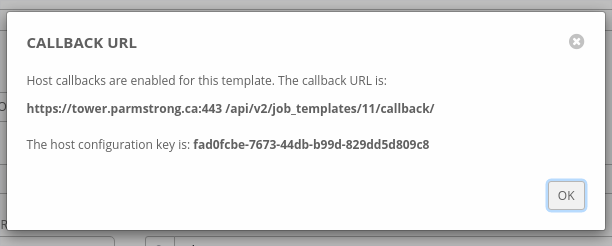
When the job template is saved, AWX generates and displays the information that we need and allows us to copy it to Foreman. The template ID is the second last element in the callback URL. In this case the number 11. The host configuration key is also repeated for us.
Adding host group parameters in Foreman
To use our integration with Ansible, our new system build needs to be passed the information about the ansible template it will call. These values can be passed in a number of ways. Typically, in Foreman provisioning, we will add them as parameters to a host group. If you recall, a host group is a definition of the configuration that is used to deploy a given type of host, as an example, a base RHEL 8 system or a standard web server, etc.. You can add these using hammer commands or through the Foreman UI by navigating to Configure > Host Groups. Select the host group name and then click on the Parameters Tab. Use the Add Parameter button to create your new parameters as below.

Provisioning
Now we can provision a new host to demonstrate our integration.
In Foreman, provision a new host using your kickstart provisioning and the hostgroup that you configured the parameters for. During the provisioning, the provisioned system will reboot and the ansible callback service will execute. This initiates an inventory of the Foreman server to get the latest host information. Then typically the latest project code is pulled for the project and the job template is run against the provisioned host. When the job finishes, Foreman is updated with the results of the provisioning request. Complete logs of the ansible job execution are available on the AWX server job page. When the provisioning completes successfully, you should see something similar to the following when you ssh into the new host. The banner is made up of several components including our /etc/motd template.
ssh convertme.parmstrong.ca
Logged in to: katie-langevin.parmstrong.ca
New message: cockpit is identified by certs
*********************************************************************************
You have been identified and granted access to this system as an authorized user.

All activities performed on this device are logged and monitored.

Attempts to inappropriately elevate privilege or circumvent system security
will result in civil and/or criminal penalties.
*********************************************************************************
Web console: https://katie-langevin.parmstrong.ca:9090/ or https://192.168.252.104:9090/

Last login: Tue Aug 24 16:45:27 2021 from 192.168.253.62
Cockpit Web UI Certificates
If you run the advanced version of the sample, you will see that it includes generating the certificates for the Cockpit Web UI on your new host. When you navigate to the Cockpit URL outside of Foreman, users will have a secure connection to the cockpit UI on the host. When you investigate your FreeIPA instance, you will see a new FreeIPA service and certificates generated for the host on the service page. I also used the Job Template to specify a new message. See the screenshot below.

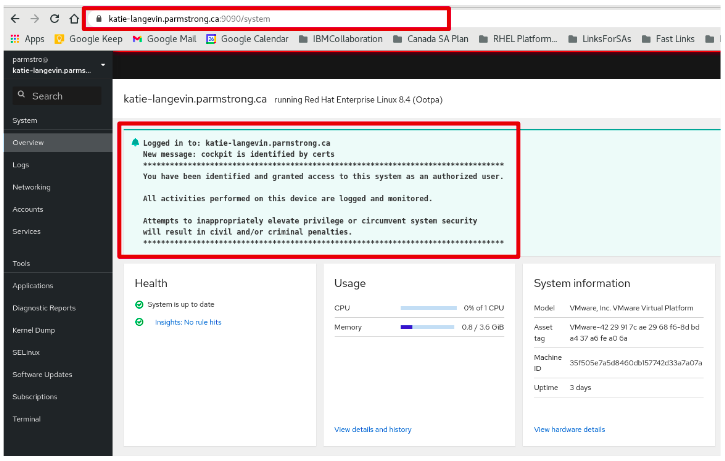
To ensure that your “Web Console” Button works on your Host details page in Foreman, change the default cockpit URL in Administer > Settings > Remote Execution. “https://%{host}:9090” will navigate to the cockpit homepage where you are asked to log in. This is also useful for instances where you have enabled 2 factor authentication for hosts using FreeIPA.
Troubleshooting:
If you are having trouble with your playbook execution you can do several things.
Firstly, you can rerun the provisioning job template from the provisioned host side by logging in and starting the ansible-callback service.
sudo systemctl start ansible-callback
Inspecting the status of the service and logs on the provisioned host can provide feedback on any issues.
Secondly, you can increase the verbosity of the logging for the job so that Ansible will provide more detailed output as the play executes from the AWX instance. See the Verbosity field in the job template. A setting of 3-Debug will usually point out any issues with the playbook.
Hopefully this little example will help you design a more integrated solution for managing your infrastructure.
Let us know what you think in the comments section!
Enjoy!
License
This work is licensed under the Creative Commons Attribution 4.0 International License. To view a copy of this license, visit http://creativecommons.org/licenses/by/4.0/ or send a letter to Creative Commons, PO Box 1866, Mountain View, CA 94042, USA.