This is a continuation of How to start with Foreman post. Today we’ll look at how the inventory can be kept up to date by receiving facts from hosts regularly. Then we’ll take a look where facts can be used. We’ll illustrate the configuration on one config management system, but the same concept is applicable to other facts sources. Links to the related documentation are provided.
Automatically update the inventory from configuration management
Having to keep a big inventory up to date manually would be a lot of work. Foreman can receive updates from other tools used to manage the infrastructure and reflect them in the database. Also new hosts can be created this way. If you use some configuration management system or you use subscription-manager (mostly RPM based distributions), you can configure it to forward data about managed hosts to Foreman. If the host does not exist in Foreman yet, it can be automatically created. If it exists, the record can be updated accordingly.
Typically every configuration management agent run starts with gathering facts. Facts are generic information about the machine, OS, networking and other areas. These facts can be uploaded to Foreman. They are parsed and processed, so that Foreman knows, for example about the current operating system version, kernel, IP addresses, available RAM etc. Foreman can also update other existing objects, such as associated subnet, OS or similar, if configured to do so. All the raw values are stored for later use. We simply call them Facts.
Importing Facts overview
The facts upload process is similar for all fact sources. The data is collected on the Smart Proxy machine and then sent to the Foreman API. Note that typically it’s not the Smart Proxy process that sends the data to the Foreman, but rather the configuration management system, e.g. Puppet server or Asible. The request with the facts is authenticated using an x509 certificate. For the authorization, the Foreman verifies the request comes from a Smart Proxy machine, meaning Smart Proxy runs on this host and this Smart Proxy has related Feature enabled (e.g. Puppet, Ansible etc). Then Foreman imports the data and stores it to the database.

If the data contains a new fact, the new fact is created. If there’s a fact from a previous fact import, that’s no longer present in the new set, it’s deleted. Fact values are updated if they changed in the new data payload.
Once facts are imported, the parsing follows. The Foreman normalizes them and updates Host attributes. For example, Puppet reports uptime while subscription-manager reports boot time timestamp. At this point the Foreman calculates the boot time and store that in a unified form which can be easily used for searching in the Foreman inventory.
The Foreman also updates the Host attributes, such as the operating system or even creates a new OS object if it does not exist yet. As mentioned earlier, if Foreman sees facts for the host that does not exist in the database yet, Foreman can create it. This can be used to populate the inventory easily when you start with the Foreman in a brownfield deployment.
To customize the fact importing behavior, the following settings can be tweaked. Note that they apply to every fact source, despite the fact, some of them are listed under Puppet and Provisioning settings category.
| Setting | Category | Effect |
|---|---|---|
| Create new host when facts are uploaded | Puppet | If set to true (default), if facts for an unknown hosts are received, Host object will be created based on them |
| Create new host when report is uploaded | Puppet | If set to true (default), if a report for an unknown host is received, Host object will be created based on it. Report usually contains information about what has happened during the configuration deployment, but at least the host name is available, so the Host can be created. |
| Default location | Puppet | When host is created based on either facts, we search for a fact representing the location. If there's no such fact or the host is created based on the report, it will be assigned to the location specified in this setting. |
| Default organization | Puppet | Same as default location, but works for organization |
| Location fact | Puppet | The name of the fact, which contains the name of the location, in which this host should be placed. By default, there's no such fact, but all configuration management systems allow to specify custom fact. Hence you can create a custom fact e.g. foreman_location and then the Host will be automatically assigned to it. |
| Organization fact | Puppet | Same as above but for organization |
| Update subnets from facts | Puppet | If an IP of existing interface is changed (or newly created), Foreman will try to match existing Subnet object based on this setting. The new Subnet is not created if it does not exist in Foreman, because we don't have enough information in facts, such as what the default gateway is or what is the DHCP range there |
| Exclude pattern for facts stored in foreman | Provisioning | Facts can contain a lot of data that may not be interesting. E.g. if you don't want to import all blockdevices from each host, all network interfaces etc, you can specify a pattern for ignoring. The default value contains commonly ignored patterns, e.g. "docker*" |
| Ignore facts for domain | Provisioning | By default, Foreman will be creating and assigning Domain objects based on the host domain name. If you don't want this to be updated, you can disable this behavior using this setting. |
| Ignore facts for operating system | Provisioning | By default, Foreman will be creating and Operating System objects if they do not exist in Foreman yet. Also the host will be associated to such OS (either found or newly created), which is useful when OS is upgraded on the host without Foreman knowing about it. In case you e.g. upgrade RHEL 7.2 to 7.3 and there's no RHEL 7.3 on your Foreman yet, it will be created. Note that newly create OS is not fully configured for provisioning. E.g. there are no Provisioning Templates assigned to it, since we don't know which should be used. Therefore later, when you decide to reprovision the host, you may be surprised you need to provide additional configuration for the Operating System first |
| Ignore interfaces with matching identifier | Provisioning | This is similar to excluded pattern settings above, it's only limited to parsing network interfaces facts. Parsing NICs is more performance heavy operation, therefore has its own configuration. But in general, it can be superceeded by the mentioned setting. |
| Ignore Puppet facts for provisioning | Provisioning | Completely ignore networking information importing from facts, this is useful when the detection does not correctly work in your environment, e.g. you use custom names for bonds or vlan interfaces. |
Configuring the Ansible callback
If you’re an Ansible user, there is an easy way to keep your Foreman inventory up to date thanks to the foreman.py callback. It is also an elegant way to populate (import) unmanaged hosts to your Foreman instance. If you use the installer and install foreman_ansible plugin, the callback is deployed for any Ansible run triggered from Foreman.
However, we’ll look at how to configure the callback manually into your existing Ansible directory. That way, if you run any Ansible playbook, Ansible will upload facts and report to your Foreman. If one or more hosts that the Ansible run included does not exist in your Foreman instance, it will be created. If it exists, it will be updated based on the facts gathered during the Ansible run. You still need the foreman_ansible plugin to be installed to your Foreman, so it can properly import and process Ansible facts.
Ideally you deploy a Smart Proxy with Ansible feature to the host that serves as the Ansible control node but it’s not necessary and we’ll not rely on this. Just keep that in mind in case you decide to start using the foreman_ansible plugin for running the Ansible.
Start by installing the foreman_ansible plugin. To do that, run the foreman-installer like this:
foreman-installer --enable-foreman-plugin-ansible
Don’t worry if you ran installer with other arguments before, they are stored and automatically added to the next installer run. If you plan to use Ansible with Foreman further, we recommended installing the Smart Proxy plugin and CLI plugin, to do so, run
foreman-installer --enable-foreman-plugin-ansible \
                  --enable-foreman-proxy-plugin-ansible \
                  --enable-foreman-cli-ansible
Then proceed to the Ansible configuration. First of all, you need to download the callback on your Ansible control node. The Ansible control node is the the machine on which you normally run ansible-playbook on. If you plan to run Ansible only from Foreman, then it is the machine you ran foreman-installer on. However it can be any other machine in your infrastructure if you already use Ansible. The callback lives in the Foreman Ansible Module
collection. To install it run this:
ansible-galaxy collection install theforeman.foreman
If you see an error collection was NOT installed successfully: Content has no field named 'owner', you need to update your Ansible, 2.9 seems to work fine.
Next step is to edit the /etc/ansible/ansible.cfg (or the cfg file that you use for running Ansible) and add the following to respective sections
[defaults]
# enable the Foreman callback that will upload the facts
# and the report for each host
callback_whitelist = foreman

# The Foreman callback specific configuration
[callback_foreman]
# the URL where your Foreman runs
url = https://foreman.example.com
# the client certificate for your Ansible host
# used for x509 client authentication against Foreman
# during the facts upload
ssl_cert = /etc/pki/tls/certs/ansible.example.com.crt
# the respective key for your Ansible host
# used for x509 client authentication against Foreman
ssl_key = /etc/pki/tls/private/ansible.example.com.key
# the CA certs chain used to verify your Foreman instance certificate
verify_certs = /etc/pki/tls/certs/example.com_ca_chain.crt
The most complicated part of the above is the certificates setup. Default Foreman installation uses self-signed certificates. If you haven’t changed that, you need to make sure to install the Foreman CA certificate to your Ansible host. Also you need a key/certificate pair for this host that Foreman will trust.
If you don’t have any SSL infrastructure, you can reuse the certificates from your Foreman installation. To find the certs you need, visit Administer -> Settings -> Authentication (tab). Copy files from paths listed as
- SSL certificate
- SSL private key
- SSL CA file
Please note this is an ugly hack and works thanks to several coincidences. For the proper setup, you should generate a certificate solely for this Ansible host (if it’s not the same host as you run Foreman on). Also the CA of Foreman’s certificate just happens to be the same as in the listed setting by default, but it’s not guaranteed.
Once you setup the certificates, you resolved the authentication part. However we also need to configure authorization. Foreman
would authorize the machine with a valid certificate, if it’s running a correctly registered Smart Proxy reporting the Ansible feature. That would be the case if you install the Smart Proxy Ansible plugin (remember that --enable-foreman-proxy-plugin-ansible argument) and used the certificate as explained above.
In case you only installed the Foreman plugin and deployed the callback, it’s necessary to allow this host for facts and reports upload. To do so, navigate to Administer -> Settings -> Authentication and find a Trusted hosts setting. You need to add the FQDN of the Ansible host, e.g. ansible.example.tst to this list of trusted hosts.
Now every Ansible run will send facts and report to the Foreman. You can try that with a simple playbook like this (save it as playbook.yml)
- name: "Register hosts"
  hosts: all
  tasks:
  - name: "Print the info about the host"
    debug:
      msg: "You should see  in the Foreman"
If you now run this playbook on 2 hosts, you’ll see the output like this
# ansible-playbook -i mqtt.example.com,tony-sloane.example.com, playbook.yml

PLAY [Register hosts] *********************************************************

TASK [Gathering Facts] ********************************************************
ok: [mqtt.example.com]
ok: [tony-sloane.example.com]

TASK [Print the info about the host] ******************************************
ok: [mqtt.example.com] => {
   "msg": "You should see mqtt.example.com in the Foreman"
}
ok: [tony-sloane.example.com] => {
   "msg": "You should see tony-sloane.example.com in the Foreman"
}

PLAY RECAP ********************************************************************
mqtt.example.com           : ok=2    changed=0    unreachable=0    failed=0    skipped=0
                             rescued=0    ignored=0
tony-sloane.example.com    : ok=2    changed=0    unreachable=0    failed=0    skipped=0
                             rescued=0    ignored=0
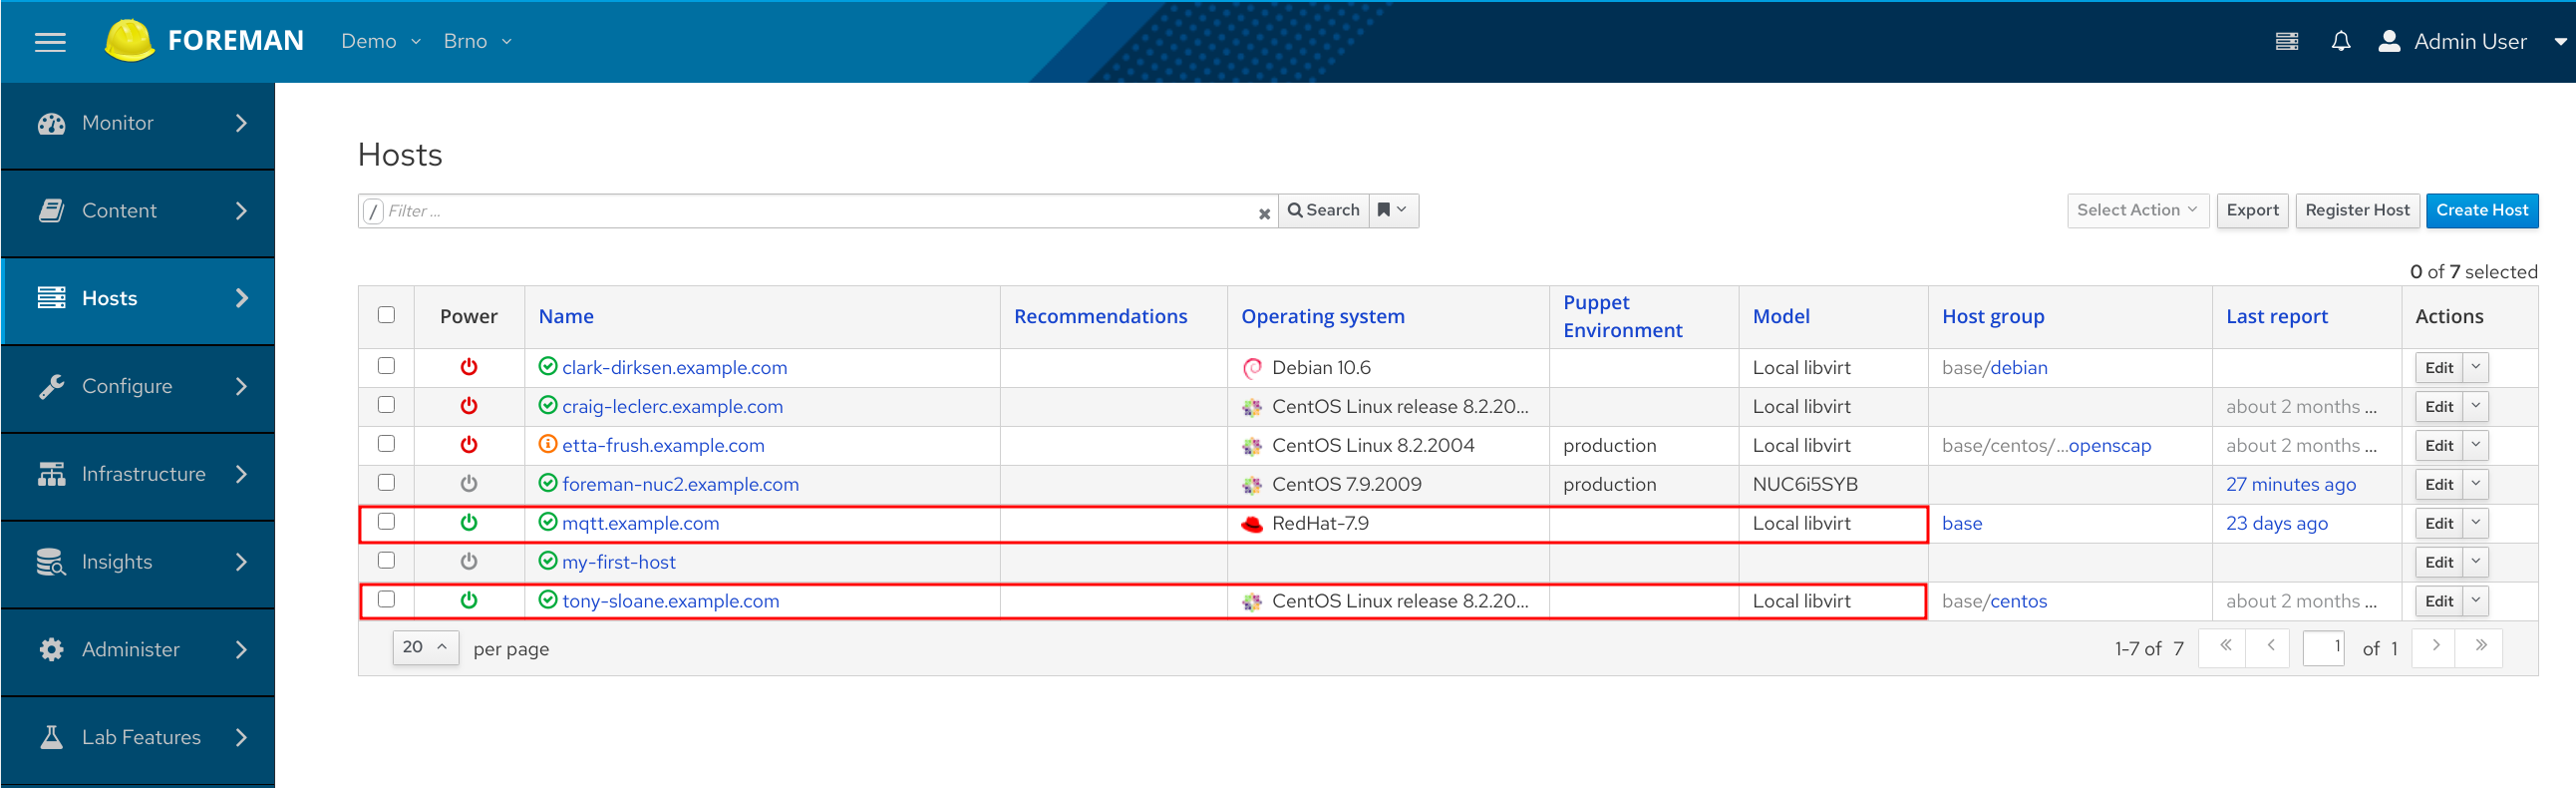
Navigate to Hosts -> All Hosts and check that you see hosts and some more data about them.
Please note that if you make a typo in the hostname (or the host is misconfigured in your Ansible inventory), the callback still sends the report for the host, even if Ansible couldn’t connect to it. That will result in host record in Foreman database. The host will indicate a configuration error and will contain no facts.
Also if you see The 'requests' python module is not installed. error in the output, make sure to install the python-requests package.
Configuring a Puppet server
You can deploy a callback script to your existing Puppet server that will forward Puppet facts to Foreman. For more details about this, please refer to the Foreman manual. The default Foreman installation (at least as of 2.3) deployed that together with the open source Puppet server so any puppet agent run results in facts being sent to Foreman.
Configuring Chef
There is a chef handler for chef-client to forward facts through the Smart Proxy to Foreman itself. The key difference is that the handler needs to be installed on every machine running a chef-client. The instructions for configuration can be found in the handler repository. The main difference is, facts are gathered and formatted directly on the chef-client. Given the huge amount of facts chef provides by default, it’s common (and recommended) to define a filter on every chef-client by using a whitelist.
Configuring SaltStack
Foreman Salt plugin also comes with the similar functionality, please take a look at the manual
The fruit
Besides that your inventory gets automatically uploaded, there are some other benefits. You notice that OS objects are automatically created and associated with the Hosts. Also Hardware Models, Architectures, Puppet Environments are populated based on what is found in your infrastructure.
If you visit Hosts -> All Hosts page, you will see a nice overview. Clicking the host name takes you to the Host detail page. You can see additional information Foreman parsed out of facts, e.g. the IP, MAC, boot time etc. The IP and MAC addresses displayed in the Properties table are addressed by what the fact source considers a primary interface. The NICs tab lists all the network interfaces we received information about.
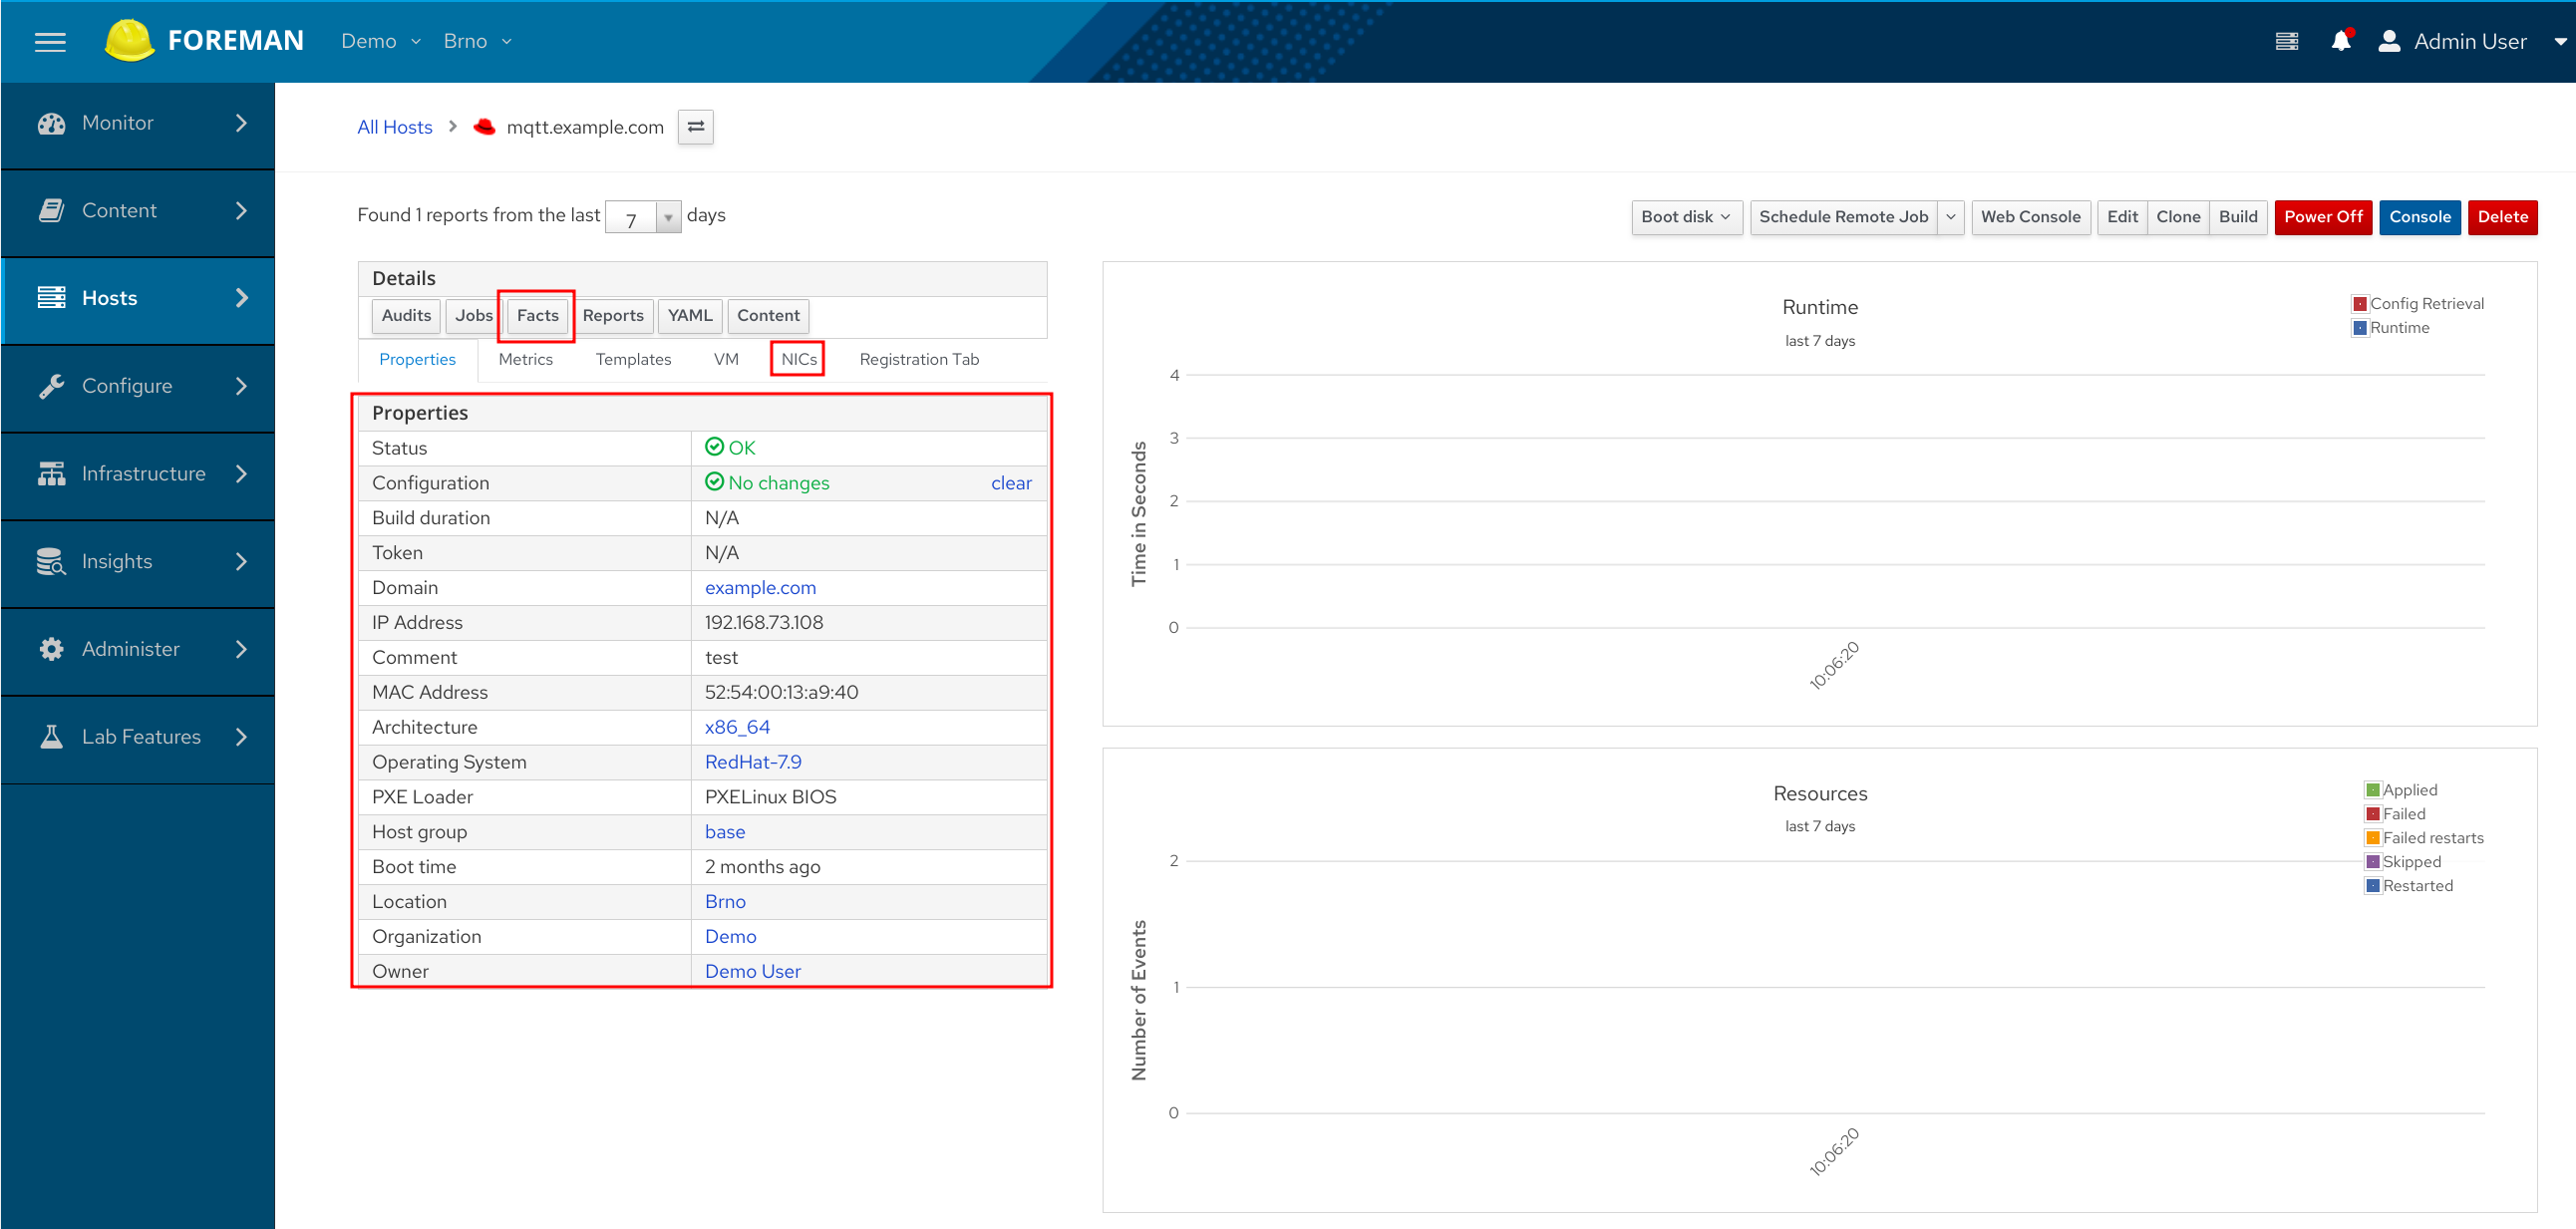
Clicking the Facts button in the Details section takes you to the list of all facts for the host. These are the raw values Foreman keeps for the host. For example, to find out the python version on your server, try searching for host = host.example.com and name = ansible_python::version_info. Similarly, you can search for your kernel version. If you want to see what all python versions you’re running in your infrastructure, click the View Chart button for the specific fact. You can also search for all hosts that run a specific, e.g. a vulnerable version. Click on the chart to filter the hosts represented by the color. The filter field above the table is updated accordingly, so you see an example of how to search for the hosts without using the charts. Searching is only limited by the data you import for your infrastructure.

The name of the fact differs per fact source, remember, these are the raw values. Some of the facts are processed and unified. You can search hosts by these attributes on the All Hosts page. See the suggestions when you click the filter field. Searching capabilities deserve its own post. For now, please refer to our manual.
Since you now have the inventory populated, let’s briefly take a look at Monitor -> Report Templates. These are the reports you can render from your Foreman. Writing your own template may be covered in some other blog post, however if you’re interested, you can find more information in the Reports chapter of our manual.
The first report is Host - Statuses. This will give you a report of all Hosts and numerical representation of all of its statuses. So far, you most likely only saw Global status and Configuration status. The first one represents overall status for the host and is based on sub-statuses. The Configuration status is a sub-status, representing the last configuration management run. It’s based on the Config Management Reports which are usually sent together with facts. They represent one config management agent run. They indicate whether there was some change during the run (Active), nothing really happened (OK), something failed (Error) or we haven’t heard about the host for more than for some interval (Out of sync). There are other possible values for this state, but let’s keep that for some other post. For now, you can find more information here.
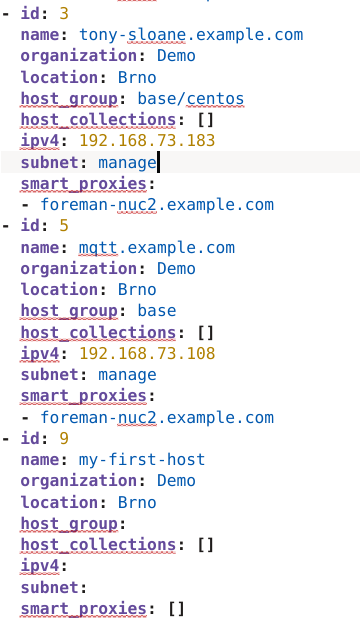
The second report that may be already useful in case you use Ansible is the Ansible - Ansible Inventory report. It renders ansible compatible representation of your inventory. You can import that to Tower or configure Tower to regularly sync it from Foreman. At the same time, it’s a machine readable export of the data, so you can use that in any other system that would benefit from it. The supported formats for every report are currently JSON, YAML, CSV, HTML.
Note on configuring puppet agents on default installation
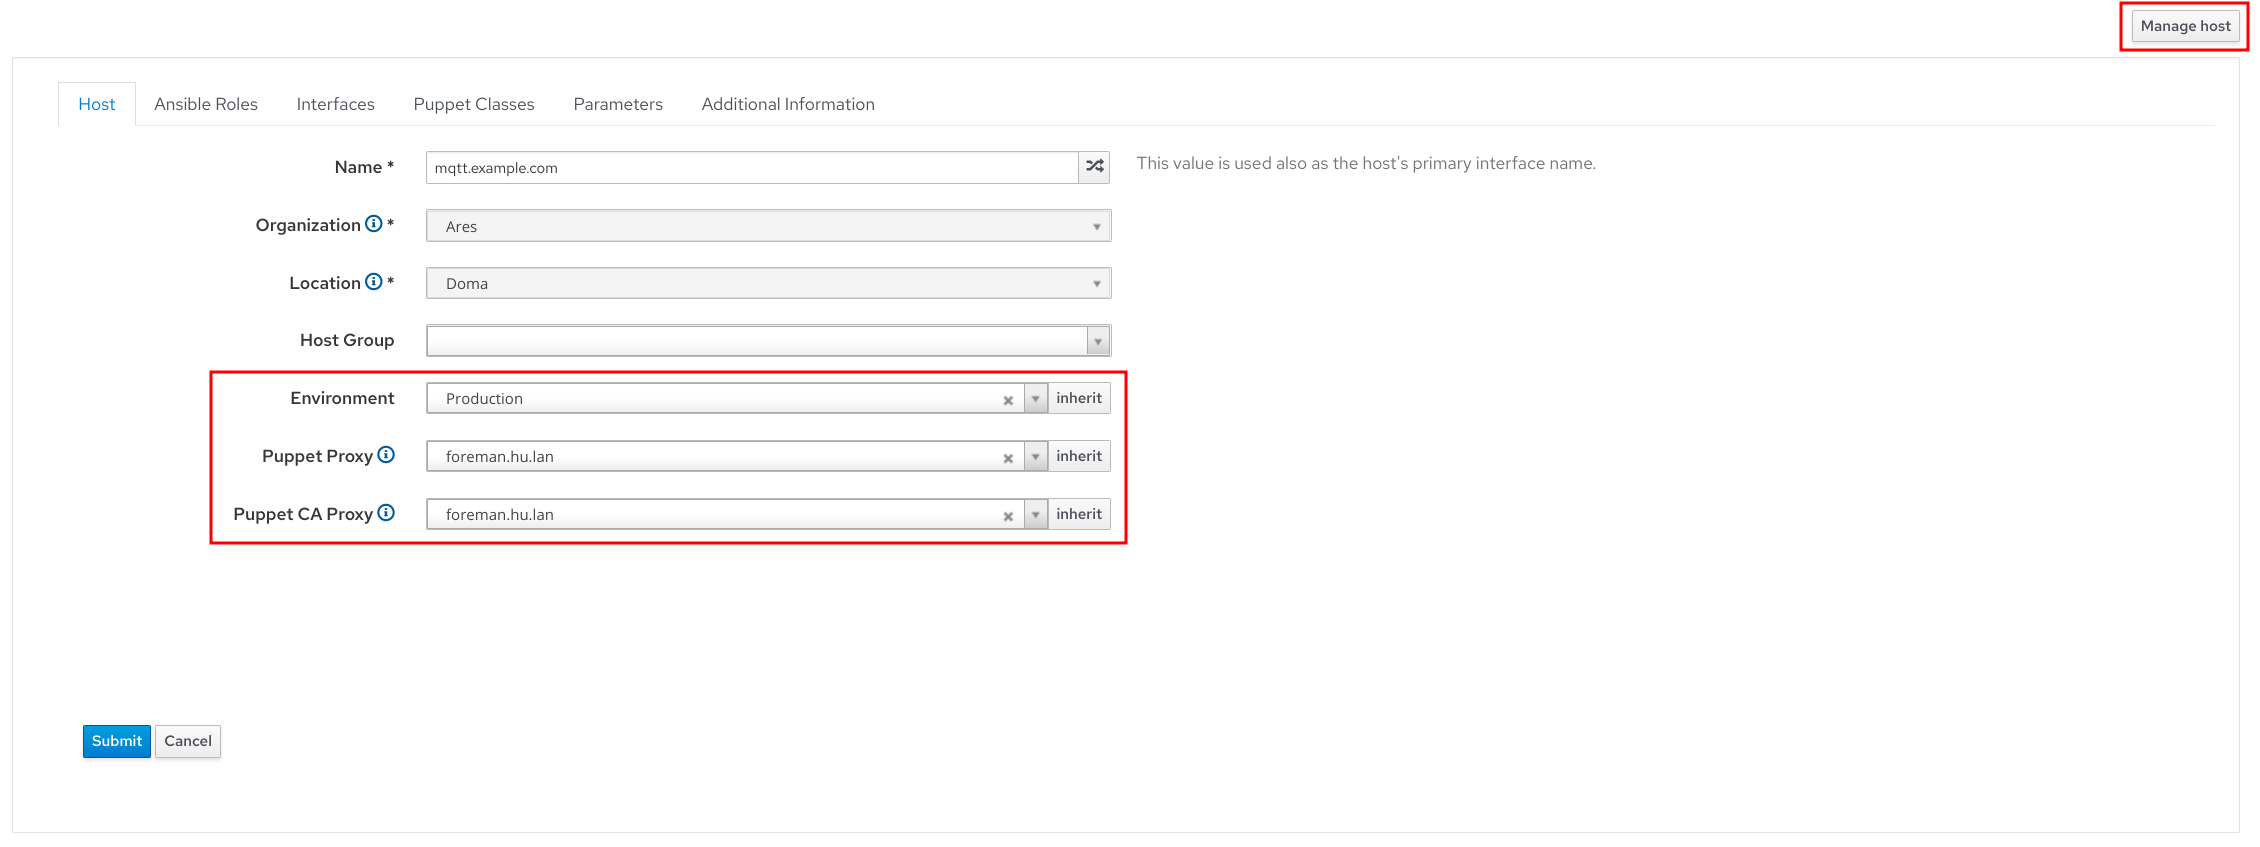
A user reading the previous post asked how to configure the puppet agent on the machine that was created in the Foreman. For the original discussion, look at our community forum. I’d like to show a different way though. Assuming the default installation, your Foreman was installed with Puppet server and Puppet CA already. Let’s configure the Foreman for use with it. Navigate to Configure -> Environments and click the Import environments button. If no environment exists yet in your server, create a new one called production. The edit you existing host. In the first tab of the edit form, select the production environment, set the Puppet Proxy and Puppet CA Proxy. Then save the host. By doing this, you’re basically saying, this host belongs to the given Puppet environment, it is managed by Puppet installed on a proxy you’ve selected and its Puppet certificate is handled by the selected Puppet CA.
Based on this information, Foreman would configure the puppet agent during the provisioning. We could also automate the setup through a remote execution plugin (next post I promise). But for now, we’ll just get the shell instructions from Foreman.
For that we need to switch the Host to managed for a moment. Go back to the Host edit form and click the Manage host button on top of the page. Without any further saving, navigate to Hosts -> Provisioning Templates and find the puppet_setup template. Click on its name to open the editor. Now click the Preview tab, select the correct host from the drop down unless it’s already selected correctly. This will give you the right instructions for the OS the Host is assigned to. Expect problems, if the Host does not have OS associated. You can manually select the OS after the Host is switched to be managed.
Note that the environment, server and ca_server in puppet.conf are populated based on what you’ve set in the form. Copy and paste that instructions to your host. These instructions will install puppet agent, configure it to use the Puppet server installed with Foreman and run the agent for one time. That will create a certificate request on the Puppet CA and will require you to verify and sign the request.
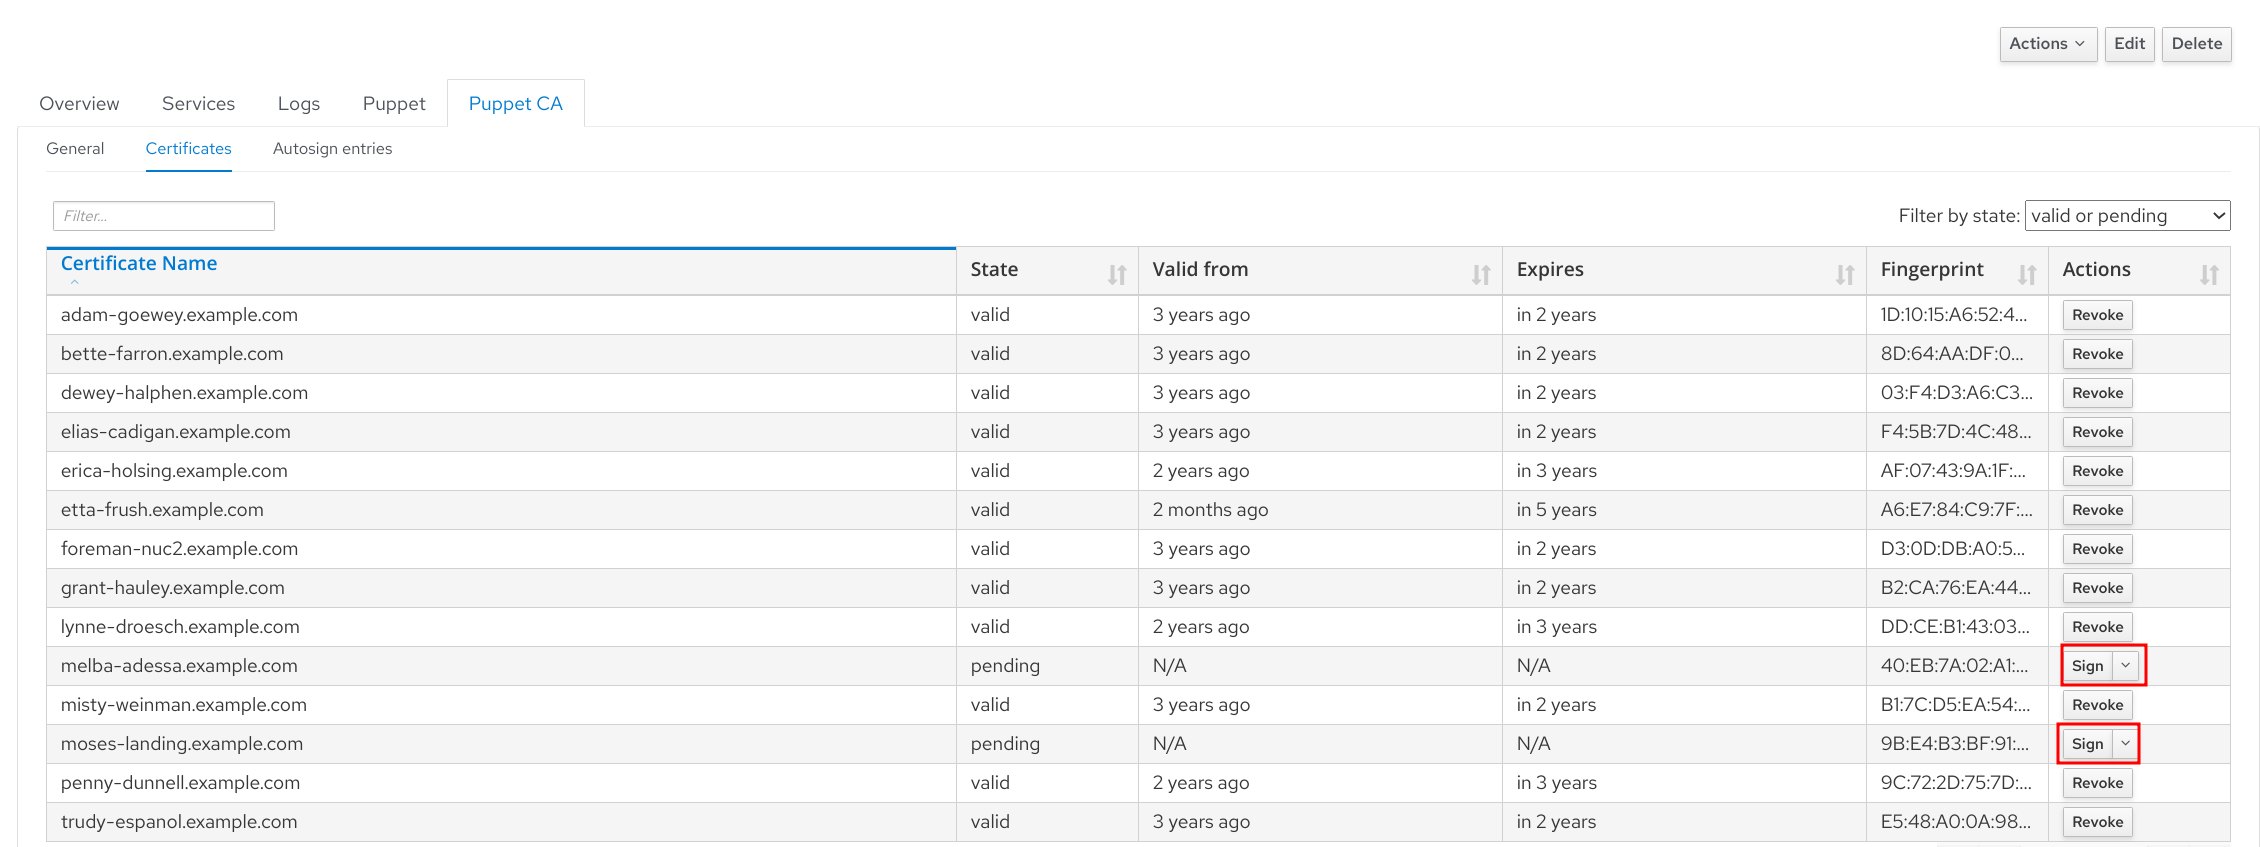
You can do that either manually using the puppetserver ca command or you can you Foreman UI for this too. Navigate to Infrastructure -> Smart Proxies and pick the one you have selected as a Puppet CA proxy for this host. Then click the Puppet CA tab and review Certificates sub-tab. Clicking the Sign button will do the necessary. To avoid this manual step, you can configure the autosigning entries. Add * to automatically sign every request, however think about the security consequences.
Note that switching the host to managed mode was necessary in order to render the provisioning template for it. But we’re not that far so we can fully manage the host, so go back to the edit Form and click the Unmanage host button. This will hide some fields from the Host form again.