1. Foreman 1.1 Manual
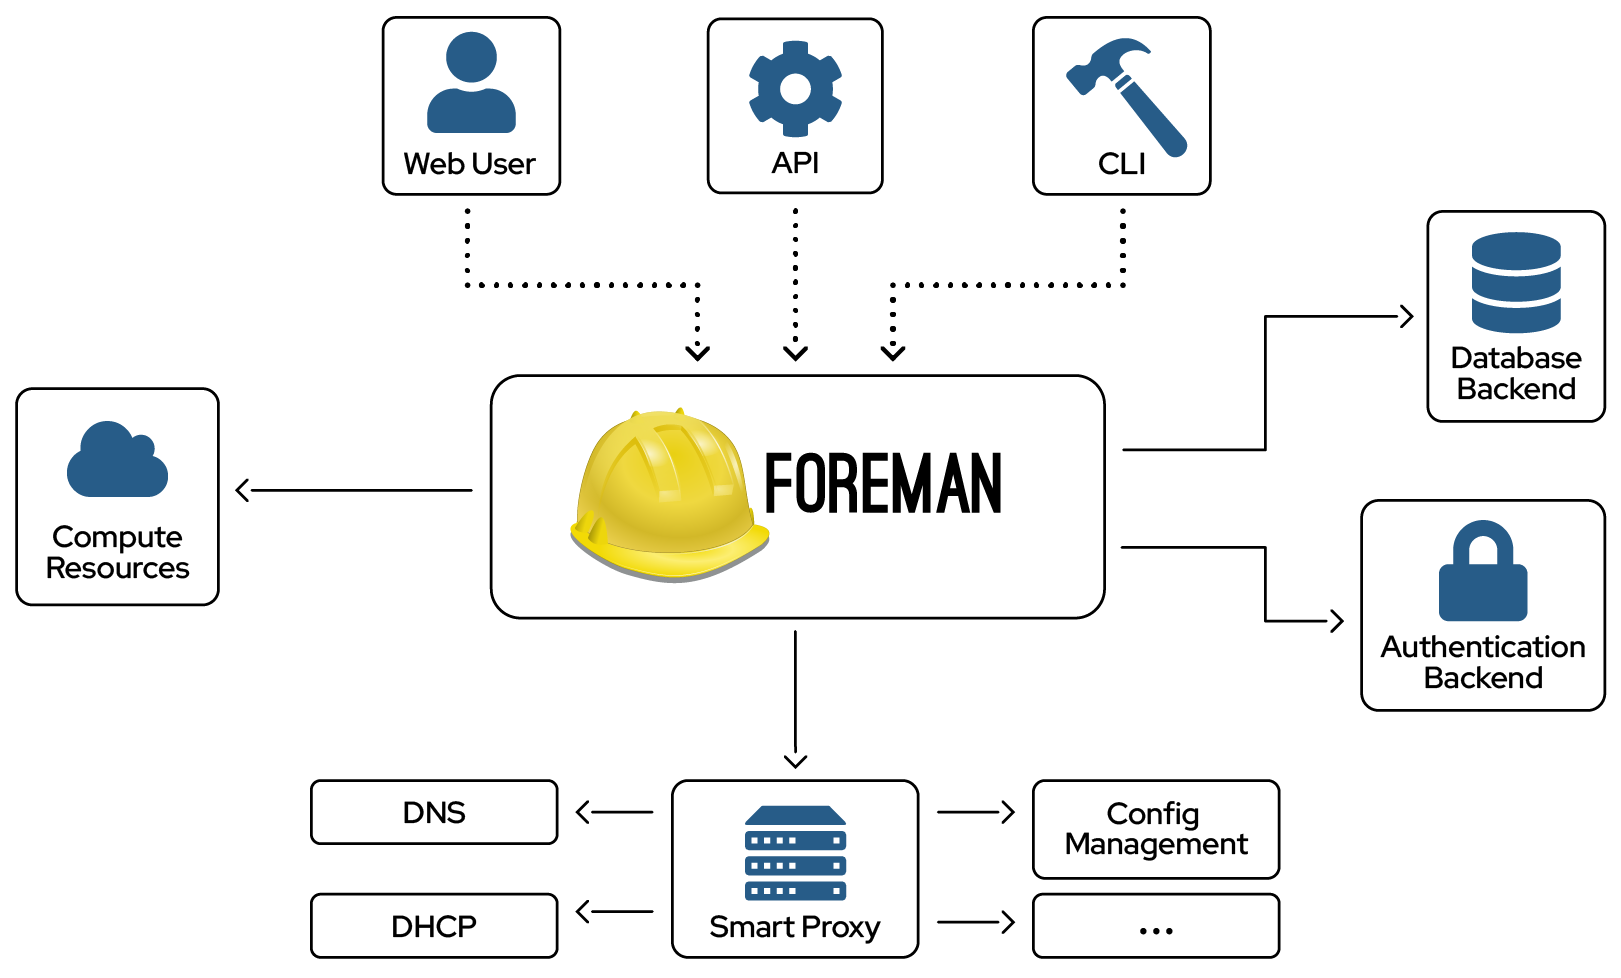
Foreman Architecture
A Foreman installation will always contain a central foreman instance that is responsible for providing the Web based GUI, node configurations, initial host configuration files, etc. However, if the foreman installation supports unattended installations then other operations need to be performed to fully automate this process. The smart proxy manages remote services and is generally installed with all Foreman installations to allow for TFTP, DHCP, DNS, and Puppet, and the Puppet CA.
Smart-Proxy
A Smart-Proxy is located on or near a machine that performs a specific function and helps foreman orchestrate the process of commissioning a new host. Placing the proxy on or near to the actual service will also help reduce latencies in large distributed organizations.
Release notes for 1.1.1
Infrastructure
- Created tmp/ if it doesn’t exist
UI
- Added AJAX routes to existing permissions to fix non-admin UI items
- A selected Organization/Location can now be cleared
Provisioning templates
- Updated safemode template rendering now allows “!=” operator
Database
- Fixed postgres error for classes_from_storeconfigs
Packaging
- Fixed the -release subpackage to include the correct URL for the stable packages
Release notes for 1.1 stable
Upgrade notes
Upgrades from previous versions of Foreman are mostly automatic when using packages, but there are some important notes to ensure things go as smoothly as possible.
Key features and improvements
Here are some of the most prominent features of Foreman 1.1
- Support for Puppet 3
- Locations & Organizations
- Parameterized classes
- V1 of a robust, versioned API
Authentication for puppetmasters
By default, the external nodes (ENC) interface and reports+fact import interfaces will now only permit hosts with smart proxies registered and will require client SSL certs to verify. The defaults are all enabled to provide the most secure config out of the box, which can be relaxed if necessary - see below.
Full HTTPS and Smart Proxies
For most users with Apache, mod_ssl and Passenger (the standard foreman-installer configuration), plus Foreman proxy on the puppetmaster host:
-
Update the ENC script node.rb and report processor foreman.rb using the foreman-installer, or copy its templates and update:
-
It’s highly recommended that you have require_ssl and login set to true in
/etc/foreman/settings.yaml.
This relies on mod_ssl verifying the client’s SSL cert with the CA configured for Foreman. If everything’s in the same Puppet CA infrastructure, this should work. For nginx users, see Setting up Nginx + Passenger an updated configuration.
No HTTPS, only Smart Proxy host auth
If you don’t use SSL, or you have a complex puppetmaster SSL setup (multiple CAs), you might decide to relax client SSL cert requirements.
- Disable the “require_ssl_puppetmasters” setting in the Foreman UI (More, Settings, Auth). This will fall back to permitting any connections from registered puppetmaster smart proxy hosts.
No authentication, no Smart Proxy
Lastly, if you want to permit any access to these interfaces - which will enable remote code execution on your Foreman server(!) - you can disable “restrict_registered_puppetmasters” in Settings.
More information and support
More detailed documentation is available in the manual, under Securing Communications with SSL We appreciate it’s a difficult change, but is necessary to improve the security of the application. If you have problems, do check the troubleshooting text in the manual, and do contact one of the Support channels.
Yum and Debian repos
Yum
As per the new yum repo structure, you can always get the latest version of Foreman 1.1 from http://yum.theforeman.org/releases/1.1. A redirect from http://yum.theforeman.org/releases/latest/ to the most recently released stable version is also a good way to be able to upgrade across major versions without have to upgrade the baseurl. Packages are available for EL5, EL6, Fedora 16, and Fedora 17*; each distro has its own subtree in the repo, so pick whichever matches your distribution and architecture.
Debian
Unlike previous releases, the 1.0 packages are still available in the repository in addition to the new 1.1 packages because of a recent change in repo management tools. Instructions for setting up the Debian repo for your system are available on http://deb.theforeman.org/.
Deprecation: ActiveRecord-based storeconfigs / database sharing
Previously it was suggested that a single database could be shared between Puppet ActiveRecord-based storeconfigs and Foreman, which would be used to import data from Puppet - this configuration has now been deprecated. The current recommendation is to use a standalone database for Foreman, then configure either an ENC, which provides most of the same functionality as database sharing without the associated issues.
Puppet 3 also deprecated the use of ActiveRecord-based storeconfigs and it is now recommended to use PuppetDB instead for storeconfigs and exported resources. This can be used alongside Foreman - the two don’t need to interact, and reports are sent to both systems.
Release notes
Infrastructure
- Upgraded to Rails 3.0.20 to address CVE-2013-0333
Database
- Fixed a minor issue with migrations by wrapping “where”’s in lambdas in the host model
UI
- Don’t store “Finished catalog run” messages
- Ensure no duplication trend counters are created
Compute resources
- Don’t show provisioning information in locations/orgs when unattended installations are disabled
- Don’t attempt to delete a host if the associate VM doesn’t exist
API
- Include nested host routes in the API documentation
Other
- Fixed a typo in the mismatches repo
- Don’t use class variables in the taxonomix class
- Use ID’s instead of name for config template routes to prevent valid chars in names from affecting routes
Release notes for 1.1RC5
A number of release-critical issues were fixed in RC5, but one of the most important features that was added is a wizard that helps fix organization and location mismatches to resolve issues users have run into with scoping.
Infrastructure
- Upgraded to Rails 3.0.19 to mitigate Rails security issues
- Optimize Puppet class SQL queries
UI
- Added gravatar to user index
- Fixed pagination for compute resource VM’s using JS-based paging
Compute resources
- Prevent users from clicking the build button when it has the disabled attribute
- Updated Fog version to fix some VMware problems
Authentication
- Fixed LDAP auth when using another account
- Corrected XHR authentication validation issue
- Added auth to smart proxies
- Restrict ENC to Puppet masters and ENC
- Enabled auth by default
Puppet integration
- Added proper version numbers for Debian testing/unstable
- Added search for Puppet class parameters
- Display Puppet’s file diff when content changes
Security
- Improve session token security
- Use a random salt when saving the root password
Release notes for 1.1RC4
Infrastructure
- Update Puppet tests to include stderr redirect
UI
- Only show console button if VM is running on the host page and VM listing tab
- Added multi-select ui component instead of multi check-boxes for long lists
- Upgraded to Bootstrap 2.2
- Reorganized the “More” menu
- Fixed new location/org buttons in user-menu so they work in Firefox
- Show a user’s login name if their full name is blank
- Respect the current location and organization for admin users
- Fixed an error in the ptable welcome text
- Removed the link from hosts list in users filter page when not needed
Puppet integration
- Improve debug when
puppet master --configprintfails - Prevent configuration values in one Puppet class from leaking into another
Database
- Fixed Postgres migrations
Provisioning
- Windows provisioning template generation fails
Other
- Allow parents in subnet description
- Fixed missing condition in taxonomix
Release notes for 1.1RC3
Database
- Fixed postgres migrations
UI
- Display the correct notice when pressing the power on/off button for VMware hosts
Other
- Minor leftover to avoid Object.id warning
- Use merge! instead of update! when connecting to the proxy
Release notes for 1.1RC2
Infrastructure
- Run test:lib from the test rake task
- Fixes for running Foreman and tests on Ruby 1.9.3
- Disabled rack-mini-profiler for now since it makes development sites very slow
- Pin minitest to 3.5+ and mocha 0.12.x
- Clear the topbar cache on server restart
UI
- Fix trend labels
- Display the opposite taxonomy when editing a location or organization
- Only show the opposite taxonomy if it’s enabled when editing a location or organization
- Fixed filtering based on report status
- Don’t display revoked certificates by default
- Fix graphs hrefs when running from subpath
- Puppet class form UI improvements
- Prevent the spinner on the VM listing page from going forever if listing fails
- Override smart proxy parameters values is now a text area
API
- Disable apipie validations for the time being
Database
- Completely remove email_replay_address from settings
- Allows mysql2 usage with Puppet < 2.7.10
- Fixed invalid postgresql query when filtering by class
- Fixed trends model with postgresql - added group() back and added select()
- Removed puppet class include in index because it creates too many joins in a single query for sqlite
- lookup_keys.default_value can now store values > 255 characters
Puppet integration
- Don’t rely on Puppet version to determine the report format
- Enabled parameterized class ENC by default with Puppet 2.6.5+
- Fixed parameterized class support in the puppet:import:puppet_classes rake task
- Don’t try to save os=nil in the fact importer
- Fixed the healthy host percentage
- Always write using_storeconfigs default as a boolean
Provisioning
Templates
- Define instance variables during ERB evaluation when not using safemode
Compute resources
- Test if oVirt API has HTTPS redirect
- Improved the speed of listing VM’s when using VMware
- Fixed issues around medium when deploying to image based providers
Smart proxy integration
- Added BMC support to the api-proxy class
Security
- Fix Foreman SQL injection through search mechanism CVE-2012-5648
Authentication
- Fixed bug preventing LDAP authentication in auth_source_ldap model
Other
- Changed the maximum username length to 100 characters
- Scope templates by taxonomy
- Remove catchall routes to allow engines to provide additional routes
- Added custom hook when host build mode changes
- Removed class_name from all relationships that has_many :through as its invalid
- Add max_trends setting
- Removed has_many_polymorphs and used has_many :source and :source_type
- Convert sp_* attributes into a BMC interface class
Release notes for 1.1RC1
Infrastructure
- Updated to Rails 3.0.17
- Add a “jenkins:unit” rake task for producing junit output
Provisioning
Compute resources
Support for the previously deprecated hypervisor feature has been removed completely.
- Added support for Rackspace Cloud V2
- Improved support for VMvware provisioning
- Removed option to delete EC2 instances once they’ve been terminated
- Added spice client support for oVirt/RHEV
- The confirmation box now reminds users which host is being deleted
- oVirt provisioning now requires the HTTPS protocol
Unattended installations
- Updated paths to the Puppet executable and removed old binaries (i.e. puppetd) from kickstart and PXE templates
- Linked templates with the corresponding hosts to which they are assigned
- Allow unattended provisioning with foreman login enabled
- Support for using tokens to identify hosts (instead of using the IP of the request)
- Support for three state boot for TFTP and provisioning
UI
- Prevent having 2 hosts with the same name
- Fixed bug that caused hosts with no reports to have a negative number
- Fixed a number of sorting bugs on index (listing) pages
- Improved pager styling to fix an issue where the pager would disappear when a large number of hosts are present
- Only show a “help” link if there is an associated help view
New features
Parameterized classes
- Added support for parameterized Puppet classes by exposing class signatures via the UI and YAML output from the ENC.
- Updated rake tests to use the class importer with parameterized class support.
- Enable parameterized class support by default.
Puppet 3 support
Puppet 3 is now fully supported. A number of changes to the proxy and Foreman core had to be made to support API’s that have changed in Puppet 3, including:
- Improved the Foreman functionality to load the default Puppet settings to work with Puppet 3
- Fixed $vardir also has to be set or in order for the Puppet configuration loader
- Fixed Puppet 3 class and environment import
Notes:
- The Foreman installer has been updated, but for other users, ensure
sudo rules allow access to
/usr/bin/puppet cert *now instead of/usr/sbin/puppetcaand/usr/bin/puppet kick *instead of/usr/sbin/puppetrun. - For non-standard puppet.conf locations (including Puppet Enterprise),
ensure that
:puppetconfdiris set correctly inconfig/settings.yamlto either the config directory or puppet.conf itself.
Locations and organizations
Locations and organizations can be used to classify most of the different objects in Foreman, including hosts, domains, host groups, users, and more. They can be enabled individually or together, so if a user only needs locations (for example), they don’t have to have organizations enabled. Locations and organizations are disabled by default.
To locations or organizations set “locations_enabled: true” and/or “organizations_enabled: true”.
- Added location and organization support
- Numerous changes to caching logic in the topbar to allow existing Foreman installations to view the context switchers
- Fixed scoping bugs that users running git-based deployments found while using locations and orgs
Trends
A new page was added for trending of different facts. This feature will allow for trending of hosts over time, instead of displaying a point-in-time display of hosts like the statistics page.
- Added the trends page to track change in fact host counts
- Updated highcharts to allow for scrolling inside trend graphs
Packaging
- Ensured the foreman user exists in Debian squeeze packaging before first start
- Fixed temp dirs on Fedora, permissions to fix failure to log
- RPM packages for the Foreman and the proxy now download sources directly from Github tags instead of theforeman.org
- A number of different changes to the Debian and RPM packages to update dependencies to match the Gemfile and bundler.d requirements
API
- Allow the creation of unmanaged host via API
- Added support for retrieving a user’s role via the API
- Authenticate API calls via REMOTE_USER
- Support for multiple API versions in prearation for V2 using an accept-header
- v1 is now feature complete
- Implemented oauth support for the API
Other
- Support searching hosts by UUID
- Fixed MySQL migration issue caused by missing the length of the key for a column
- Use an int instead of a float for run distribution graphs
A full list of bugs and feature changes in 1.1 is available at http://projects.theforeman.org/versions/show/20
2. Quickstart
The Foreman installer is a collection of Puppet modules that installs everything required for a full working Foreman setup. It uses native OS packaging (e.g. RPM and .deb packages) and adds necessary configuration for the complete installation.
Components include the Foreman web UI, Smart Proxy, Passenger (for the puppet master and Foreman itself), and optionally TFTP, DNS and DHCP servers. It is configurable and the Puppet modules can be read or run in “no-op” mode to see what changes it will make.
Supported platforms
- RHEL derivatives (CentOS), 5 and 6 (EPEL required, plus subscribe to “optional” channel on RHEL 6)
- Fedora 16, 17
- Debian 6 (Squeeze) (update Puppet from backports)
- Ubuntu 12.04 (Precise)
Other operating systems will need to use alternative installation methods (see the manual).
Installation
The Foreman installer uses Puppet to install Foreman. This guide assumes that you’ve already installed Puppet (without a master), but the installer will setup Foreman and the puppet master with Passenger and the Smart Proxy by default.
Downloading the installer
For Red Hat variants, run this (replace both instances of ‘el6’ with ‘el5’, ‘f16’ or ‘f17’ as appropriate):
yum -y install http://yum.theforeman.org/releases/1.1/el6/x86_64/foreman-release.rpm
yum -y install foreman-installer
For Debian variants, run this (replace ‘squeeze’ with ‘precise’ if on Ubuntu 12.04):
echo "deb http://deb.theforeman.org/ squeeze stable" > /etc/apt/sources.list.d/foreman.list
wget -q http://deb.theforeman.org/pubkey.gpg -O- | apt-key add -
apt-get update && apt-get install foreman-installer
Running the installer
The procedure is initially interactive, allowing changes to the configuration and then the option is given to run Puppet to perform the installation:
ruby /usr/share/foreman-installer/generate_answers.rbAfter Puppet runs, Foreman will be accessible at https://fqdn/ with a default
username/password of “admin” and “changeme”. To complete the installation,
click on More > Configuration > Smart Proxies and add a new proxy with the URL https://fqdn:8443/.
3. Installing Foreman
There are several different methods of installing Foreman. The recommended way is with the puppet based Foreman Installer but you may also use your distribution’s package manager or install directly from source.
3.1 Supported Platforms
The following operating systems are supported by the installer, have packages and are tested for deploying Foreman:
- RHEL derivatives (CentOS), 5 and 6
- EPEL is required
- On RHEL 6, subscribe to the “optional” child channel
- Fedora 16, 17
- Debian 6 (Squeeze)
- Ensure Puppet is updated from backports
- Ubuntu 12.04 (Precise)
All platforms will require Puppet 2.6.5 or higher. Puppet 3.x is supported and may be installed from the Puppet Labs repositories.
Other operating systems will need to use alternative installation methods, such as from source. Using Foreman with SELinux in Enforcing mode is not currently supported.
The following operating systems are known to install successfully from Foreman:
- RHEL derivatives (CentOS) 3+
- Fedora
- Ubuntu
- Debian
- Solaris 8, 10
- OpenSUSE 11.4
3.2 Foreman Installer
The Foreman installer is a collection of Puppet modules that installs everything required for a full working Foreman setup. It uses native OS packaging (e.g. RPM and .deb packages) and adds necessary configuration for the complete installation.
Components include the Foreman web UI, Smart Proxy, Passenger (for the puppet master and Foreman itself), and optionally TFTP, DNS and DHCP servers. It is configurable and the Puppet modules can be read or run in “no-op” mode to see what changes it will make.
It’s strongly recommended to use the installer instead of only installing packages, as the installer uses OS packages and it saves a lot of time otherwise spent replicating configuration by hand.
By default it will configure:
- Apache HTTP with SSL (using a Puppet-signed certificate)
- Foreman running under mod_passenger
- Smart Proxy configured for Puppet, TFTP and SSL
- Puppet master running under mod_passenger
- Puppet agent configured
- TFTP server (under xinetd on Red Hat platforms)
Other modules can be enabled, which will also configure:
- ISC DHCP server
- BIND DNS server
3.2.1 Installation
The Foreman installer uses Puppet to install Foreman. This guide assumes that you’ve already installed Puppet (without a master), but the installer will setup Foreman and the puppet master with Passenger and the Smart Proxy by default.
Downloading the installer
For Red Hat variants, run this (replace both instances of ‘el6’ with ‘el5’, ‘f16’ or ‘f17’ as appropriate):
yum -y install http://yum.theforeman.org/releases/1.1/el6/x86_64/foreman-release.rpm
yum -y install foreman-installer
For Debian variants, run this (replace ‘squeeze’ with ‘precise’ if on Ubuntu 12.04):
echo "deb http://deb.theforeman.org/ squeeze stable" > /etc/apt/sources.list.d/foreman.list
wget -q http://deb.theforeman.org/pubkey.gpg -O- | apt-key add -
apt-get update && apt-get install foreman-installer
Running the installer
The procedure is initially interactive, allowing changes to the configuration and then the option is given to run Puppet to perform the installation:
ruby /usr/share/foreman-installer/generate_answers.rbAfter Puppet runs, Foreman will be accessible at https://fqdn/ with a default username/password of “admin” and “changeme”.
To complete the installation, log into Foreman, click on More > Configuration > Smart Proxies and add a new proxy with the URL https://fqdn:8443/. This will enable Puppet class imports from your new puppet master.
3.2.2 Installer Options
The installer is a collection of Puppet modules that can be operated using an answers file distributed inside the foreman_installer module. This is located at /usr/share/foreman-installer/foreman_installer/answers.yaml in the foreman-installer packages.
The answers file describes the classes that will be applied to the host to install Foreman. By default, the all-in-one setup will include Foreman, a puppet master and the Smart Proxy:
---
foreman: true
puppet: true
puppetmaster: true
foreman_proxy: true
This can be customized for your site by copying /usr/share/foreman-installer/foreman_installer/answers.yaml to /etc/foreman-installer/answers.yaml and editing. For example, a standalone puppet master and Smart Proxy can use:
---
foreman: false
puppet: true
puppetmaster: true
foreman_proxy: true
Other examples are given in /usr/share/foreman-installer/README.md. The installer itself provides a text driven interface to generate this answers file, and can be run by executing:
ruby /usr/share/foreman-installer/generate_answers.rb3.3 Install From Packages
Packages are available for Red Hat and Debian-based distributions. This will install a standalone Foreman service running under WEBrick, which has limited scalability.
The Puppet-based Foreman installer is recommended for most environments, instead of installing only the packages as it will perform full configuration too.
3.3.1 RPM Packages
We maintain a repository for RHEL and Fedora (and clones) - you may add it via:
Release
-
For RHEL 6 ensure your system is subscribed to EPEL.
For RHEL 5 you will need to be subscribed to both EPEL and the RHEL Virtualization RHN Channel. Also be advised, the Foreman repo will Ruby to 1.8.7 on RHEL 5. This has the potential to break stuff (like passenger, notes on getting it working again below), so be sure you want to proceed before committing to the installation.
http://fedoraproject.org/wiki/EPEL
-
Install the foreman-release.rpm for your version of RHEL or Fedora.
x86_64 architecture:
 yum localinstall http://yum.theforeman.org/releases/1.1/el5/x86_64/foreman-release.rpm
 yum localinstall http://yum.theforeman.org/releases/1.1/el6/x86_64/foreman-release.rpm
 yum localinstall http://yum.theforeman.org/releases/1.1/f16/x86_64/foreman-release.rpm
 yum localinstall http://yum.theforeman.org/releases/1.1/f17/x86_64/foreman-release.rpm
i386 architecture:
 yum localinstall http://yum.theforeman.org/releases/1.1/el5/i386/foreman-release.rpm
 yum localinstall http://yum.theforeman.org/releases/1.1/el6/i386/foreman-release.rpm
 yum localinstall http://yum.theforeman.org/releases/1.1/f16/i386/foreman-release.rpm
 yum localinstall http://yum.theforeman.org/releases/1.1/f17/i386/foreman-release.rpm
- Install foreman and other foreman-* packages to add functionality:
 foreman               Foreman server
 foreman-proxy         Foreman Smart Proxy
 foreman-cli           Foreman CLI utility
 foreman-libvirt       libvirt provisioning support
 foreman-ovirt         ovirt/RHEV provisioning support
 foreman-ec2           EC2 provisioning support
 foreman-vmware        VMware provisioning support
 foreman-console       Console additions
 foreman-mysql         MySQL database support
 foreman-mysql2        MySQL database support
 foreman-postgresql    PostgreSQL database support
 foreman-sqlite        SQLite database support
 foreman-test          Testing support (dependency rpm's not built yet)
 foreman-devel         Development support (dependency rpm's not built yet)
- Configure
 Edit /etc/foreman/settings.yaml and /etc/foreman/database.yml
 su - foreman -s /bin/bash -c /usr/share/foreman/extras/dbmigrate
- Start the foreman service or set up passenger
service foreman start
-
Set up Passenger
On RHEL5 the RPM’s at the URL above will not run after updating ruby. Fortunately it is fairly easy to get it working again. After foreman is installed ensure /usr/sbin is in your path so that the axps binary can be found, otherwise the rpm’s may fail to build while complaining about being unable to find some files. Then do the following:
 yum localinstall http://passenger.stealthymonkeys.com/rhel/5/x86_64/rubygem-daemon_controller-0.2.5-1.noarch.rpm
 wget http://passenger.stealthymonkeys.com/SRPMS/rubygem-passenger-3.0.12-1.src.rpm
 yum-builddep rubygem-passenger-3.0.12-1.src.rpm
 rpmbuild --rebuild rubygem-passenger-3.0.12-1.src.rpm
Development
-
For RHEL 6 ensure your system is subscribed to EPEL.
For RHEL 5 you will need to be subscribed to both EPEL and the RHEL Virtualization RHN Channel. Also be advised, that on RHEL5 the Foreman Repo will update Ruby to version 1.8.7. This has the potential to break stuff (like passenger, notes on getting it working again below), so be sure you want to proceed before committing to the installation.
http://fedoraproject.org/wiki/EPEL
- Install the foreman-release.rpm for your version of RHEL or Fedora
 http://yum.theforeman.org/development/el5/foreman-release.rpm
 http://yum.theforeman.org/development/el6/foreman-release.rpm
 http://yum.theforeman.org/development/f16/foreman-release.rpm
 http://yum.theforeman.org/development/f17/foreman-release.rpm
- Install foreman and other foreman-* packages to add functionality:
 foreman               Foreman server
 foreman-proxy         Foreman Smart Proxy
 foreman-cli           Foreman CLI utility
 foreman-libvirt       libvirt provisioning support
 foreman-ovirt         ovirt/RHEV provisioning support
 foreman-ec2           EC2 provisioning support
 foreman-vmware        VMware provisioning support
 foreman-console       Console additions
 foreman-mysql         MySQL database support
 foreman-mysql2        MySQL database support
 foreman-postgresql    PostgreSQL database support
 foreman-sqlite        SQLite database support
 foreman-test          Testing support (dependency rpm's not built yet)
 foreman-devel         Development support (dependency rpm's not built yet)
- Configure
 Edit /etc/foreman/settings.yaml and /etc/foreman/database.yml
 su - foreman -s /bin/bash -c /usr/share/foreman/extras/dbmigrate
-
Start Foreman
- With the foreman service
service foreman start
- With Phusion Passenger
Passenger packages/repos are available at http://passenger.stealthymonkeys.com/
On RHEL5 the RPM’s at the URL above will not run after updating ruby. Fortunately it is fairly easy to get it working again. After foreman is installed ensure /usr/sbin is in your path so that the axps binary can be found, otherwise the rpm’s may fail to build while complaining about being unable to find some files. Then do the following:
 yum localinstall http://passenger.stealthymonkeys.com/rhel/5/x86_64/rubygem-daemon_controller-0.2.5-1.noarch.rpm
 wget http://passenger.stealthymonkeys.com/SRPMS/rubygem-passenger-3.0.12-1.src.rpm
 yum-builddep rubygem-passenger-3.0.12-1.src.rpm
 rpmbuild --rebuild rubygem-passenger-3.0.12-1.src.rpm
Nightly Builds
Create a /etc/yum.repos.d/foreman-nightly.repo with the following contents:
el5:
[foreman-nightly]
name=foreman-nightly
baseurl=http://yum.theforeman.org/nightly/el5/$basearch
gpgcheck=0
enabled=1

[foreman-nightly-source]
name=foreman-nightly
baseurl=http://yum.theforeman.org/nightly/el5/source
gpgcheck=0
enabled=0
el6:
[foreman-nightly]
name=foreman-nightly
baseurl=http://yum.theforeman.org/nightly/el6/$basearch
gpgcheck=0
enabled=1

[foreman-nightly-source]
name=foreman-nightly
baseurl=http://yum.theforeman.org/nightly/el6/source
gpgcheck=0
enabled=0
f16:
[foreman-nightly]
name=foreman-nightly
baseurl=http://yum.theforeman.org/nightly/f16/$basearch
gpgcheck=0
enabled=1

[foreman-nightly-source]
name=foreman-nightly
baseurl=http://yum.theforeman.org/nightly/f16/source
gpgcheck=0
enabled=0
f17:
[foreman-nightly]
name=foreman-nightly
baseurl=http://yum.theforeman.org/nightly/f17/$basearch
gpgcheck=0
enabled=1

[foreman-nightly-source]
name=foreman-nightly
baseurl=http://yum.theforeman.org/nightly/f17/source
gpgcheck=0
enabled=0
Getting the RPMS
If you just want to get the rpms:
3.3.2 Debian Packages
The Foreman packages should work on the following Debian-based Linux distributions:
Distributions
- Debian Linux 6.0 (Squeeze)
- Ubuntu Linux 12.04 LTS
Foreman might still work on these distros, but it has not been tested (let us know if it works for you):
- Debian Linux 5.0 (Lenny)
- Ubuntu Linux 11.04
- Ubuntu Linux 10.10
If you encounter any errors during the installation, please file a bug report!
Apt Configuration
Add one of the following lines to your /etc/apt/sources.list (alternatively in a separate file in /etc/apt/sources.list.d/foreman.list):
# Stable packages

# Debian Squeeze
deb http://deb.theforeman.org/ squeeze stable
# Ubuntu Precise
deb http://deb.theforeman.org/ precise stable

# RC packages - these will only exist during an Release Candidate phase leading up to a release

# Debian Squeeze
deb http://deb.theforeman.org/ squeeze rc
# Ubuntu Precise
deb http://deb.theforeman.org/ precise rc

# Nightly builds. Beware: HERE BE DRAGONS

# Debian Squeeze
deb http://deb.theforeman.org/ squeeze nightly
# Ubuntu Precise
deb http://deb.theforeman.org/ precise nightly
The public key for secure APT can be downloaded here
You can add this key with
apt-key add pubkey.gpg
or combine downloading and registering:
wget -q http://deb.theforeman.org/pubkey.gpg -O- | apt-key add -
The key fingerprint is
7059 542D 5AEA 367F 7873  2D02 B348 4CB7 1AA0 43B8
Foreman Automatic Signing Key (2014) <packages@theforeman.org>
Remember to update your package lists!
apt-get update
Install packages
The packages are now split by gem dependencies - there are 11 packages to choose from. These are:
Main package:
- foreman
Database gems - you need at least one of these:
- foreman-sqlite3
- foreman-mysql2
- foreman-mysql
- foreman-pgsql
Optional functionality:
- foreman-console
- foreman-compute
- foreman-libvirt
- foreman-ovirt
- foreman-test
- foreman-vmware
Installation instructions are:
# Install packages  (adjust additional packages as needed)
apt-get install foreman foreman-sqlite3 foreman-libvirt

# Copy sample db config to /etc
cp /usr/share/foreman/config/database.yml.example /etc/foreman/database.yml

# Review settings and DB config
vi /etc/foreman/settings.yaml /etc/foreman/database.yml

# Perform initial DB setup
su - foreman -s /bin/bash -c /usr/share/foreman/extras/dbmigrate
The packages should auto-run db:migrate if /etc/foreman/database.yml exists. So the initial db:migrate is only needed during first install, upgrades should just work.
Upgrading from 0.4.2
Upgrading from 0.4.2 to 1.0 has been tested on Debian 6 (32 and 64 bit) and we expect that simply upgrading should work fine
apt-get update
apt-get dist-upgrade
The packages include a db:migrate, so your database will be migrated too. However, please note the new split-package architecture - you may want check and see if any of the new dependencies fit your usecase(s).
apt-cache search foreman
Upgrading from 1.0
Upgrading from 1.0 to 1.1 has been tested on Debian 6 (32 and 64 bit) and on Ubuntu 12.04 (32 and 64 bit). The only notable packaging change is that the packages are now self-sufficient - they no longer call out to Github/Rubygems during the postinst. This should be upgrade-safe (and has been tested) but odd environments may affect the upgrade. If in doubt, ask in IRC.
Please note foreman-fog has been renamed to foreman-compute - this should happen transparently through Apt
3.4 Install From Source
Installing the latest development code: Foreman has now moved to using Rails 3 and Bundler to get up and running. This is the preferred way to get Foreman if you want to benefit from the latest improvements. By using the git repository you can also upgrade more easily. You will need to have Bundler installed manually for now (check your distribution repositories, or install it via rubygems).
Foreman will run with the following requirements (aside from rubygem dependencies):
- Ruby 1.8.7 or 1.9
- rubygems
- Puppet >= 0.24.4
The installation has been successfully tested on RHEL[5,6], Fedora[13,14,15,16,17], Debian Linux 6.0 (Squeeze) and Ubuntu Linux 12.04 (the community has reported varying success with other Debian/Ubuntu versions - 12.10 seems fine for example). For older operating systems you might need additional packages (e.g. sqlite). It is also known to work on Solaris and Mac.
to get latest “development” version do:
You will want to make sure that you have one of the mysql-devel, postgresql-devel, and sqlite-devel libraries installed so the database gems can install properly. also, you would also need gcc, ruby-devel, libxml-devel, libxslt-devel, and libvirt-devel packages
Additionally, it is important that config/database.yml is set to use
the correct database in the “production” block. Rails (and subsequently
Foreman) will use these connection settings under “production” to manage
the database it uses and setup the necessary schema.
git clone https://github.com/theforeman/foreman.git -b develop
cd foreman
# must have the bundler gem installed -- gem install bundle
bundle install --without mysql mysql2  sqlite test --path vendor # or postgresql
cp config/settings.yaml.example config/settings.yaml
cp config/database.yml.example config/database.yml
RAILS_ENV=production bundle exec rake db:migrate # (to set up database schema)
You can run Foreman with the command ”./script/rails s -e production”
Latest stable version
to get latest “stable” version do:
git clone https://github.com/theforeman/foreman.git -b 1.0-stable
cd foreman
git submodule init
git submodule update
If you are behind a proxy or firewall and don’t have access to Github using the git protocol, use http protocol instead:
git clone https://github.com/theforeman/foreman.git foreman
cd foreman
sed -i 's/git:\/\//http:\/\//g' .gitmodules
git submodule init
git submodule update
3.5 Configuration
The following sections detail the configuration steps required to get Foreman working in your environment. Lets get started!
3.5.1 Initial Setup
Configuration
Foreman configuration is managed from two places; a configuration file config/settings.yaml and from the SETTINGS/Foreman Settings page. A full description of the configuration options is given at foreman_configuration
Database
Foreman uses a database, this database can be shared with Puppet store-configs (they are compatible, as Foreman extends the puppet database schema). By default, SQLite is used, if you want to use other database (e.g. MySQL) please modify the configuration file under config/database.yml.
If you want to share the database with Puppets (storeconfig), just modify config/database.yml to point to the same database configuration as puppet is.
In both cases, please use the production settings.
to initialize the database schema type:
cd (foreman installation path) && RAILS_ENV=production rake db:migrate
On foreman 1.0 use bundle:
cd (foreman installation path) && RAILS_ENV=production bundle exec rake db:migrate
For more information please see the database configuration page here
Import Data from Puppet
At this point, you might want to go through the [[FAQ]] to see how can you import your data into Foreman.
Start The Web Server
if you installed via rpm, just start the foreman service, or start the builtin web server by typing:
RAILS_ENV=production rails server
and point your browser to http://foreman:3000
If you would like to keep the server running, its recommend to setup passenger or use the RPM. Example usage with passenger can be found on GitHub.
Getting your Puppet Reports into Foreman
Read Puppet_Reports to learn how to get your nodes to report to Foreman.
3.5.2 Configuration Options
Configuration is broken into two parts. The config/settings.yaml file and the SETTINGS/Foreman Settings page. The configuration file contains a few low-level options that need to be set before Foreman starts but the majority of Foreman customization is managed from within the program on the Foreman Settings page.
The config/settings.yaml file
YAML start
The first non-comment line of this file must be three dashes.
---
login
This boolean option configures whether Foreman requires users to to login. If it is set then each user will be expected to authenticate themselves and all operations will occur, and be audited, under their identity. When this option is false then all activity will be executed under the admin account.
:login: true
require_ssl
This boolean option configures whether Foreman insists on using only https/ssl encrypted communication channels in the web interface. This does not configure the channels used to contact the smart-proxies. Note that certain operations will still accept a http connection even if this is set, for example, the downloading of a finish script.
:require_ssl: true
unattended
This boolean option configures whether Foreman will act as a simple node classifier for puppet, or support the full spectrum of operations required for managing a host’s lifecycle. When set to true then foreman will provide full host building facilities for various operating systems.
:unattended: true
The ‘More/Settings’ page
administrator
When Foreman needs to mail the administrator then this is the email address that it will contact.
Default: root@
default_puppet_environment
When Foreman receives a fact upload from a machine that it has not previously come across it will create a host in its database. If the facts from that host did not contain information about the puppet environment then it will assign the default_puppet_environment environment to this host. Default: production
Default_variables_Lookup_Path
A Smart-variable’s match criteria are evaluated in a specific order and if this search order is not provided then Default_variables_Lookup_Path is used. Default: [“fqdn”, “hostgroup”, “os”, “domain”]
document_root
This is the directory into which the rake puppet:rdoc:generate task will place the web-based on-line documentation for your puppet classes. It should be under a web server’s control and the default location is served by Foreman’s own web server. Default: public/puppet/rdoc
email_reply_address
The return address applied to outgoing emails. Default: Foreman-noreply@<your domain>
Enable_Smart_Variables_in_ENC
Whether Smart-variables should be included in the yaml node information provided to puppet. Default: true
entries_per_page
The number of entries that will be shown in the web interface for list operations. Default: 20
failed_report_email_notification
If this option is set to true then an email will be sent to the host’s owner whenever a report is received that contains errors. If the host is not owned or Foreman is not configured to use logins then send the email to the administrator. Default: false
foreman_url
Emails may contain embedded references to Foreman’s web interface. This option allows the hostname component of the URL to be configured.
Default: foreman.
ignore_puppet_facts_for_provisioning
If this option is set to true then Foreman will not update a host’s IP and MAC with the values that it receives in a host’s facts and it will also include Foreman’s values for IP and MAC to puppet in its node information. Default: false
manage_puppetca
If this option is set to true then Foreman will manage a host’s Puppet certificate signing. If it is set to false then some external mechanism is required to ensure that the host’s certificate request is signed. Default: true
modulepath
This it the modulepath that foreman uses when processing puppet modules. It is usually able to determine this itself at runtime but if it is not able to find a value then modulepath is used. Default: /etc/puppet/modules
puppet_interval
This is the number of minutes between each run of puppet. Default: 30
puppet_server
The default puppet server hostname. For larger organizations this is often a non fqdn so that a name like puppet can be a different host within each DNS domain. Default: puppet
puppetconfdir
Path to puppet.conf. Default: /etc/puppet/puppet.conf
puppetrun
If this option is set to true then Foreman will be able to trigger a puppet run on any host that it manages. Default: false
root_pass
If a root password is not provided whilst configuring a host then this encrypted password is used when building the machine. The plain text password “123123” has been encrypted to produce the default value. Default: xybxa6JUkz63w (To generate a new one you should use: openssl passwd “your_password” )
safemode_render
The default templating system used within Foreman allows unlimited interpolated variables and expressions. This could obviously be abused so a evaluation environment is provided that restricts the template variables and expressions to a whitelist. When this option is true then only known helper methods and instance variables will be available in template expansion. Default: true
ssl_ca_file
The SSL Certificate Authority file that Foreman will use when connecting to its smart-proxies. Default: The CA file used by puppet
ssl_certificate
The SSL certificate that Foreman will use when connecting to its smart-proxies. Default: The host certificate used by puppet
ssl_priv_key
The SSL private key file that Foreman will use when connecting to its smart-proxies. Default: The private key file used by puppet
update_environment_from_facts
If Foreman receives an environment fact from one of its hosts and if this option is true, it will update the host’s environment with the new value. By default this is not the case as Foreman should manage the host’s environment. Default: false
using_storeconfigs
Set this option to true if your Foreman installation shares puppet’s storeconfig database. Default: true if puppet uses store configs otherwise false.
3.5.3 Database Setup
Foreman is a rails application. Therefore, anything that is supported under RAILS (sqlite, mysql, postgresql, …) can be used. See 3.3 Install From Packages for a list of packages for connecting foreman to the databse of your choice. At this time, Oracle DB is known to not work. Patches are welcome!
The database configuration file can be found at:
/etc/foreman/database.yml
SQLite (default)
By default, the database will be created in the db subdirectory.
production:
  adapter: sqlite3
  database: db/production.sqlite3
  pool: 5
  timeout: 5000
MySQL
Edit your config/database.yml and modify:
production:
  adapter: mysql
  database: puppet
  username: puppet
  password: password
  host: localhost
  socket: "/var/run/mysqld/mysqld.sock"
If you use foreman 1.0 with foreman-mysql2 use ‘adapter: mysql2’ instead
Afterwards you would need to re-populate your database, simply execute extras/dbmigrate script.
PostGreSQL
Edit your config/database.yml and modify:
production:
  adapter: postgresql
  database: foreman
  username: foreman
  password: password
  host: localhost
Switching from SQLite to MySQL/PostgreSQL while maintaining existing data
We have a rake task for this. First setup your database.yml to have the sqlite db as production and the mysql/psql db as dev:
production:
  adapter: sqlite3
  database: db/production.sqlite3
  pool: 5
  timeout: 5000

development:
  adapter: postgresql
  database: foreman
  username: foreman
  password: password
  host: localhost
Now migrate both dbs so they’re consistent:
bundle exec rake db:migrate RAILS_ENV=production
bundle exec rake db:migrate RAILS_ENV=development
Now move the data to the new db
bundle exec rake db:convert:prod2devOnce you’ve migrated to your new database using prod2dev, you should update your database.yml file to point your ‘production’ environment at the new database. You should also update the ‘development’ environment to point to an alternative location (for example, at SQLite) to ensure you don’t accidentally overwrite your production database.
Special note for migrating to Postgres
The psql sequence numbers will be wrong after the prod2dev execution. You can fix them like this:
cat <<EOF > reset.sql
SELECT  'SELECT SETVAL(' ||quote_literal(S.relname)|| ', MAX(' ||quote_ident(C.attname)|| ') ) FROM ' ||quote_ident(T.relname)|| ';'
FROM pg_class AS S, pg_depend AS D, pg_class AS T, pg_attribute AS C
WHERE S.relkind = 'S'
    AND S.oid = D.objid
    AND D.refobjid = T.oid
    AND D.refobjid = C.attrelid
    AND D.refobjsubid = C.attnum
ORDER BY S.relname;
EOF
psql -Atq -f reset.sql -o temp foreman
psql -f temp foreman
rm temp reset.sql
(big thanks to Fixing Sequences for the fix)
3.5.4 Puppet Reports
Foreman uses a custom puppet reports address (similar to tagmail or store) which Puppet will use to upload it’s report into Foreman. This enables you to see the reports through the web interface as soon as the client finish its run.
Configuration
Client
Ensure that the puppet clients has the following option in their puppet.conf:
report = true
Without it, no reports will be sent.
puppetmaster
- copy https://raw.github.com/theforeman/puppet-foreman/master/templates/foreman-report_v1.rb.erb to your report directory
- e.g. /usr/lib/ruby/1.8/puppet/reports/foreman.rb or /usr/lib/ruby/site_ruby/1.8/puppet/reports/foreman.rb or /var/lib/gems/1.8/gems/puppet-2.6.4/lib/puppet/reports/foreman.rb
- make sure you copied the foreman-report_v1.rb.erb to foreman.rb so puppet can find it!
- open the new file with your favorite editor
- edit the URL to point to foreman.
- add this report in your puppetmaster reports - e.g, in your master puppet.conf under the main section add:
reports=log, foreman
and restart your puppetmaster
You should start seeing reports coming in under the reports link.
Expire Reports automatically
You will probably want to delete your reports after some time to limit database growth. To do so, you can set a cronjob:
Available conditions:
- days => number of days to keep reports (defaults to 7)
- status => status of the report (defaults to 0 –> “reports with no errors”)
Example:
- Expires all reports regardless of their status
rake reports:expire days=7 RAILS_ENV="production"
- expires all non interesting reports after one day
rake reports:expire days=1 status=0 RAILS_ENV="production"
Note: on Debian systems, these commands must be run as the foreman user from its default home directory.
3.5.5 Importing Facts
There are several ways you can get your facts visible in Foreman.
Recommended Approach: Using the ENC
If you are planning using Foreman as your Puppet External Nodes Classifier, the recommended approach would be using the ENC script, which both updates your facts, and fetch the information at the same time. If you are not using the ENC features, the ENC script will still serve as an example of how to upload facts via an HTTP POST request. See Pushing facts through HTTP for another example.
Running Foreman on the puppetmaster
If you run Foreman on the same machine as your puppetmaster and you have only one puppet master, you probably want to create a simple cronjob:
rake puppet:import:hosts_and_facts RAILS_ENV=production
This will import your facts (only new facts) every time you run the script.
Multiple puppet masters or Foreman on another server
Pushing facts through HTTP directly to Foreman
Foreman accepts remote puppetmaster sending their nodes facts through http, making it effective way to send facts over WAN.
This script is meant to run on each of your puppetmasters. The script will scan over all of the new fact files (from its last run) and will send them to foreman.
You will need to edit the script and set the Foreman URL (based on where Foreman is located in your setup).
You should run this script in a cronjob, if you have many puppet masters, you might consider adding a simple sleep argument (as mentioned inside the script header), this will avoid all of your puppetmasters hammering your database at the same time.
Using Puppet Storeconfigs
Missing facts when using storeconfigs
If nodes are finishing their catalog runs, although the hosts operating system description is missing. Ensure that your /etc/puppet/puppet.conf contains the dbadapter under the [master] section. Add the following and either wait for a node to check in again, or manually run it with puppetd –test for this information to be updated.
/etc/puppet/puppet.conf
[master]

  storeconfigs=true
  dbadapter=mysql
  dbuser= puppetuser
  dbpassword= puppetpass
  dbserver= mysql.domain.com
local file system access to fact yaml files
The previously mentioned rake task accepts a dir parameter, which means you can tell it to import facts from any directory. if you store your fact yaml on some network share, or if you want to mount your puppetmaster you can:
rake puppet:import:hosts_and_facts dir=/my/dir/with/yaml/files RAILS_ENV=production
However, I would not recommend this option if you have any network latency or if it requires you to run an NFS (or sshfs) etc
4. General Foreman
This section covers general information on using Foreman to manage your infrastructure. It covers the features of the web interface, managing puppet, provisioning systems and the installation and configuration of Foreman Smart Proxies.
4.1 Web Interface
4.1.1 LDAP Authentication
Foreman natively supports LDAP authentication using one or multiple LDAP directories.
Enabling LDAP
Enable LDAP and User/Group settings menus
Edit your config/setting.yml
:login: true
and restart Foreman
Setting up
Go to More > Users > LDAP Authentication
Click on New LDAP Source and enter the following
- Name: an arbitrary name for the directory
- Host: the LDAP host name
- Port: the LDAP port (default is 389)
- LDAPS: check this if you want or need to use LDAPS to access the directory
- Account: leave this field empty if your LDAP can be read anonymously, otherwise enter a user name that has read access to the LDAP or use $login (which will be replaced with the actual user credentials upon login)
- Account Password: password for the account (if defined above and its not using the $login)
- baseDN: the top level DN of your LDAP directory tree
On the fly user creation
By checking On-the-fly user creation, any LDAP user will have his Foreman account automatically created the first time he logs into Foreman. For that, you have to specify the LDAP attributes name (firstname, lastname, email) that will be used to create their Foreman accounts.
Examples
Active Directory
Name              = My Directory
Host              = host.domain.org
Port              = 636
TLS               = yes
Onthefly register = yes
Account           = MyDomain\$login
Password          = (leave blank)
Base DN           = CN=users,DC=host,DC=domain,DC=org
attr login        = sAMAccountName
attr firstname    = givenName
attr lastname     = sN
mail              = mail
OpenLDAP
Name              = My Directory
Host              = host.domain.org
Port              = 389
TLS               = no
Onthefly register = yes
Account           = (leave blank if anonymous access is enabled)
Password          = (leave blank)
Base DN           = ou=Users,dc=domain,dc=co,dc=il
attr login        = uid
attr firstname    = givenName
attr lastname     = sn
mail              = mail
Note that LDAP attribute names are case sensitive.
Troubleshooting
If you want to use on-the-fly user creation, make sure that Foreman can fetch from your LDAP all the required information to create a valid user. For example, on-the-fly user creation won’t work if you don’t have valid email addresses in your directory (you will get an ‘Invalid username/password’ error message when trying to log in).
4.1.2 Roles and Permissions
A user’s access to the features of Foreman are constrained by the roles and permissions that they are granted. These permissions are also used to restrict the set of hosts, host groups and domains that a user is able to access and modify.
Note: a user with global admin enabled is not restricted by the authorization system. This is the default for installations that do not have :login:true in config/settings.yml.
A logged in user will be granted the Anonymous role plus one or more additional roles. The permissions associated with these roles are aggregated and determine the final permission set.
Roles may be administered only by a user with global admin privileges.
Roles
These may be created, deleted and edited on the Roles page. Each role will be associates with one or more base privileges.
There are two builtin system roles
- Anonymous: This is a set of permissions that every user at your installation will be granted, irrespective of any other roles that they have.
- Default user: When a new Role is created this set of permissions are used as the template for the Role. The name is somewhat misleading but basically an ordinary default user who was assigned this Role would have these permissions set.
Permissions
These determine the operations that are allowed to be performed upon the items to which they refer. For simple items, like an architecture, this operates as expected but for more complex items, such as, the hosts a user is able to operate on, there is an additional layer of security called filtering.
When editing a user account there is a section at the bottom that narrows the scope of the permissions granted to a subset of the hosts, domains and host groups. See filtering below.
| Permission | Description |
|---|---|
| Permissions for Architectures, Authentication providers, environments, External variables, Common parameters, Medias, Models, Operating systems, Partition tables, Puppet classes and User groups | |
| view | The user is allowed to see this type of object when listing them on the index page |
| create | The user is allowed to create this type of object |
| edit | The user is allowed to edit this type of object |
| destroy | The user is allowed to destroy this type of object |
| Permissions for Domains | |
| view | The user is allowed to see a list of domains when viewing the index page |
| create | The user is allowed to create a new domain and will also be able to create domain parameters |
| edit | The user is allowed to edit a domain and will also be able to edit a domain's parameters. If they have domain filtering active in their profile then only these domains will be editable |
| destroy | The user is allowed to destroy a domain and will also be able to destroy domain parameters. If they have domain filtering active in their profile then only these domains will be deletable |
| Permissions for Host groups | |
| view | The user is allowed to see a list of host groups when viewing the index page |
| create | The user is allowed to create a new host group and will also be able to create host group parameters |
| edit | The user is allowed to edit a host group and will also be able to edit a host group's parameters. If they have host group filtering active in their profile then only these host groups will be editable |
| destroy | The user is allowed to destroy a host group and will also be able to destroy host group parameters. If they have host group filtering active in their profile then only these host groups will be deletable |
| Permissions for Hosts | |
| view | The user is allowed to see a list of hosts when viewing the index page. This list may be constrained by the user's host filters |
| create | The user is allowed to create a new host. This operation may be constrained by the user's host filters |
| edit | The user is allowed to edit a host. This operation may be constrained by the user's host filters |
| destroy | The user is allowed to destroy a host. This operation may be constrained by the user's host filters |
| Permissions for Users | |
| view | The user is allowed to see a list of users when viewing the index page. A user will always be able to see their own account even if they do not have this permission |
| create | The user is allowed to create a new user |
| edit | The user is allowed to edit existing users. A user will always be able to edit their own basic account settings and password |
| destroy | The user is allowed to delete users from the system |
Filtering
If the filtering section at the bottom of the user’s profile page has no content then the permissions that the user has been granted will apply to all hosts within the system.
However, if the filtering section is in use then the permissions will apply only to those items selected in the filters and the user will have no access to anything not selected by the filters.
This is primarily a mechanism for restricting access to hosts. However if one or more domains or host groups are selected then this also restricts where parameters can be created, edited and deleted.
Filtering operates by generating a list of hosts on which actions can be performed. The list may be built out of four components
-
Ownership: The hosts that a user owns directly or hosts that are owned by a user group of which the user is a member.
-
Domain membership: The hosts that exist within one or more indicated domains.
-
Host group membership: The hosts that are defined as being of one or more host group types.
-
Fact filtering: These restrict the hosts to those machines that have this fact associated with them. As a fact is only generated during a puppet run, this filter will only refer to machines that have been built and therefore cannot be used to restrict the creation of machines.
These four pools of hosts can be combined by adding them together or the filters can be used to restrict the selected hosts to a smaller and smaller subset of the total. Think of it as set operations.
Note: If the “Administrator” check box is checked for a user, filtering will not take effect.
Example
A user’s filter section has the select checkbox unticked, indicating that the user’s owned hosts are not included in the final set of hosts, (unless they are selected some other way.)
The domain selection is prefixed with plus all and the two domains a.com and b.com are ticked. This implies that the hosts selected are the user’s hosts, (of which there are none,) plus all the hosts in a.com and b.com.
The host group section is prefixed by must be and the hostgroup web server is selected. This implies that the hosts selected are the user’s hosts, (of which there are none,) plus all the hosts in a.com and b.com but they must be of type web server.
The fact filter section is prefixed by must match and there are two filters virtual = vmware and architecture = i386. This implies that the hosts selected are the user’s hosts, (of which there are none,) plus all the hosts in a.com and b.com but they must be of type web server and must match an i386 vmware host.
In any of these sections above, if the prefix had been plus all then every host in the system that matched the selections would have been added to the final host list, (though possibly removed by a later filter.)
4.1.3 Trends
Trends in Foreman allow you to track changes in your infrastructure over time. It allows you to track both Foreman related information and any puppet facts. The Trend pages give a graph of how the number of hosts with that value have changed over time, and the current hosts list.
There are two pieces to the Trends area, the Trends to track and their corresponding counters. To define trend counters, use the “Add Trend Counter” button on the ‘/trends’ page. Optionally set the “Name” field to over-ride odd puppet fact names to be more readable. Once created you can optionally ‘Edit’ the Trend to change the display names of the underlying values.
Next, to start collecting trend data, set a cron job to execute ‘rake trends:counter’. Each time the rake task executes it will create 1 tick on the graphs, so you can fine tune the granularity with your cron job. We recommend using the same as your puppet run interval (30 minutes). Here’s an example to run once per hour:
0 * * * * cd /usr/share/foreman/ && /usr/bin/rake trends:counterFinally note that these trends are the same for all users. So if you delete a Trend category you will loose all history for that trend and the trackers will start all over again. So please be careful when deleting.
4.1.4 Auditing
Foreman supports auditing of almost all changes that happen within Foreman, from both the UI and from the API. Auditing is done at a user level, and is thus ineffective if :login: is set to false, as all audits will be done as the ‘admin’ user.
Basic View
Got to the Audit tab to see a view of what has changed. This view can be filtered by the type of change or by the object that was altered (e.g. search for a hostname to see all changes relating to that host). You also get the parent object - so if a parameter was modified, you can see what host/group that parameter belongs to. The timestamp of the change and the user who performed it will be listed.
Extended Audits for Templates
Template changes also store a diff of the changes, and the ability to roll back to a previous version of the template.
4.2 Managing Puppet
In this section we’ll look at the various ways we can control and interact with Puppet.
4.2.1 Environments
Puppet environments are mapped directly into Foreman. They can be used at various levels throughout the Foreman interface. Puppet environments are generally used to separate classes from different types of Host, typically allowing changes to a module to tested in one environment (e.g. development) before being pushed to another (e.g production).
Defining Environments
There are several ways to create Puppet environments within Foreman.
Manual creation
To create an environment by hand, simply go to More > Configuration > Environments and click New Environment. Give the new environment a name and save.
Importing from Puppet
Foreman can detect all the environments and classes contained on a PuppetMaster, and import them automatically. To do this, go to More > Configuration > Environments and click on *Import from
Assigning Environments to Hosts
This is done from the Host Edit page, on the Host tab. Selecting an environment will filter the classes visible on the Puppet Classes tab to just the classes in the selected environment.
You can also also mass-assign an environment to a group of hosts - tick the checkboxes of the required Hosts in the Hosts index, and then select Change Environment from the buttons at top of the page.
Environments with Hostgroups
You can assign an environment to a hostgroup as well. This functions as a form of default - a user creating a new host and selecting the hostgroup will automatically have the environment pre-selected. The user is not prevented from changing the environment of the new host, it simply saves a few clicks if they are happy with it.
4.2.2 Classes
Puppet classes are generally imported from the Puppet Master(s) via the Import button on the Puppet Classes page. They can also be created by hand, and manually associated with a set of environments (for filtering purposes).
Importing Classes
Go to More > Configuration > Puppet Classes and click the Import button. This will not be visible unless you have at least one Puppet Master with a puppet-enabled Smart Proxy
Ignoring classes on import
It’s often to have a module structure like this:
$ tree git/
git/
└── manifests
    ├── init.pp
    ├── install.pp
    ├── params.pp
    └── repo.pp
In this situation, Foreman would offer to create:
git
git::install
git::params
git::repo
However, if we know that the subclasses are not intended for direct consumption, but are only really part of the internal structure of the module, then we would want to exclude those from the import mechanism, so that Foreman only offers to import git. We can achieve this via the file config/ignored_environments.yml. This file takes a set of regular expressions - any class which matches one of them will not be imported. So, for this example, we might configure:
:filters:
  - !ruby/regexp '/install$/'
  - !ruby/regexp '/params$/'
  - !ruby/regexp '/repo$/'
Assigning Classes to Hosts
To cause Puppet to apply your classes, you will need to assign them to your Hosts. This can be done at either an individual host level, or at a group level. The process is the same; edit the Host(group), select an Environment, and then go to the Puppet Classes tab and select what classes you want in this Host(Group).
Checking the results
To see how Foreman is passing the classes to Puppet, go to a Host and click the YAML button. You will be shown the exact YAML data sent to the PuppetMaster - the classes will be in the “classes” hash.
4.2.3 Parameters
Foreman’s concept of parameters maps onto Puppet’s idea of default-scope parameters. Foreman allows us to define a hierarchy of parameter inheritance.
Global Parameters
These are defined in More > Configuration > Global Parameters and will apply to every host in Foreman.
Domain Parameters
These are defined for all Hosts in a given domain. Edit the domain from More > Provisioning > Domains and switch to the Parameters tab and specify a parameter. If it has the same name as a Global Parameter, it will override the Global one.
Hostgroup Parameters
These are defined for all Hosts in the Group. Edit the Hostgroup from More > Configuration > Host Groups and switch to the Parameters tab and specify a parameter. If it has the same name as a Global or Domain Parameter, it will override it.
Host Parameters
The final (most-specific) level of Parameters applies only to a single Host. Edit a Host and switch to Parameters, and you will see all it’s inherited parameters from the other three layers (note: they will all be marked as “Scope: Global” as this refers to the Puppet scope, not the Foreman scope). You can override higher-level parameters or define new ones here.
Checking the results
To see how Foreman is passing the parameters to Puppet, go to a Host and click the YAML button. You will be shown the exact YAML data sent to the PuppetMaster -the parameters will be in the “parameters” hash.
4.2.4 Smart Variables
Smart variables are a tool to provide data (Key / Value), normally to your puppet ENC, depending on a set of rules. They are intended to be a stepping stone to full parameterized classes.
Smart variable is usually associated with a puppet class, and may have multiple values, all depending on hierarchical context or various conditions a user can wish to apply.
for example:

Creating a Smart Variable
Start by going to Foreman > More > Puppetclasses and then click one of your classes to edit it.
Click on the Smart Variables tab. If you have any existing Smart Variables, they will be listed at the left side of the tab.
Click New Variable, and you will be presented with a set of input fields:
| Name | What the parameter will be called in the ENC data |
| Description | A free form text box for your own information |
| Default Value | What the ENC will use if no other criteria is matched |
| Type Validator | A combo-box of data types. The type applies to the next field, the validator |
| Validator Constraint | Used to enforce certain values for the Smart Variable. See below for examples |
| Order | A list of variables which Foreman will search (in order) for the validator |
Once you’ve created the defaults for your Smart variable, you then need to add at least one criterion to match against - click the “plus” under your variable, and two more input fields will appear:
| Match | Should state a name = value relationship that Foreman use to match against the entries in searchlist |
| Value | What the parameter should be in the ENC, if this rule is matched |
Validators
The fourth and fifth fields in the Smart Variable combine to produce a validation criteria for the final value of the Smart Variable.
String validators
At present, the string type cannot be validated - leave the validator field blank, and all strings in the variable will be considered acceptable
Regexp / List validators
By entering a list (comma-separated, no spaces) or a regex (no delimiter required), the value to be assigned to the Smart Variable will be checked against this list. If the value does not match the validator, and error will be raised.
Ordering
All the ordering information is stored in the sixth field of the Smart Variable (order). The order matters and is used to find the first match.
Examples
Example 1 - Simple change to a single host
All our hosts use server.foo for something, except bob.domain.com which uses server2.bar:
| Name | target |
| Description | The target server to talk to |
| Default Value | server.foo |
| Type Validator | string |
| Validator Constraint | |
| Order | fqdn hostgroup os domain |
| Match | fqdn = bob.domain.com |
| Value | server2.bar |
Example 2 - Change for a group of hosts (via custom fact) with validation and ordering
Most hosts need to use a port of 80 but all machines with a fact region and value europe need to use 8080. To do this, you have to add the factname (in this example region) to the searchlist:
| Name | port |
| Description | The port to use |
| Default Value | 80 |
| Type Validator | list |
| Validator Constraint | 80,443,8080 |
| Order | fqdn region hostgroup os domain |
| Match | region = europe |
| Value | 8080 |
| Match | fqdn = foo.domain |
| Value | 67 |
Note that all machines will get either 80 or 8080 as required, except foo.domain which will generate an error, since 67 is not in the list validator. Note also that foo.domain will match before region, since it is higher in the searchlist. The rule ordering does not matter.
It is also possible to mix conditions, e.g.
| Name | port |
| Description | The port to use |
| Default Value | 80 |
| Type Validator | list |
| Validator Constraint | 80,443,8080 |
| Order | fqdn region, hostgroup, environment hostgroup environment domain |
| Match | fqdn = foo.domain |
| Value | 67 |
| Match | region = europe, hostgroup = "web servers", environment = production |
| Value | 8080 |
API usage
It’s also possible to retrieve these values if you’re not using a ENC, via a custom Puppet function or a http request.. You’ll need to retrieve the value from
https://foreman/hosts/<fqdn>/lookup_keys/<key>
You can find a ready-made function for your puppet module here
4.2.5 Parameterized Classes
Parameterized Class Support (PCS) permits detecting, importing, and supplying parameters direct to classes which support it, via the ENC.
Requirements
- Foreman 1.1+
- Foreman-Proxy 1.1+
- Puppet 2.6.5+
Setup
Firstly, you’ll need to enable the PCS support. Go to More > Settings, select the Puppet tab, and ensure Parameterized_Classes_in_ENC is set to true.

Now you’ll need to import some parameterized classes from your puppet master. If you don’t have any parameterized classes in your modules dir, the foreman-installer has several, you can download a few modules from the Puppet Forge. Once you have some parameterized modules, import your classes (see 4.2.2 Classes)
Configure a class
This example will work with the foreman class from the installer. Click on the class, and you should get a page with 3 tabs, like so:
The middle tab, “Smart Class Parameter”, is the important one. Click onto that, and you should see something like this:
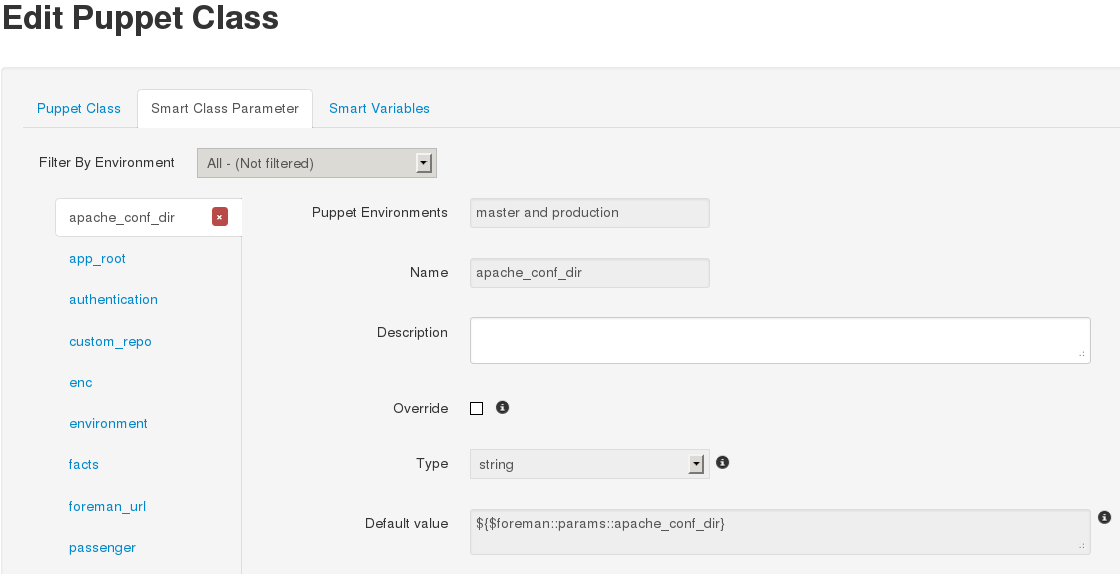
On the left, we have a list of possible parameters that the class supports. On the right, we have the configuration options for the parameter selected.
Lets configure the foreman class to change the user the foreman processes run as. Select the user parameter, at the end of the list. Now lets go through the options:
- Puppet Environments / Name
- These can’t be edited, they’re just for information.
- Description
- Purely information textbox for making notes in. Not passed to puppet, or reused anywhere else
- Override (important)
- If this is unchecked, Foreman will not attempt to control this variable, and it will not be passed to Puppet via the ENC.
- Type
- The type of data we want to pass. Most commonly a string, but many other data types are supported. There’s no easy way to tell what type of data puppet is expecting, so you will need to read through the code/documentation that comes with a particular module to find out
- Default Value
- This will be imported from puppet initially, but if puppet is using any class inheritance, you’ll get something unhelpful like “${$foreman::params::user}”. This is because Foreman won’t follow the inheritance, so you’ll need to set a sensible default value
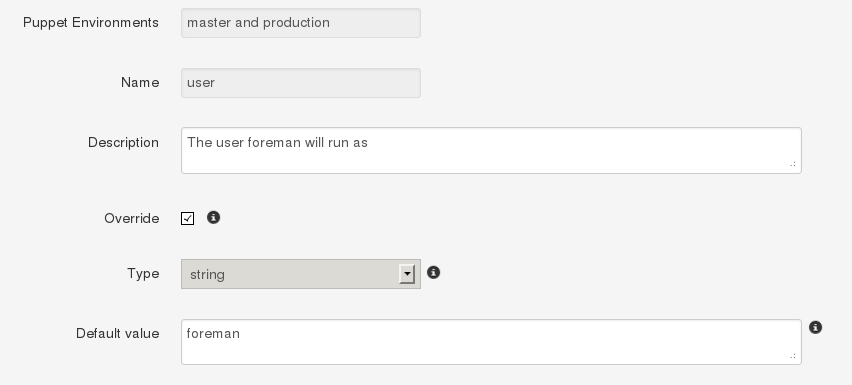
Ok, so let’s configure our user parameter. We want to tick Override, set type to “String” and set the default value to “foreman”, like so:
Setting up Matchers
We’ve configured the default, but that’s not very useful. We need to be able to override the default for hosts or groups of hosts. To do that we need the “Override Value For Specific Hosts” section at the bottom of the page.
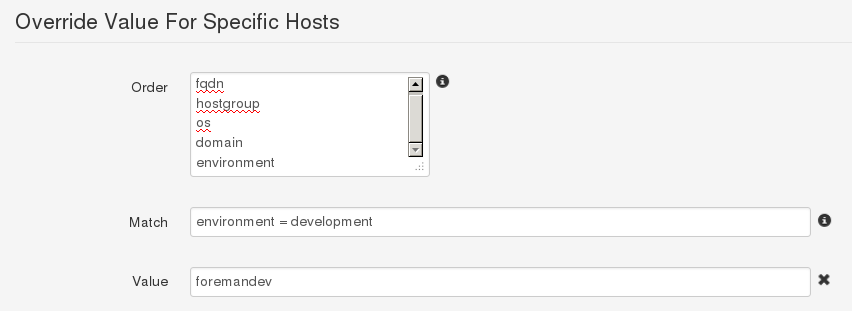
Let’s say that any machine in the “development” puppet environment should use a value of “foremandev” instead of “foreman” for the “user” parameter. Add “environment” to the end of the matchers list, then click the “New Matcher-Value” button, and fill it out like this:
This is a basic configuration - for more complex examples of using matchers, see the 4.2.4 Smart Variables page.
Complex Data
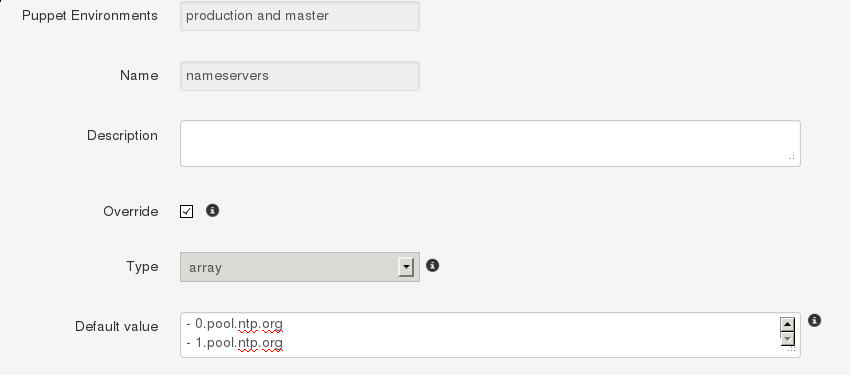
Here’s an example of adding an array parameter. Note the use of YAML in the editbox:
This will be converted to the normal [“a”,”b”] syntax when you save. You can also use Hashes, YAML or JSON as data types too.
Editing Param from within a Host
If Foreman manages the value of a class parameter (“override = true”), it’s also possible to update a host-specific override from the host itself. That way you don’t have to grant access to the Puppet Classes page to everyone. From a Host, click Edit, go to the Parameters tab, and you’ll see the variable, the class-scope, and the current value. You can then override the value for that host:
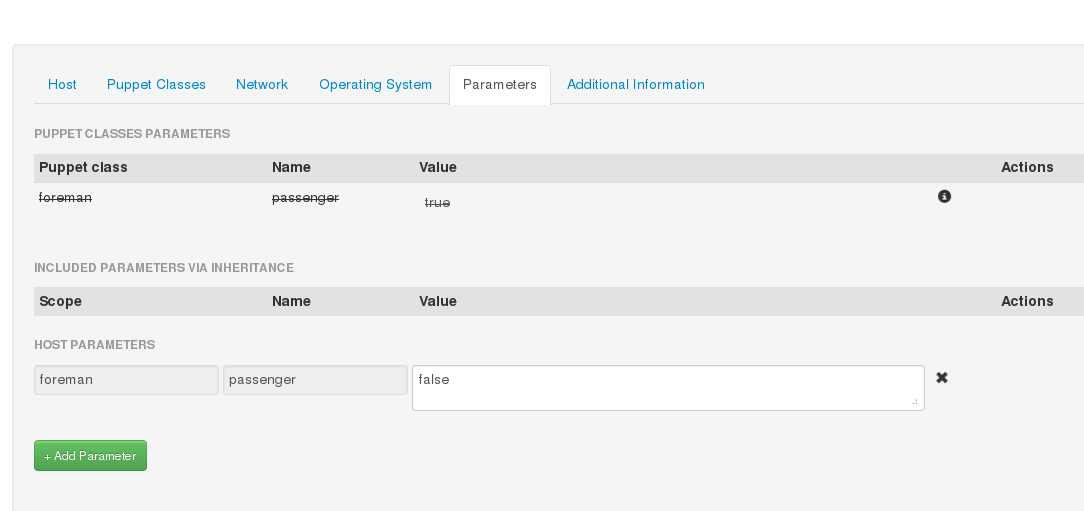
If you go back and look at the Puppet class, you’ll see Foreman has added a matcher for that host:

Currently this only works for Hosts, not Hostgroups. For more complex logic, like matching on facts, use the Puppet Class page
Input Validation
The “Optional Input Validator” section can be used to restrict the allowed values for the parameter. This functions in the same way as for Smart Variables, but it is important to note that the validation applies to changes made from the Host edit page as well as the Puppet Classes edit page.
For example, to restrict the “user” field to either “foreman” or “foremandev”, tick the Required checkbox, and then set:
- Type: List
- Rule: foreman,foremandev
4.3 Smart Proxies
The Smart Proxy is a project which provides a restful API to various sub-systems.
Its goal is to provide an API for a higher level orchestration tools (such as Foreman). The Smart proxy provides an easy way to add or extended existing subsystems and API’s.
Currently supported (Click on the links below for more details).
- DHCP - ISC DHCP and MS DHCP Servers
- DNS - Bind and MS DNS Servers
- TFTP - any UNIX based tftp server
- Puppet - Any Puppet server from 0.24.x
- Puppet CA - Manage certificate signing, cleaning and autosign on a Puppet CA server
If you require another sub system type or implementation, Please add a new feature request.
After you got it running, You would need to configure each one of the sub systems via the [[settings.yml]] file in the config directory.
4.3.1 Smartproxy Installation
A smart proxy is an autonomous web-based foreman component that is placed on a host performing a specific function in the host commissioning phase. It receives requests from Foreman to perform operations that are required during the commissioning process and executes them on its behalf. More details can be found on the Foreman Architecture page.
To fully manage the commissioning process then a smart proxy will have to manipulate these services, DHCP, DNS, Puppet CA, Puppet and TFTP. These services may exist on separate machines or several of them may be hosted on the same machine. As each smart proxy instance is capable of managing all the of these services, there is only need for one proxy per host. In the special case of a smart proxy managing a windows DHCP server, the host machine must be running Windows and support the netsh dhcp utility, it does not need to be the Microsoft DHCP server itself.
Source code
You can get the latest stable code from GitHub (via git).
git clone git://github.com/theforeman/smart-proxy.git
RPM
You can get a the stable rpm Here
Debian/Ubuntu packages
We provide packages for Smart-Proxy for the following Debian-based Linux distributions:
- Debian Linux 6.0 (Squeeze)
- Ubuntu Linux 11.04 (Precise Pangolin)
These packages may also work on (let us know if they do :P):
- Debian Linux 5.0 (Lenny), see notes below
- Ubuntu Linux 10.04 (Lucid Lynx)
- Ubuntu Linux 10.10 (Maverick Meerkat)
- Ubuntu Linux 11.04 (Natty Narwhal)
Add one (and only one) of the following package sources to your /etc/apt/sources.list or create an appropriate file in /etc/apt/sources.list.d/:
# Stable packages

# Debian Squeeze
deb http://deb.theforeman.org/ squeeze stable
# Ubuntu Precise
deb http://deb.theforeman.org/ precise stable

# RC packages - these will only exist during an Release Candidate phase leading up to a release

# Debian Squeeze
deb http://deb.theforeman.org/ squeeze rc
# Ubuntu Precise
deb http://deb.theforeman.org/ precise rc

# Nightly builds. Beware: HERE BE DRAGONS

# Debian Squeeze
deb http://deb.theforeman.org/ squeeze nightly
# Ubuntu Precise
deb http://deb.theforeman.org/ precise nightly
The public key for secure APT can be downloaded here
You can add the key after its download with
  # Debian Linux (as root)
  apt-key add pubkey.gpg

  # Ubuntu Linux (as normal user)
  sudo apt-key add pubkey.gpg
or combine downloading and registering:
  # Debian Linux (as root)
  wget -q http://deb.theforeman.org/pubkey.gpg -O- | apt-key add -

  #Ubuntu Linux (as normal user)
  wget -q http://deb.theforeman.org/pubkey.gpg -O- | sudo apt-key add -
The key fingerprint is
  7059 542D 5AEA 367F 7873  2D02 B348 4CB7 1AA0 43B8
  Foreman Automatic Signing Key (2014) <packages@theforeman.org>
To install Smart-Proxy, run
  # Debian Linux (as root)
  apt-get update
  apt-get install foreman-proxy

  # Ubuntu Linux (as normal user)
  sudo aptitude update
  sudo aptitude install foreman-proxy
Debian Linux 5.0 (Lenny)
Users of Debian Lenny will have to use rake, rack, and Sinatra from lenny-backports.
See http://backports.debian.org/Instructions/ for instructions on how to add lenny-backports to your list of repositories and install a package from it.
Please note that you’ll have to install the packages from lenny-backports using apt-get -t lenny-backports install libsinatra-ruby.
Configuration file
Usually can be found at /etc/foreman-proxy/settings.yml or on the config/settings.yml subdirectory. You can use the settings.yml.example file inside the config directory as a template for your own settings.yml.
If you don’t plan to use one of the subsystems, please disable them in this configuration file. For more information see Smartproxy Configuration
Start the daemon
bin/smart-proxy.rb
Or if you installed it via a package simply start the foreman-proxy service.
Add the smart-proxy to Foreman
- Go to [FOREMAN_URL]/smart_proxies and click New Proxy
- Type in the Name for your Proxy and the URL of your Proxy, with the Port used.
For example:
  Name: Puppet-Proxy
  URL: http://puppet.your-domain.com:8443
4.3.2 Smartproxy Settings
The configuration for Smart-Proxy is held in the /etc/foreman-proxy/settings.yml or config/settings.yml file.
YAML start
The first non-comment line of this file must be three dashes.
---
SSL configuration
The existence of all the three ssl key entries below enables the use of an SSL connections.
NOTE that both client certificates need to be signed by the same CA, which must be in the ssl_ca_file, in order for this to work see SSL for more information
  :ssl_certificate: ssl/certs/fqdn.pem
  :ssl_ca_file: ssl/certs/ca.pem
  :ssl_private_key: ssl/private_keys/fqdn.key
This is the list of hosts from which the smart proxy will accept connections. If this list is empty then every verified SSL connection is allowed to access the API.
:trusted_hosts:
- foreman.prod.domain
- foreman.dev.domain
Instance attributes
If this entry is present and not false then Smart-Proxy will attempt to disconnect itself from the controlling terminal and daemonize itself.
:daemon: true
The port listened to by the proxy. If this is not present then the default Sinatra port of 4567 is used.
:port: 8443
TFTP section
Activate the TFTP management module within the Smart-Proxy instance.
The tftproot value is directory into which tftp files are copied and then served from. The tftp daemon will also be expected to chroot to this location. This component is only supported in the Unix environment
:tftp: true
:tftproot: /var/lib/tftpboot
:tftp_servername: name of your tftp server (used for next server value in your dhcp reservation) - defaults to the host name of your proxy.
NOTE: the foreman proxy user must have read/write access to the tftpboot/pxelinux.cfg and tftpboot/boot directories.
DNS section
Activate the DNS management module within the Smart-Proxy instance.
The DNS module can manipulate any DNS server that complies with the ISC Dynamic DNS Update standard and can therefore be used to manage both Microsoft and Bind servers.
The dns_key is used to validate the client request. If it is not present then the update operation is performed without peer verification, (not recommended.) The dns_server option is used if the Smart-Proxy is not located on the same physical host as the DNS server. If it is not specified then localhost is presumed.
:dns: true
:dns_key: /home/proxy/keys/Kapi.+157+47848.private
:dns_server: dnsserver.site.domain.com
NOTE: if you use a key, make sure that the foreman proxy account can read that file.
DHCP section
Activate the DHCP management module within the Smart-Proxy instance.
:dhcp: true
If the DHCP server is ISC compliant then set dhcp_vendor to isc. In this case Smart-Proxy must run on the same host as the DHCP server. If the proxy is managing a Microsoft DHCP server then set dhcp_vendor to native_ms. Smart-Proxy must then be run on an NT server so as to access the Microsoft native tools, though it does not have to be the same machine as the DHCP server. More details can be found at [[Foreman:Foreman Architecture]].
:dhcp_vendor: isc
The DHCP component needs access to the DHCP configuration file as well as the currently allocated leases. The section below shows these values for a RedHat client. In the case of a Smart-Proxy hosted on an Ubuntu machine then these values would be more appropriate: /etc/dhcp3/dhcpd.conf and /var/lib/dhcp3/dhcpd.leases
:dhcp_config: etc/dhcpd.conf
:dhcp_leases: etc/dhcpd.leases
NOTE: Make sure that the foreman proxy account can read both ISC configuration files.
If your native_ms implementation is slow then you can request that the smart proxy only operate on a subset of the subnets managed by the dhcp server.
:dhcp_subnets: [192.168.1.0/255.255.255.0, 192.168.11.0/255.255.255.0]
If you secured your DHCP with an “omapi_key”, add the entries:
:dhcp_key_name: omapi_key
:dhcp_key_secret: XXXXXXXX
Puppet Certificate Authority section
Activate the Puppet CA management module within the Smart-Proxy instance.
This should only be enabled in the Smart-Proxy that is hosted on the machine responsible for providing certificates to your puppet clients. You would expect to see a directory /var/lib/puppet/ssl/ca on such a host.
:puppetca: true
If your puppet SSL directory is located elsewhere, you’ll need to set ‘ssldir’ as well.
:ssldir: /etc/puppet/ssl
:puppetdir: /etc/puppet
The proxy requires write access to the puppet autosign.conf file, which is usually owner and group puppet, and has mode 0644 according to the puppet defaults.
Ensure the foreman-proxy user is added to the puppet group ( e.g. gpasswd -a foreman-proxy puppet or usermod -aG puppet foreman-proxy)
puppet.conf:
[master]
autosign = $confdir/autosign.conf {owner = service, group = service, mode = 664 }
Sudo access to the proxy is required - in your sudoers file ensure you have the following lines:
For older puppet (pre-3.0) with separate sub-commands available:
foreman-proxy ALL = NOPASSWD: /usr/sbin/puppetca *
Defaults:foreman-proxy !requiretty
For newer monolithic puppet without separate commands (3.0-onwards)
foreman-proxy ALL = NOPASSWD: /usr/bin/puppet cert *
Defaults:foreman-proxy !requiretty
Puppet section
Activate the puppet management module within the Smart-Proxy instance.
This should only be enabled in the Smart-Proxy that is hosted on the machine capable of executing puppetrun. This will be a puppetmaster. This can also be set to true if you need to import puppet classes from the puppetmaster. Without this the import will not be possible
:puppet: true
:puppet_conf: /etc/puppet/puppet.conf
# Defaults to %INSTALL_DIR%/.puppet/puppet.conf
Sudo access to the proxy is required - in your sudoers file ensure you have the following lines:
Defaults:foreman-proxy !requiretty
foreman-proxy ALL = NOPASSWD: /usr/bin/puppetrun
If running puppet version 2.6+ you will need to use the following (use /opt/puppet/bin/puppet for Puppet Enterprise)
Defaults:foreman-proxy !requiretty
foreman-proxy ALL = NOPASSWD: /usr/bin/puppet
EDIT In my case the account which was triggering puppetrun was not foreman-proxy but foreman itself. It took me some time to figure out why puppetruns are not triggered.
Logging
The proxy’s output is captured to the log_file and may be filtered via the usual unix syslog levels:
- WARN
- DEBUG
- ERROR
- FATAL
- INFO
- UNKNOWN
See Ruby’s Logger class for details.
:log_file: /tmp/proxy.log
:log_level: DEBUG
4.3.3 ISC_DHCP
ISC implementation is based on the omapi interface, which means:
- No need for root permissions on your DHCP server
- No need to restart (or “sync”) your dhcp server after every modifications.
Configuration
- dhcpd configuration file: ensure you have the following line in your dhcpd.conf file (somewhere in the top first lines):
omapi-port 7911;
- configure the settings file to point to your dhcpd.conf and dhcpd.leases files (make sure they are readable by the smart-proxy user)
- make sure the omshell command (/usr/bin/omshell) can be executed by the smart-proxy user.
- make sure that /etc/dhcp and /etc/dhcp/dhcpd.conf has group foreman-proxy
Securing the dhcp API
The dhcpd api server will listen to any host. You might need to add a omapi_key to provide basic security.
Example generating a key (on CentOS):
yum install bind97
dnssec-keygen -r /dev/urandom -a HMAC-MD5 -b 512 -n HOST omapi_key
cat Komapi_key.+*.private |grep ^Key|cut -d ' ' -f2-
-
Edit your “/etc/dhcpd.conf”:
omapi-port 7911; key omapi_key { algorithm HMAC-MD5; secret "XXXXXXXXX"; #<-The output from the generated key above. }; omapi-key omapi_key; -
Make sure you also add the omapi_key to your proxy’s [[Smart-Proxy:Settingsyml#DHCP-section settings.yml]] - Restart the dhcpd and foreman-proxy services
Testing
If everything works, you could browse your dhcp server data if you goto http://proxy:8443/dhcp
The next step is to set up appropriate Subnets in Foreman from the settings menu.
Sample dhcpd.conf
ddns-update-style interim;
ignore client-updates;
authoritative;
allow booting;
allow bootp;

omapi-port 7911;
#Optional key:
key omapi_key {
        algorithm HMAC-MD5;
        secret "2wgoV3yukKdKMkmOzOn/hIsM97QgLTT4CLVzg9Zv0sWOSe1yxPxArmr7a/xb5DOJTm5e/9zGgtzL9FKna0NWis==";
}
omapi-key omapi_key;

subnet 10.1.1.0 netmask 255.255.255.0 {
# --- default gateway
  option routers      10.1.1.254;
  option subnet-mask  255.255.255.0;

  option domain-name    "domain.com";
  option domain-name-servers  10.1.1.1, 8.8.8.8;
  option log-servers    syslog;
  option ntp-servers    ntp;

  range dynamic-bootp 10.1.1.10 10.1.1.250;
  default-lease-time 21600;
  max-lease-time 43200;

}
4.3.4 MS_DHCP
The Microsoft smart-proxy installation procedure is very basic compared to the RPM or APT based solution.
It is required that this procedure is executed as an administrator.
It is not required that the smart-proxy be on the same host as the MS dhcp server. The smart-proxy just needs to be on a windows host that has netsh commands available.
- Go to the smart-proxy repository at https://github.com/theforeman/smart-proxy
- Select download and choose the latest revision
- Extract this to a directory that does not have any spaces in its name.
- Go to the rubyinstaller webpage at http://rubyinstaller.org/downloads/
- Download and install the “ruby 1.8.7 release 334”:http://rubyforge.org/frs/download.php/74293/rubyinstaller-1.8.7-p334.exe (Allow the ruby associations to be installed.)
- Open a CMD window and, using gem install –version X.X.X –platform ?????, add these gems
  columnize (0.3.2)
  highline (1.6.1)
  json (1.4.6 x86-mswin32)
  linecache (0.43 mswin32)
  mime-types (1.16)
  mocha (0.9.11)
  net-ping (1.3.7)
  rack (1.2.0)
  rake (0.8.7)
  rest-client (1.6.1)
  sinatra (1.1.0)
  tilt (1.1)
  win32-api (1.4.6 x86-mswin32-60)
  win32-open3 (0.3.2 x86-mswin32-60)
  win32-service (0.7.1 x86-mswin32-60)
  windows-api (0.4.0)
  windows-pr (1.1.2)
Command to download them all:
wget http://rubygems.org/downloads/columnize-0.3.2.gem \
     http://rubygems.org/downloads/haml-3.0.24.gem \
     http://rubygems.org/downloads/highline-1.6.1.gem \
     http://rubygems.org/downloads/json-1.4.6-x86-mswin32.gem \
     http://rubygems.org/downloads/linecache-0.43-mswin32.gem \
     http://rubygems.org/downloads/mime-types-1.16.gem \
     http://rubygems.org/downloads/mocha-0.9.11.gem \
     http://rubygems.org/downloads/net-ping-1.3.7.gem \
     http://rubygems.org/downloads/rack-1.2.0.gem \
     http://rubygems.org/downloads/rake-0.8.7.gem \
     http://rubygems.org/downloads/rest-client-1.6.1.gem \
     http://rubygems.org/downloads/sinatra-1.1.0.gem \
     http://rubygems.org/downloads/tilt-1.1.gem \
     http://rubygems.org/downloads/win32-api-1.4.6-x86-mswin32-60.gem \
     http://rubygems.org/downloads/win32-open3-0.3.2-x86-mswin32-60.gem \
     http://rubygems.org/downloads/win32-service-0.7.1-x86-mswin32-60.gem \
     http://rubygems.org/downloads/windows-api-0.4.0.gem \
     http://rubygems.org/downloads/windows-pr-1.1.2.gem
To get it to work on Windows 2008 R2 some of the packages has to change
 columnize (0.3.2)
 highline (1.6.1)
 json (1.4.6 x86-mingw32)
 linecache (0.43 mswin32)
 mime-types (1.16)
 mocha (0.9.11)
 net-ping (1.3.7)
 rack (1.2.0)
 rake (0.8.7)
 rest-client (1.6.1)
 sinatra (1.1.0)
 tilt (1.1)
 win32-api (1.4.6 x86-mingw32)
 win32-open3 (0.3.2 x86-mingw32)
 win32-service (0.7.1 x86-mswin32-60)
 windows-api (0.4.0)
 windows-pr (1.1.2)
Easy copy and paste method (platform may be different for you. Please check gem environment to find out.
  gem install --version 0.3.2 --platform x86-mingw32 columnize
  gem install --version 1.6.1 --platform x86-mingw32 highline
  gem install --version 1.4.6 --platform x86-mingw32 json
  gem install --version 0.43 --platform x86-mingw32 linecache
  gem install --version 1.16 --platform x86-mingw32 mime-types
  gem install --version 0.9.11 --platform x86-mingw32 mocha
  gem install --version 1.3.7 --platform x86-mingw32 net-ping
  gem install --version 1.2.0 --platform x86-mingw32 rack
  gem install --version 0.8.7 --platform x86-mingw32 rake
  gem install --version 1.6.1 --platform x86-mingw32 rest-client
  gem install --version 1.1.0 --platform x86-mingw32 sinatra
  gem install --version 1.1 --platform x86-mingw32 tilt
  gem install --version 1.4.6 --platform x86-mingw32 win32-api
  gem install --version 0.3.2 --platform x86-mingw32 win32-open3
  gem install --version 0.7.1 --platform x86-mingw32-60 win32-service
  gem install --version 0.4.0 --platform x86-mingw32 windows-api
  gem install --version 1.1.2 --platform x86-mingw32 windows-pr
Command to download them all:
wget http://rubygems.org/downloads/columnize-0.3.2.gem \
     http://rubygems.org/downloads/haml-3.0.24.gem \
     http://rubygems.org/downloads/highline-1.6.1.gem \
     http://rubygems.org/downloads/json-1.4.6-x86-mingw32.gem \
     http://rubygems.org/downloads/linecache-0.43-mswin32.gem \
     http://rubygems.org/downloads/mime-types-1.16.gem \
     http://rubygems.org/downloads/mocha-0.9.11.gem \
     http://rubygems.org/downloads/net-ping-1.3.7.gem \
     http://rubygems.org/downloads/rack-1.2.0.gem \
     http://rubygems.org/downloads/rake-0.8.7.gem \
     http://rubygems.org/downloads/rest-client-1.6.1.gem \
     http://rubygems.org/downloads/sinatra-1.1.0.gem \
     http://rubygems.org/downloads/tilt-1.1.gem \
     http://rubygems.org/downloads/win32-api-1.4.6-x86-mingw32.gem \
     http://rubygems.org/downloads/win32-open3-0.3.2-x86-mingw32.gem \
     http://rubygems.org/downloads/win32-service-0.7.1-x86-mswin32-60.gem \
     http://rubygems.org/downloads/windows-api-0.4.0.gem \
     http://rubygems.org/downloads/windows-pr-1.1.2.gem
8) CD to the root of the smart-proxy install directory
9) Edit config/settings.yml so that it looks a bit like this
Sample config/settings.yml file
 ---
 # HTTPS settings
 :ssl_certificate: c:\documents\smart-proxy\config\signed.pem
 :ssl_private_key: c:\documents\smart-proxy\config\private.pem
 :ssl_ca_file:     c:\documents\smart-proxy\config\ca.pem

 :trusted_hosts: [ foreman.someware.com]

 :daemon: false


 # Enable DHCP management
 :dhcp: true
 # The vendor can be either isc or native_ms
 :dhcp_vendor: native_ms
 # The dhcp_server is only used by the native_ms implementation
 :dhcp_server: 172.29.90.240

 # Where our proxy log files are stored
 # filename or STDOUT
 # Unix setting
 #:log_file: log/proxy.log
 # Windows setting
 :log_file: c:\tmp\proxy.log
 # valid options are
 # Logger::WARN, Logger::DEBUG, Logger::Error, Logger::Fatal, Logger:INFO, LOGGER::UNKNOWN
 #:log_level: Logger::DEBUG
10) Create the SSL key
10.1) Login to your puppetmaster
10.2) puppetca –generate Smart-proxy FQDN. (Do not use an alias here.)
10.3) Copy the private key, the public certificate and the ca.pem from /var/lib/puppet/ssl over to the locations that you specified in the setting file.
11) Test the installation by running ruby bin\smart-proxy.rb
12) Install the program as a service
12.1) ruby extra\register-service.rb
12.2) This may install the service but not run it. If so then try to start the service from the Ordinary Microsoft services snapin utility.
13) You may test connectivity by running the extra\query.rb utility from your foreman host. (Note that this file comes from the extra directory in the smart-proxy release.)
4.3.5 Bind
Bind configuration manipulation is based on nsupdate, which means that in theory could also be used to manipulate other dns servers which support nsupdate (such as Microsoft DNS server).
Configuration
In order to communicate securely with your dns server, you would need a key which will be used by nsupdate and your named daemon using ddns-confgen or dnssec-keygen
example using ddns-confgen
execute ‘ddns-confgen -k foreman -a hmac-md5’ - this should output something like the following:
# To activate this key, place the following in named.conf, and
# in a separate keyfile on the system or systems from which nsupdate
# will be run:
key "foreman" {
        algorithm hmac-md5;
        secret "GGd1oNCxaKsh8HA84sP1Ug==";
};

# Then, in the "zone" statement for each zone you wish to dynamically
# update, place an "update-policy" statement granting update permission
# to this key.  For example, the following statement grants this key
# permission to update any name within the zone:
update-policy {
        grant foreman zonesub ANY;
};

# After the keyfile has been placed, the following command will
# execute nsupdate using this key:
nsupdate -k /path/to/keyfile
You should create a new file (such as /etc/rndc.key or other) and store the key “foreman {…} in it. in the proxy Settings file you should point to this file location - make sure that the proxy have read permissions to this file.
In your named file, you could add the update-policy statement or something like this named example file if you need more fine grained permissions.
4.3.6 SSL
The smart proxy can work in SSL mode, where both sides verify and trust each other. Requests from Foreman will only be accepted if the SSL certificate can be verified. Since proxies abstract a high level of control over your infrastructure, the configuration and security of keys and certificates is important.
Using Puppet CA certificates
Since Foreman integrates with Puppet heavily, it is recommended to use the Puppet Certificate Authority (CA) to secure proxy access. See the Security Communciations with SSL section for more advanced installations (multiple or internal CAs).
If the smart proxy host is not managed by Puppet, you will need to generate a certificate - skip forward to the generate section.
When using Puppet’s certificates, the following lines will be required in puppet.conf to relax permissions to the puppet group. The foreman and/or foreman-proxy users should then be added to the puppet group.
[main]
privatekeydir = $ssldir/private_keys { group = service }
hostprivkey = $privatekeydir/$certname.pem { mode = 640 }
Configuring the proxy
Configure the locations to the SSL files in /etc/foreman-proxy/settings.yml, plus the list of trusted Foreman hosts:
:ssl_certificate: /var/lib/puppet/ssl/certs/FQDN.pem
:ssl_ca_file: /var/lib/puppet/ssl/certs/ca.pem
:ssl_private_key: /var/lib/puppet/ssl/private_keys/FQDN.pem

:trusted_hosts:
- foreman.corp.com
#- foreman.dev.domain
Generating a certificate
To generate a certificate for a proxy host that isn’t managed by Puppet, do the following:
- Generate a new certificate on your puppetmaster:
puppet cert --generate <proxy-FQDN> - Copy the certificates and key from the puppetmaster to the smart proxy in
/etc/foreman-proxy:<ol>
</ol>
Follow the configuration section above, however use the /etc/foreman-proxy paths instead of the Puppet defaults.
Configuring Foreman
For Foreman to connect to an SSL-enabled smart proxy, it needs configuring with SSL certificates in the same way. If the Foreman system is managed by Puppet, it will already have these, else certificates can be generated following the above instructions.
The locations of the certificates are managed in the Settings page, under Provisioning with the ssl_ca_file, ssl_certificate and ssl_priv_key settings. By default these will point to the Puppet locations - for manually generated certificates, or non-standard locations, they may have to be changed.
Lastly, when adding the smart proxy in Foreman, ensure the URL begins with https:// rather than http://.
4.3.7 TFTP
An essential first step in netbooting a system is preparing the TFTP server with the PXE configuration file and boot images. This document assumes that you have already configured your DHCP infrastructure, either via manual configuration or through the DHCP smart proxy.
Configuration Values
Once enabled, there is currently only one valid setting to change, the default TFTP root. This is set with the :tftproot: parameter, which defaults to /var/lib/tftpboot.
Foreman tries to guess the right server name that should put into the dhcp record, if this is not what you want, you can override it - see tftp_servername under Settings.yml.
Setting Up the Proxy Server Host
Regardless of the filesystem setup is performed, you must also make sure you have the wget utility installed and in the default path. wget is used to download OS specific installation when a given host is enabled for the build process.
Automatic Setup
Foreman includes a TFTP server module that will perform all of the basic setup. It defaults to TFTP root of /var/lib/tftpboot, which may change if necessary. You will still need to provide the basic TFTP load images in your TFTP root directory. For vanilla PXE booting, this includes pxelinux.0, menu.c32, and chain.c32.
Manual Setup
The setup is very simple, and may be performed manually if desired.
- The TFTP root directory must exist (we will use /var/lib/tftpboot in this example).
- Populate /var/lib/tftpboot with PXE booting prerequisites. At a minimum, this should include:
- pxelinux.0
- menu.c32
- chain.c32
- Create the directory /var/lib/tftpboot/boot and make it writeable by the foreman proxy user (foreman-proxy, for instance, when installing through a rpm package).
- Create the directory /var/lib/tftpboot/pxelinux.cfg and make it writeable by the foreman proxy user (foreman-proxy).
Setting Up Foreman
| In most cases, the default templates should work fine. You do, however, need to make sure that a PXELinux or gPXE template is associated with your hosts. See [[Foreman:Unattended_installations | Unattended Installations]] for details. The template will be used to define the PXE configuration file when a host is enabled for build. |
Workflow
This is a rough outline of the steps triggered on the TFTP smart proxy host when you click on the “Build” link for a host.
- Call mkdir -p /var/lib/tftpboot/pxelinux.cfg if it does not already exist.
- Create a host-specific TFTP configuration file in /var/lib/tftpboot/pxelinux.cfg/01-XX-XX-XX-XX-XX-XX, named based off of the MAC address, using the associated PXE template.
- Call mkdir -p /var/lib/tftpboot/boot if it does not already exist.
- Download the OS specific kernel and initrd files using wget.
- The download URLs are derived from the installation media path, and OS specific log (see app/models/redhat.rb and debian.rb in foreman for examples of the gory details).
- The debian.rb file tries to guess if you want Ubuntu or Debian, based on the Name you give to your OS in the UI. If the name does not contain ‘ubuntu’ or ‘debian’, it may default to debian, hence fail to fetch the kernel/initrd.
- The exact wget command is
wget --no-check-certificate -nv -c <src> -O "<destination>" - At this point, the TFTP state is ready for the installation process.
- Once the host has completed installation, the OS specific installation script should inform foreman by retrieving the built URL.
- The host-specific TFTP configuration file is deleted.
- The kernel and initrd are not deleted, but left in place for future installs of the same OS and architecture combination. Please note that in the unlikely case that these files are modified, the simplistic freshness check of wget will likely get confused, corrupting the downloaded versions of the files. If this happens, you should simply delete the files and let them be re-downloaded from scratch.
Limitations
At the moment, the proxy is not able to fetch boot files using NFS. As a workaround, expose your installation medium (or use a public mirror) over http/ftp to configure one machine with the require boot files. this would be resolved as part of #992.
4.4 Provisioning
This chapter details the configuration of the required UI components necessary to provision an OS onto a host.
4.4.1 Operating Systems
The Operating Systems page (More -> Provisioning -> Operating Systems) details the OSs known to Foreman, and is the central point that the other required components tie into.
Creating an Operating System
Simply click New Operatingsystem on the main page. You will be taken to a screen where you can create the bare essentials of a new OS. Not everything required for a successful provision is on this page (yet) - the remaining components will appear for selection as we create them.
You will need to fill in the first few parts of the form (Name, Major, Minor, Family, and possibly some family-dependent information). In the case of OSs like Fedora, it is fine to leave Minor blank.
If the default Partition Tables & Installation media are suitable, then you can assign them now. If not, return here after each step in this chapter to assign the newly created objects to your Operating System
Auto-created Operating Systems
Foreman does not come with any Operating Systems by default. However, Foreman will detect the Operating System of any host which reports in via Puppet - if the OS of that Host is supported, it will be created (with very basic settings) and assigned to the Host. Thus you may find some OSs already created for you.
4.4.2 Installation Media
The Installation Media represents the web URL from where the installation packages can be retrieved (i.e. the OS mirror). Some OS Media is pre-created for you when Foreman is first installed. However, it is best to edit the media you are going to use and ensure the Family is set.
New Installation Media
If your OS of choice does not have a mirror pre-created for you, click the New Medium button to create one. There are a few variables which can be used to pad out the URL. For example:
http://mirror.averse.net/centos/$major.$minor/os/$arch
Be sure to set the Family for the Media
Assign to Operating System
If you have not already done so, return to the Operating System page for your OS and assign the Media to it now.
4.4.3 Provisioning Templates
The Provision Templates is the core of Foreman’s flexibility to deploy the right OS with the right options. There are several types of template, along with a flexible matching system to deliver different templates to different Hosts.
Foreman comes with pre-created templates for the more common OSs, but you will need to review these.
Template Kinds
There are 5 template kinds:
- PXELinux - Deployed to the TFTP server to ensure the Host boots the correct installer with the correct kernel options
- Provision - The main unattended installation file; e.g. Kickstart or Preseed
- Finish - A post-install script used to take custom actions after the main provisioning is complete
- Script - An arbitrary script, not used by default, useful for certain custom tasks
- gPXE - USed in {g,i}PXE environments in place of PXELinux
In practice, most environments only make use of the first 3. The Create Host action deploys the PXELinux template to the TFTP server. The PXELinux template directs the host to retrieve the Provision template. The Provision template will direct the installer to retrieve and run the Finish template at the end of the install, and the Finish template will notify Foreman the build is complete just before reboot.
Editing Templates
Clicking a template will take you to the edit page. All templates are ERB-enabled, and you can access many variables about the to-be-installed-host within the template. See Template Writing for ideas.
As noted in 4.1.4 Auditing, changes to the templates are logged as diffs - you can browse the history of changes to the templates from the History tab within the Edit Template page. You can also revert changes here.
Template Association
When editing a Template, you must assign a list of Operating Systems which this Template can be used with. Optionally, you can restrict a template to a list of Hostgroups and/or Environments
When a Host requests a template (e.g. during provisioning), Foreman will select the best match from the available templates of that type, in the following order:
- Host-group and Environment
- Host-group only
- Environment only
- Operating system default
The final entry, Operating System default, can be set by editing the Operating System page.
Associating an Operating System default template
You will need to associate at least one PXELinux, Provision, and Finish template to your Operating System, and this must be done in two steps. First edit each of the templates, switch to the Association tab, and ensure the appropriate OSs are checked. Then edit the Operating System, switch to the Templates tab, and choose a default template for each template kind.
4.4.4 Partition Tables
Partition templates are a subset of normal Provisioning Templates. They are handled separately because it is frequently the case that an admin wants to deploy the same host template (packages, services, etc) with just a different harddisk layout to account for different servers’ capabilities.
Foreman comes with pre-created templates for common Operating Systems, but it is good to edit the template, check it’s content and it’s Family setting. If the Family is wrong, be sure to go back to Operating Systems and associate it with your Operating System.
Dynamic Partition tables
When creating a new Host, you will be given the option to create a Dynamic Partition table. This is essentially a ‘one-off’ partition table that is stored with the host and used only for that host. It replaces the choice of Partition Table from the normal list of those associated with the selected OS.
4.4.5 Architectures
Architectures are simple objects, usually created by Foreman automatically when Hosts check in via Puppet. However, none are created by default, so you may need to create them if you’re not using Foreman for reporting.
Creating a new Architecture
Simply click New Architecture to create a new one. This should match the Facter fact :architecture e.g. “x86_64”. If you’ve already created some Operating Systems, you can associate the Architecture with the OS now; if not, the list of Architectures will be present when you create an OS.
5. Advanced Foreman
Missing content. Consider contributing, you kind soul!
5.1 API
Missing content. Consider contributing, you kind soul!
5.2 Compute Resources
Missing content. Consider contributing, you kind soul!
5.3 Install Locations
Missing content. Consider contributing, you kind soul!
5.4 Securing Communications with SSL
The Foreman web application needs to communicate securely with associated smart proxies and puppet masters, plus users and applications connecting to the web interface. This section details recommended SSL configurations.
5.4.1 Securing Puppet Master Requests
In a typical ENC-based setup with reporting, puppet masters require access to Foreman for three tasks:
- Retrieval of external nodes information (classes, parameters)
- Uploading of host facts
- Uploading of host reports
All traffic here is initiated by the puppet master itself. Other traffic from Foreman to the puppet master for certificate signing etc. is handled via smart proxies (SSL configuration covered in the next section).
Configuration options
The Foreman interface authorizes access to puppet master interfaces based on its list of registered smart proxies with the Puppet feature, and identifies hosts using client SSL certificates.
Four main settings control the authentication, the first two are in Foreman under Settings, Auth:
- require_ssl_puppetmasters (default: true), requires a client SSL certificate on the puppet master requests, and will verify the CN of the certificate against the smart proxies. If false, it uses the reverse DNS of the IP address making the request.
- restrict_registered_puppetmasters (default: true), only permits access to hosts that have a registered smart proxy with the Puppet feature.
And two in config/settings.yaml:
- login (default: true), must be enabled to prevent anonymous access to Foreman.
- require_ssl (default: false), should be enabled to require SSL for all communications, which in turn will require client SSL certificates if require_ssl_puppetmasters is also enabled. If false, host-based access controls will be available for HTTP requests.
Enabling full SSL communications
Using Apache HTTP with mod_ssl and mod_passenger is recommended. For simple setups, the Puppet certificate authority (CA) can be used, with Foreman and other hosts using certificates generated by puppet cert.
- Set Foreman’s require_ssl_puppetmasters, restrict_registered_puppetmasters and require_ssl to true.
- The mod_ssl configuration must contain:
- *SSLCACertificateFile* set to the Puppet CA
- *SSLVerifyClient optional*
- *SSLOptions +StdEnvVars*
- ENC script (e.g.
/etc/puppet/node.rb) should have these settings:
- *:ssl_ca* set to the Puppet CA
- *:ssl_cert* set to the puppet master's certificate
- *:ssl_key* set to the puppet master's private key
- Report processor (e.g.
/usr/lib/ruby/site_ruby/1.8/puppet/reports/foreman.rb) should have these settings:
- *$foreman_ssl_ca* set to the Puppet CA
- *$foreman_ssl_cert* set to the puppet master's certificate
- *$foreman_ssl_key* set to the puppet master's private key
Troubleshooting
Warning messages will be printed to Foreman’s log file (typically /var/log/foreman/production.log) when SSL-based authentication fails.
- No SSL cert with CN supplied indicates no client SSL certificate was supplied, or the CN wasn’t present on a certificate. Check the client script has the certificate and key configured and that mod_ssl has SSLVerifyClient set.
- SSL cert has not been verified indicates the client SSL certificate didn’t validate with the SSL terminator’s certificate authority. Check the client SSL certificate is signed by the CA set in mod_ssl’s SSLCACertificateFile and is still valid. More information might be in error logs.
- SSL is required indicates the client is using an HTTP URL instead of HTTPS.
- No smart proxy server found on $HOST indicates Foreman has no smart proxy registered for the source host, add it to the Smart Proxies page in Foreman.
Advanced SSL notes
A typical small setup will use a single Puppet CA and certificates it provides for the Foreman host and puppet master hosts. In larger setups with multiple CAs or an internal CA, this will require more careful configuration to ensure all hosts can trust each other.
- Ensure the Common Name (CN) is present in certificates used by Foreman (as clients will validate it) and puppet master clients (used to verify against smart proxies).
- Foreman’s SSL terminator must be able to validate puppet master client SSL certificates. In Apache with mod_ssl, the SSLCACertificateFile option must point to the CA used to validate clients and SSLVerifyClient set to optional.
- Environment variables from the SSL terminator are used to get the client certificate’s DN and verification status. mod_ssl’s SSLOptions +StdEnvVars setting enables this. Variable names are defined by ssl_client_dn_env and ssl_client_verify_env settings in Foreman.
Reduced security: HTTP host-based authentication
In non-SSL setups, host-based authentication can be performed, so any connection from a host running a puppet smart proxy is able to access the interfaces.
- Set restrict_registered_puppetmasters to true.
- Set require_ssl_puppetmasters and require_ssl to false.
No security: disable authentication
Entirely disabling authentication isn’t recommended, since it can lead to security exploits through YAML import interfaces and expose sensitive host information, however it may be useful for troubleshooting.
- Set require_ssl_puppetmasters, restrict_registered_puppetmasters and require_ssl to false.
5.4.2 Securing Smart Proxy Requests
Foreman makes HTTP requests to smart proxies for a variety of orchestration tasks. In a production setup, these should use SSL certificates so the smart proxy can verify the identity of the Foreman host.
In a simple setup, a single Puppet Certificate Authority (CA) can be used for authentication between Foreman and proxies. In more advanced setups with multiple CAs or an internal CA, the services can be configured as follows.
Proxy configuration options
/etc/foreman-proxy/settings.yml contains the locations to the SSL certificates and keys:
---
# SSL Setup

# if enabled, all communication would be verified via SSL
# NOTE that both certificates need to be signed by the same CA in order for this to work
# see https://projects.theforeman.org/projects/smart-proxy/wiki/SSL for more information
:ssl_certificate: /var/lib/puppet/ssl/certs/FQDN.pem
:ssl_ca_file: /var/lib/puppet/ssl/certs/ca.pem
:ssl_private_key: /var/lib/puppet/ssl/private_keys/FQDN.pem
In this example, the proxy is sharing Puppet’s certificates, but it could equally use its own.
In addition it contains a list of hosts that connections will be accepted from, which should be the host(s) running Foreman:
# the hosts which the proxy accepts connections from
# commenting the following lines would mean every verified SSL connection allowed
:trusted_hosts:
- foreman.corp.com
#- foreman.dev.domain
Configuring Foreman
For Foreman to connect to an SSL-enabled smart proxy, it needs configuring with SSL certificates in the same way.
The locations of the certificates are managed in the Settings page, under Provisioning - the ssl_ca_file, ssl_certificate and ssl_priv_key settings. By default these will point to the Puppet locations - for manually generated certificates, or non-standard locations, they may have to be changed.
Lastly, when adding the smart proxy in Foreman, ensure the URL begins with https:// rather than http://.
Sharing Puppet certificates
If using Puppet’s certificates, the following lines will be required in puppet.conf to relax permissions to the puppet group. The foreman and/or foreman-proxy users should then be added to the puppet group.
[main]
privatekeydir = $ssldir/private_keys { group = service }
hostprivkey = $privatekeydir/$certname.pem { mode = 640 }
6. Troubleshooting
There are two primary methods of getting support for the Foreman: IRC and mailing lists.
IRC
We work on the libera.chat servers. You can get general support in #theforeman, while development chat takes place in #theforeman-dev.
Mailing lists
Mailing lists are available via Google Groups. Much like IRC, we have a general users (support, Q/A, etc) lists and a development list: